Hanging a gallery wall in a rental isn’t about hope; it’s about engineering. The key to protecting your deposit is to understand the physics of failure and proactively mitigate risk.
- Most damage-free strips fail not from weight, but from incorrect surface prep and « peel stress » caused by tilting frames.
- The choice of art (lightweight canvas vs. heavy original), consistent spacing, and strategic rotation are all critical risk management decisions.
Recommendation: Adopt a « deposit-first » mindset. Before hanging anything, assess its weight, the wall’s integrity, and choose a mounting method that prioritises reversibility over permanence.
You’re standing in your rented flat, frame in hand, staring at a blank wall. It’s a scene familiar to every UK renter: the desire to make a space your own clashing with the paralysing fear of a deduction from your tenancy deposit. The internet offers a chorus of simple advice— »just use Command Strips, » « lay it out on the floor first »—but these platitudes fall silent when you think about the real-world consequences of a 3kg frame crashing to the floor, taking a chunk of paint and plaster with it. The anxiety is real, and it’s about more than just aesthetics; it’s about financial security.
But what if the solution wasn’t just to find a better adhesive, but to fundamentally change your approach? What if you treated your gallery wall not as a casual decorative act, but as a small-scale engineering project? This guide moves beyond the generic tips to give you a specialist’s framework for creating impactful displays that are beautiful, personal, and, most importantly, 100% reversible. We’ll dissect the common failure points, from the physics of adhesive strips to the visual mistakes that make a collection feel cluttered.
By focusing on the science of hanging, the principles of curation, and proactive risk mitigation, you can stop seeing your walls as a liability and start seeing them as a canvas. This is your blueprint for expressing yourself freely without ever having to worry about that dreaded end-of-tenancy inspection. You can have a home that feels like yours and get your full deposit back.
In this guide, we’ll deconstruct every step of creating a beautiful, deposit-safe gallery wall. From the mechanics of hanging to the art of curation, here’s what we’ll cover to empower your inner interior designer.
Summary: A Renter’s Blueprint for a Damage-Free Gallery Wall
- Why Did Your Command Strip Fail and Drop a 3 kg Frame on the Floor?
- How to Detect Electrical Cables Behind Plaster Before Hanging Heavy Art?
- Canvas Print or Original Painting: Which Makes a Bigger Impact in a 3 m Wide Room?
- The Spacing Mistake That Makes Your Gallery Wall Look Like a Jumble Sale
- When Should You Swap Wall Art to Prevent Visual Fatigue in the Same Room?
- Why Does Your Modular Sofa Void the Tenancy Deposit on Wooden Floors?
- The Mantelpiece Overload Mistake That Makes Your Living Room Feel Busy
- How to Curate a Shelf Display That Looks Intentional, Not Cluttered?
Why Did Your Command Strip Fail and Drop a 3 kg Frame on the Floor?
The catastrophic failure of a Command Strip is a rite of passage for many renters. The common assumption is that the frame was simply « too heavy, » but the reality is more technical. Most failures aren’t due to exceeding the stated weight limit but are a result of two critical, often-overlooked factors: improper surface preparation and the wrong kind of stress. Adhesives are incredibly sensitive to microscopic layers of grease, dust, or cleaning residue, which prevent a proper bond from forming. Without a pristine surface, the strip is doomed before the frame is even hung.
More importantly, these strips are engineered to resist shear stress (a downward pull, parallel to the wall). However, the moment a frame tilts even slightly away from the wall—perhaps because of the hanging wire or an uneven frame back—it introduces peel stress. This concentrates the entire weight of the frame onto the top edge of the strip, effectively trying to peel it off the wall. This force is exponentially more powerful and is the true culprit behind most sudden failures.
The Physics of Command Strip Failure: Shear vs Peel Stress
Command strips are designed to handle shear stress (downward pull), but frames that tilt even slightly create peel/tensile stress that concentrates force on one edge. This uneven weight distribution means that even when within the stated weight limit, the weakest strip in a multi-strip setup will fail first, creating a domino effect. A study demonstrates that it’s nearly impossible to achieve perfectly equal weight distribution across multiple strips, making the system vulnerable to failure despite being ‘under capacity’. This explains why adding more strips isn’t a reliable way to hold more weight; it just creates more potential points of failure.
To avoid this, you must shift your mindset from simply sticking it on the wall to executing a proper installation procedure. Following a professional-level preparation guide isn’t just a suggestion; it’s the only way to ensure the adhesive reaches its full potential and your art stays exactly where you put it.
Your Action Plan: Pro-Level Surface Prep for Command Strips
- Clean the wall surface with isopropyl alcohol (not standard cleaning wipes which leave residue).
- Allow the surface to dry completely for at least 5 minutes to ensure all alcohol has evaporated.
- Apply the strips to your frame and then press the frame firmly against the wall for 30 seconds with consistent pressure.
- Carefully remove the frame, leaving the strips on the wall. Wait a full 1 hour to allow the adhesive to cure and build a strong bond.
- Re-attach your frame. Avoid high-humidity areas like bathrooms and surfaces near heat sources (radiators, direct sun), which can weaken the adhesive over time.
- Use strips on smooth, sealed surfaces only. Textured or vinyl-papered walls can reduce adhesion by up to 60%, making failure almost inevitable.
How to Detect Electrical Cables Behind Plaster Before Hanging Heavy Art?
While adhesive failures are a threat to your deposit, drilling into a live electrical cable is a threat to your life. For any item that is too heavy for damage-free solutions—like a large mirror or a significant original painting—the primary risk shifts from surface damage to structural danger. Plasterboard walls hide a network of essential services, including wiring, pipes, and studs. Guessing where to drill is not a risk worth taking. The only professional and safe approach is to map out what lies beneath the surface before a drill ever touches the wall.
The essential tool for this job is an electronic stud finder. Basic models simply detect density changes to locate wooden studs, but for renter safety, a multi-mode scanner is non-negotiable. These advanced devices can differentiate between wood, metal (pipes or metal studs), and, most critically, live AC wiring. By sliding the device across the wall, you create a mental map of safe and unsafe zones. Always scan a wider area than you plan to use, as wires don’t always run in perfectly straight vertical or horizontal lines from sockets and switches.

Using a multi-mode scanner transforms hanging heavy art from a game of chance into a calculated procedure. In fact, testing reviews demonstrate that advanced multi-mode scanners achieve a 90% reduction in false negatives for live wire detection compared to basic models. Investing in a quality scanner is a small price to pay for the absolute certainty that you are not about to cause a major electrical fault or, worse, a serious injury. Treat every wall as if it contains live wiring until you have proven otherwise.
Canvas Print or Original Painting: Which Makes a Bigger Impact in a 3 m Wide Room?
The art you choose is as important as how you hang it, especially when considering deposit security. In a standard UK room, often around 3 metres wide, the choice between a lightweight canvas print and a heavy, glass-fronted original painting has significant consequences for both visual impact and risk. A large, frameless canvas print has a low perceived weight; its matte surface and lack of a bulky frame make it feel expansive and airy, which can help a smaller room feel bigger. Conversely, a traditionally framed original painting has a high perceived weight, and its reflective glass can shrink a space by creating glare and visual clutter.
From a renter’s perspective, the most critical difference is the actual weight and the associated risk. A canvas is incredibly lightweight, making it a perfect candidate for high-performance Command Strips or other no-damage solutions. The risk of it falling is low, and if it does, the financial loss is minimal. An original painting, however, is heavy. It requires robust fixings drilled into a stud, which immediately introduces the risk of wall damage. If it falls, the financial and emotional loss can be significant. Every choice you make should be run through a « Renter’s Decision Matrix » that balances aesthetic desire with deposit risk.
The following table breaks down these factors, helping you make an informed choice that aligns with both your design goals and your tenancy agreement.
| Factor | Canvas Print (Frameless) | Original Painting (Framed) |
|---|---|---|
| Perceived Weight in 3m Room | Lower – creates expansive feel | Higher – can visually shrink space |
| Actual Weight & Hanging Risk | Lightweight (easier no-damage mounting) | Heavy (requires stronger fixings) |
| Glare Factor | Matte surface – ideal for awkward lighting | Glass reflects light – limits viewing angles |
| Financial Risk if Falls | Lower replacement cost | Significant financial and emotional loss |
| Deposit Security Risk | Minimal – lightweight options available | Higher – heavy frames risk wall damage |
| Best Mounting Method | Command strips, adhesive hooks | Picture wire on picture rail or easel |
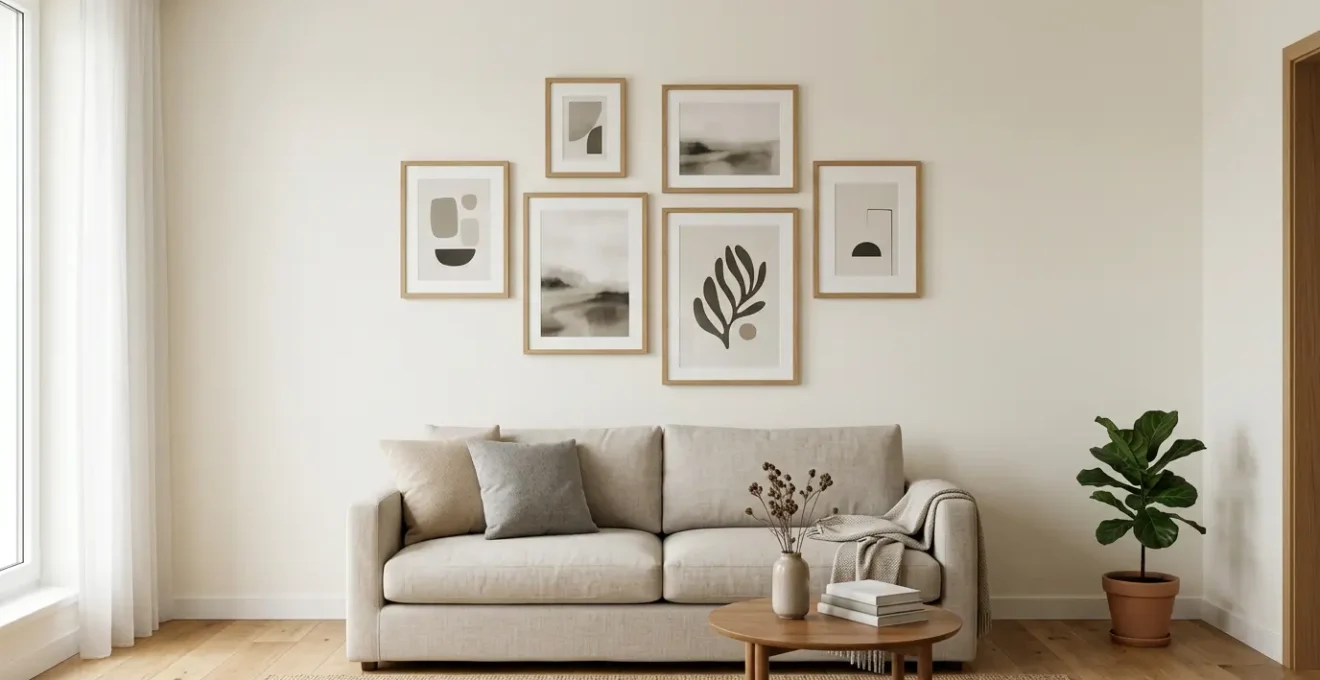
The Spacing Mistake That Makes Your Gallery Wall Look Like a Jumble Sale
You’ve chosen your art and your hanging method, but the final hurdle to a professional-looking gallery wall is spacing. This is where most DIY arrangements fail, descending from « curated collection » to « jumble sale. » The cardinal sin is inconsistent spacing. When the gaps between frames are random—some wide, some narrow—the eye doesn’t see a cohesive group. Instead, it sees a chaotic mess of individual objects, which makes the entire wall feel busy and accidental. The solution is disciplined consistency.
The industry standard is to maintain a uniform gap between every frame in your arrangement. As a rule of thumb, interior designers recommend consistent spacing of 2 to 4 inches between frames. This creates a visual « grid, » even in an asymmetrical layout, allowing each piece to breathe while still feeling connected to the whole. For most UK living rooms, a 2-inch to 3-inch gap is the sweet spot. Anything less feels cramped, and anything more can make the collection feel disjointed, drawing more attention to the blank wall than the art itself.
The 2-Inch Rule: Real-World Spacing Test Results
A hands-on experiment testing three spacing approaches revealed that less than 1.5 inches created a cramped, cluttered appearance where individual frames lost their identity and the wall felt 15% more cramped in photographs. Conversely, 4-inch gaps created cold negative space that emphasized wall blankness rather than art presence. The 2-inch standard proved optimal, creating visible separation while maintaining cohesion. Notably, high-contrast walls (navy, charcoal) required adjustment to 2.3-2.5 inches because darker paint absorbs light, making gaps feel tighter than on lighter walls. This shows the importance of adjusting the rule to your specific environment.
Before you make a single mark on the wall, lay your entire composition out on the floor. Use a tape measure to enforce your chosen gap (e.g., 2.5 inches) between every single edge. This pre-planning phase is non-negotiable and is the secret to achieving that intentional, gallery-quality finish. It’s also about seeing the bigger picture, as one expert panel notes.
The biggest mistake is treating the wall in isolation. The gallery wall’s scale and bottom edge MUST relate to the a furniture below it to feel grounded and intentional.
– Interior Design Experts, Gallery Wall Design Principles
When Should You Swap Wall Art to Prevent Visual Fatigue in the Same Room?
A successful gallery wall isn’t a static, one-time project; it’s a living part of your home. Over time, even a perfectly curated collection can become part of the background, leading to visual fatigue—the point where you no longer truly « see » or feel an emotional connection to the art. For renters, this presents a unique opportunity. Since you’re already using flexible, non-permanent hanging methods, you can easily rotate your art to keep your space feeling fresh and dynamic without any additional wall damage.
The key is to think of your collection not as one fixed entity, but as a system of « core » and « flex » pieces. This allows for easy updates without having to redesign the entire wall. A picture ledge is a renter’s best friend in this scenario. It provides a semi-permanent anchor point that can host a constantly changing display of smaller frames, photos, and objects with zero new holes in the wall. This lets you respond to seasonal changes, new art you’ve acquired, or simply the desire for a different mood.
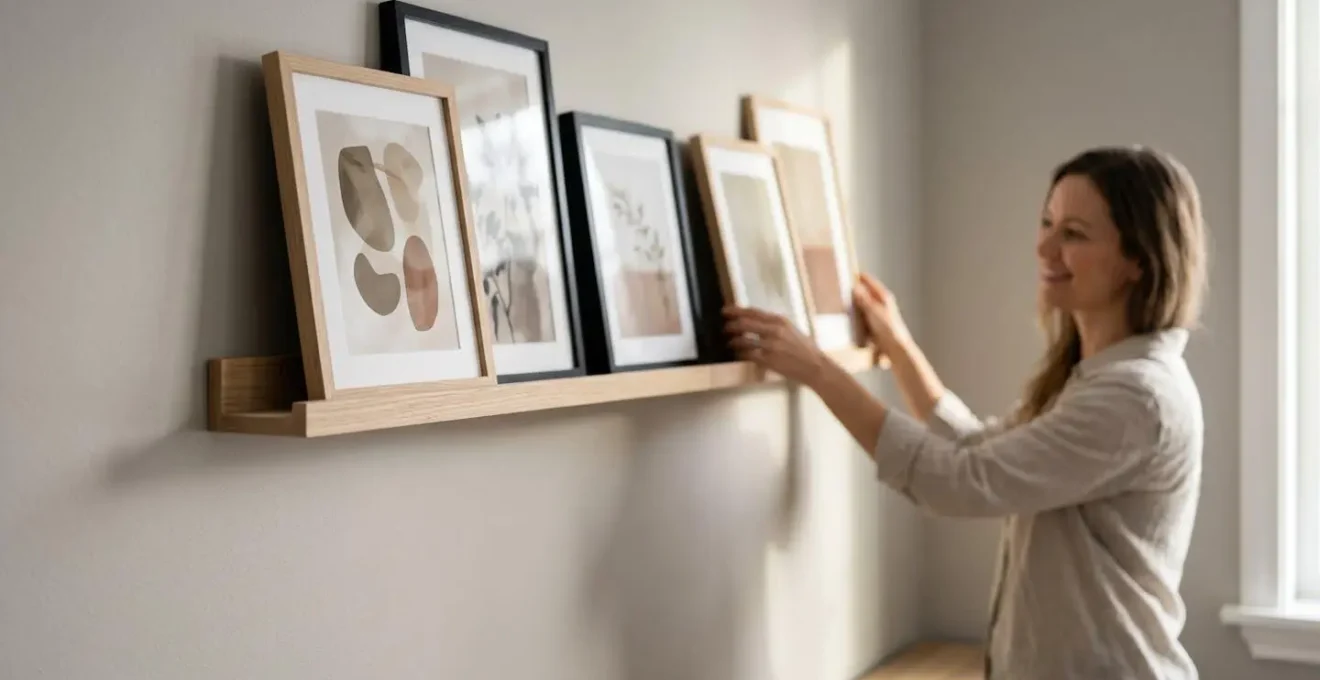
Rather than a strict timeline, the cue to rotate is emotional. When a piece no longer brings you joy or catches your eye, it’s time for it to be swapped out. This proactive approach to curation ensures your home continues to reflect and inspire you. The « Core & Flex » system is a practical way for renters to implement this without risk.
Your Action Plan: The Core & Flex Rotation System for Renters
- Establish 1-2 ‘core’ anchor pieces hung semi-permanently with minimal, high-quality fixings. These are your largest or most-loved works.
- Create a ‘flex’ collection of 3-5 smaller, lightweight pieces designed for rotation on picture ledges or lightweight Command hooks.
- Rotate the ‘flex’ pieces seasonally to change the room’s mood: lighter, airier prints for spring/summer; warmer, moodier pieces for autumn/winter.
- As a personal rule, swap at least one individual ‘flex’ piece every 8-12 weeks, or whenever you notice you no longer feel an emotional response to it.
- Use this low-stakes rotation to test new art or colour combinations before you ever consider committing to a more permanent placement.
- Keep your swapped-out pieces stored safely and flat in a portfolio case, ready for their next appearance in a future rotation.
Why Does Your Modular Sofa Void the Tenancy Deposit on Wooden Floors?
The « deposit-first » mindset doesn’t stop at the walls. One of the most common and costly sources of rental deposit deductions is floor damage, and a prime culprit is the modern modular sofa. Their very flexibility is the source of the danger. Because the individual sections are relatively light, they shift and slide with daily use. This constant micro-movement, combined with the hard plastic feet common on many contemporary designs, acts like sandpaper on wooden or laminate flooring. Over a year, this can create a network of scratches, scuffs, and indentations.
Under UK tenancy law, this kind of damage is often not classified as « normal wear and tear. » While minor scuffs from walking are expected, significant scratches or deep indentations from furniture are typically considered tenant negligence. As a result, landlord-tenant law establishes that large holes and indentations are not considered normal wear and tear, and a landlord is well within their rights to deduct the cost of repairing or refinishing the floor from your deposit. The small felt pads that come with furniture are often inadequate; they compress quickly and can collect grit, making the problem worse.
Protecting your deposit requires a more robust and proactive approach to floor protection. This means distributing the weight of the furniture and creating a soft, non-abrasive barrier between the sofa feet and the floor surface. An area rug is your most powerful tool.
- Replace standard felt pads with heavy-duty, slip-on furniture socks or thick rubber cups that cover the entire foot of each sofa section.
- Place a large area rug with a high-grip, non-damaging underlay beneath the entire footprint of the modular sofa. For a large sectional, this might mean a rug of at least 8×10 ft.
- The rug’s job is twofold: it prevents the sections from sliding and it distributes the weight across a much larger surface area, preventing indentations.
- When you do need to reconfigure the sofa, lift each piece fully rather than dragging or sliding it across the floor.
- Before moving in, document the floor’s condition with dated photos. Do this again after placing the furniture. This evidence is invaluable in case of a dispute.
The Mantelpiece Overload Mistake That Makes Your Living Room Feel Busy
Just as a gallery wall can become cluttered, so can a mantelpiece, shelf, or console table. The common mistake is « mantelpiece overload »—the urge to fill every available inch of surface space with objects. This creates visual noise and makes a room feel busy and stressful. The goal of a curated display is not to show off everything you own, but to create a pleasing composition that tells a story and allows key pieces to shine. The secret to achieving this balance is embracing negative space.
Negative space is the empty area around and between objects. It gives the eye a place to rest and is just as important as the objects themselves. In fact, professional interior styling principles dictate that at least 30% of a surface should remain visible and uncluttered. This breathing room is what separates an intentional, high-end display from a chaotic collection of trinkets. To achieve this, you need to edit ruthlessly and arrange objects with a clear structure.
Two powerful techniques for styling a mantelpiece are the Pyramid Principle and the Rule of Three. These provide a simple framework for creating balance and visual interest.
- The Pyramid Principle: Start by placing your tallest item (like a vase with branches or a large art print) either in the center or slightly off-center. This creates the « apex » of your visual pyramid. Then, arrange smaller items tapering down on either side, creating a pleasing triangular shape that guides the eye smoothly across the display.
- The Rule of Three: This rule applies to both groupings and materials. Our brains find odd-numbered groupings more dynamic and appealing than even-numbered ones. Group smaller objects in clusters of 3 or 5. Similarly, limit your dominant materials or finishes to three (e.g., ceramic, brass, and wood) to create a sense of cohesion without being monotonous. Avoid symmetrical pairs, which can look static and dated.
Key Takeaways
- Adopt a « Deposit-First » Mindset: Every decorating choice, from the weight of a frame to the placement of a sofa, should be evaluated for its potential risk to your tenancy deposit.
- Understand the Physics of Failure: Most damage-free solutions fail due to improper surface prep and « peel stress, » not just weight. Proper installation is non-negotiable.
- Curation is Editing: A successful display, whether on a wall or a shelf, is defined by what you choose to leave out. Embrace negative space and use consistent spacing to create cohesion.
How to Curate a Shelf Display That Looks Intentional, Not Cluttered?
The final frontier in creating a home that feels intentionally designed is the bookshelf or display shelf. Like a mantelpiece, it can quickly become a dumping ground for odds and ends. Curating a shelf that looks like it belongs in a magazine is about applying a few simple but powerful design principles: layering, variation, and unification. Instead of lining items up in a flat, one-dimensional row, a professional display has depth and rhythm.
The most effective method for this is the Foreground, Midground, Background layering technique. This creates a three-dimensional vignette on each shelf. Start by placing a tall, flat item like a leaning art print or a tray in the background. In the midground, add an object of medium height, like a stack of 2-4 books (stacked horizontally for a change of pace) or a vase. Finally, place a small, sculptural object or a low bowl in the foreground. This simple technique instantly adds depth and sophistication.
Within this structure, variation is key. Vary the heights of your objects to create a dynamic « skyline » across the shelf, avoiding a flat, monotonous line. And just as with mantelpieces, group objects using the rule of odds. Research confirms that interior design research confirms that odd-numbered groupings (like 3, 5, or 7) are more visually dynamic and pleasing to the eye than even-numbered pairs. A single sculptural object can stand alone, while smaller items work best in a tight cluster of three.
Finally, every great display has a unifying thread that ties it all together. This could be:
- A strict colour palette (e.g., only black, white, and natural wood).
- A consistent theme (e.g., coastal objects like coral and driftwood).
- A repeated material (e.g., pops of brass or ceramic throughout the shelves).
This unifying element is what makes the collection feel cohesive and intentional, rather than a random assortment of possessions.
You now possess the engineering mindset and the design rules of a removable-solutions specialist. It’s time to stop worrying about your deposit and start curating your space. Choose your first wall, plan your layout using these deposit-safe principles, and create a display that is both beautifully you and brilliantly temporary.