Your patio’s potential is being wasted not by the rain, but by a misunderstanding of how wind, heat, and water behave in the UK climate.
- Managing wind chill and using high thermal mass materials is more critical than air temperature.
- Efficient radiant heat and precise drainage are non-negotiable engineering solutions, not optional extras.
Recommendation: Shift from temporary fixes like blankets to permanent, integrated design choices to create a truly usable outdoor room.
You’ve invested in it. The beautiful paving is laid, the bi-fold doors glide open, and the garden furniture is perfectly arranged. Yet, how often do you actually use your patio? If you’re a UK homeowner, the answer is likely « not enough. » The familiar story is one of fleeting sunny afternoons and evenings cut short by a sudden chill, a persistent breeze, or an unexpected shower. Many guides will suggest simply buying a patio heater or throwing a few blankets over your chairs. These are temporary patches, not solutions. They treat an outdoor space with indoor logic, and that’s the fundamental mistake.
The truth is, reclaiming your patio from the unpredictable British weather isn’t about fighting it; it’s about outsmarting it. It requires a shift in mindset from decoration to engineering. You need to think about your patio as a high-performance outdoor system, designed to manage wind, retain radiant heat, and control water with precision. This isn’t about grand, expensive gestures. It’s about a series of smart, strategic choices in heating technology, material science, and micro-drainage that work together to create a comfortable microclimate.
This guide moves beyond the obvious. We will deconstruct the core environmental challenges your patio faces—wind chill, heat loss, and water logging—and provide the specific, technical solutions to overcome them. We will explore how to add shelter without falling foul of planning regulations, why your paving choice dictates evening warmth, and how to choose furniture that genuinely survives a British winter. The goal is to transform your patio from a fair-weather-only feature into a dependable extension of your home, comfortable and inviting for at least eight months of the year.
In the following sections, we will break down the essential strategies to re-engineer your outdoor space. This structured approach will provide a clear roadmap for turning your patio into a year-round asset.
Summary: How to Reclaim Your Patio From the British Weather
- Why Is Your South-Facing Patio Still Too Cold for Evening Dining in May?
- How to Add a Retractable Awning in England Without Needing Planning Approval?
- Patio Heater, Fire Pit or Infrared Panel: Which Warms 10 m² Most Efficiently?
- The Paving Slope Mistake That Floods 1 in 5 UK Patios During Heavy Rain
- When to Lay a New Patio: The Spring Window UK Landscapers Recommend
- Why Does Your Indoor Tile Clash With Your Outdoor Paving at the Bi-Fold Doors?
- Why Does Your « Weatherproof » Sofa Cushion Turn Mouldy Every Autumn?
- How to Keep Rattan Garden Furniture Looking New After 5 British Winters?
Why Is Your South-Facing Patio Still Too Cold for Evening Dining in May?
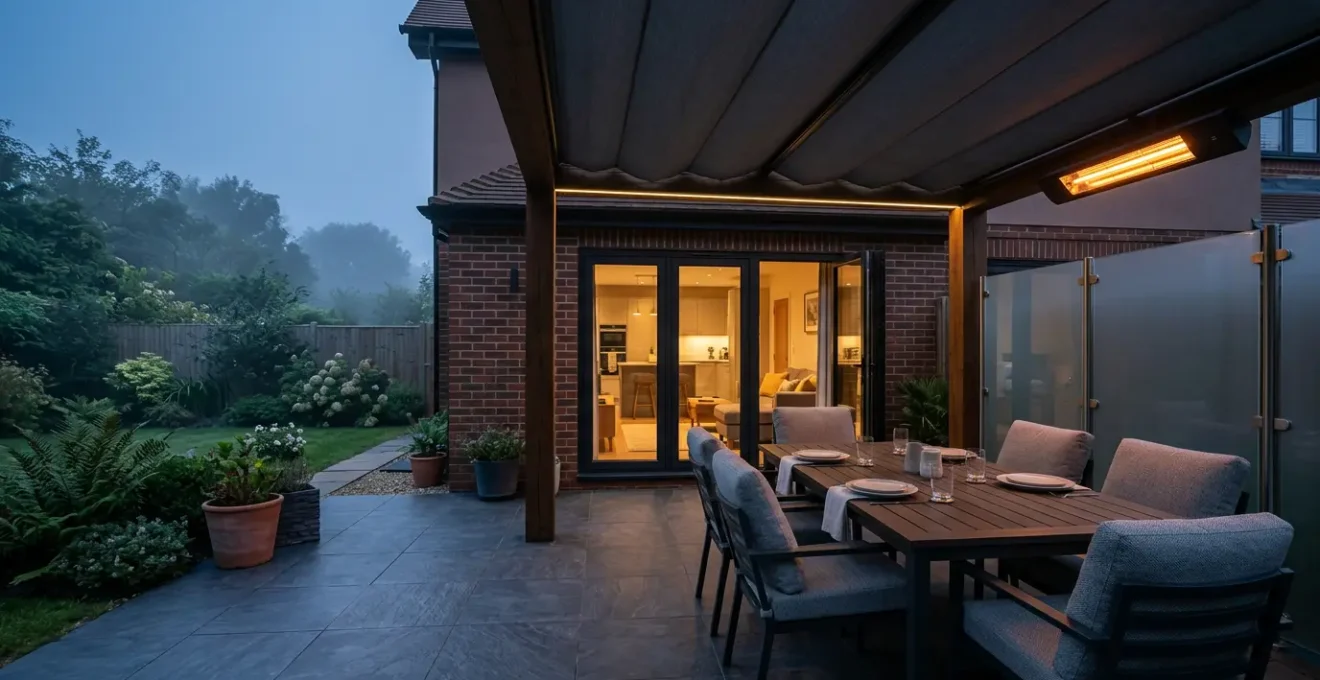
It’s a common and frustrating paradox for many UK homeowners. You’ve positioned your patio to capture maximum sunlight, yet as soon as the sun dips, a persistent chill sets in, making evening use impossible without layers of clothing. The culprit isn’t just the drop in air temperature; it’s a combination of two critical factors often overlooked in garden design: wind chill and low thermal mass. The air temperature might be a pleasant 15°C, but even a gentle breeze can make it feel significantly colder. Research shows that a 5-10 mph breeze can dramatically lower perceived temperature due to the wind chill factor, stealing warmth from your body faster than it can be replaced.
The second issue is the material under your feet. Many popular patio materials, like timber decking or light-coloured sandstone, have low thermal mass. This means they heat up quickly in the sun but lose that heat just as fast when it disappears. Your patio isn’t storing any of that valuable daytime energy. The solution is to think like a thermal engineer. To create a comfortable space, you must first manage airflow and then choose materials that act like a storage heater for your garden.
Strategic windbreaks are essential. However, a solid fence is often a poor choice, as it can create wind turbulence on the leeward side. A far better approach involves filtering the wind. Consider using elements like:
- Glass balustrades or retractable side screens to block wind without sacrificing light.
- Strategically placed pleached trees or dense hedges to slow and diffuse wind.
- Creating enclosed ‘outdoor rooms’ with low walls or large planters to disrupt airflow at seating level.
For paving, opt for materials with high thermal mass. Dark slate, basalt, or dense porcelain tiles are excellent choices. They absorb solar radiation throughout the day and gently radiate that warmth back out during the cooler evening, naturally extending the comfortable hours you can spend outside.
How to Add a Retractable Awning in England Without Needing Planning Approval?
An awning is a transformative addition, offering instant shelter from a sudden downpour or intense summer sun. However, the fear of navigating the complexities of planning permission stops many homeowners from even considering one. The good news is that in England, most retractable awnings fall under « Permitted Development Rights, » meaning you can install one without a formal planning application, provided you adhere to a strict set of rules. Understanding these rules is the key to a hassle-free installation.
Permitted Development is designed to allow for minor improvements to a home, and a well-chosen awning fits this description perfectly. The regulations are primarily concerned with the awning’s size, position, and potential impact on neighbours. The most critical constraints are its projection from the wall and its height relative to your property’s roofline. It must not be installed on the front-facing elevation of your house—the wall facing the road. It is intended for rear or side elevations to maintain the street’s visual character.
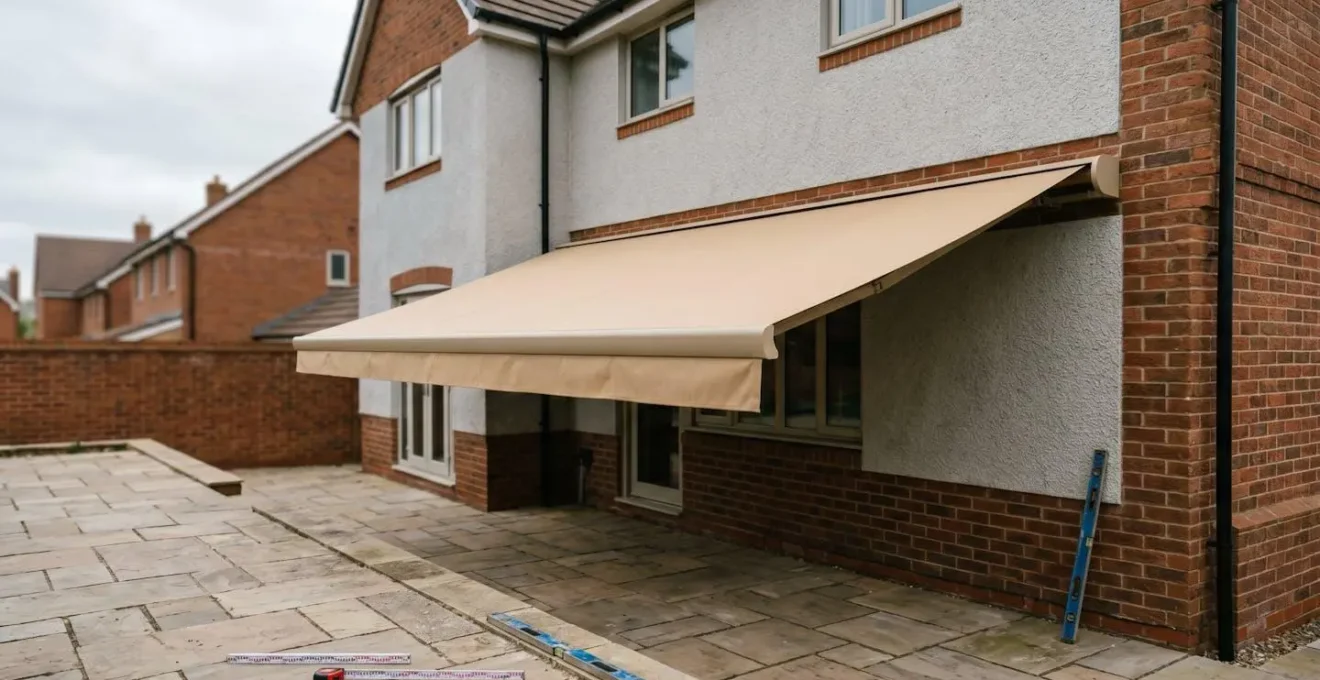
As the image demonstrates, a compliant installation is discreet and respectful of the property’s original structure. The rules are clear and easy to follow. A mistake here can lead to an enforcement notice from the local council, forcing you to remove the structure. Therefore, working with a reputable installer who understands these regulations is paramount. Furthermore, if your property is a Listed Building or located within a Conservation Area, these permitted development rights are typically removed, and you will almost certainly need to apply for full planning permission.
Your Action Plan: Permitted Development Checklist for Awnings
- Check Location: Verify that the awning will be installed on a rear or side wall of the house, never on the front-facing wall.
- Measure Projection: Ensure the awning’s projection does not extend more than 3 metres from the rear wall of the property.
- Confirm Height: The highest point of the awning’s cassette and mechanism must not be higher than the eaves of the house.
- Verify Property Status: Check if your home is a Listed Building or in a designated Conservation Area, as Permitted Development rights may not apply.
- Assess Boundaries: The installation must not overhang a neighbour’s boundary, and you must manage water runoff to ensure it doesn’t affect their property.
Patio Heater, Fire Pit or Infrared Panel: Which Warms 10 m² Most Efficiently?
Choosing a heating source is one of the most critical decisions for extending patio use into cooler evenings. The traditional gas-powered « mushroom » heater and the rustic fire pit are popular choices, but their efficiency in typical British conditions is often disappointing. The key to effective outdoor heating is understanding the difference between convection and radiant heat. Convection heaters, like most gas models, work by heating the surrounding air. In an open, breezy patio, this warmed air is immediately blown away, wasting enormous amounts of energy and money. A fire pit offers a pleasant ambience but suffers from similar inefficiencies, with much of its heat rising straight up.
The superior solution for an open or semi-enclosed patio is radiant heat, delivered by electric infrared panels. Unlike convection, infrared radiation doesn’t heat the air; it heats objects and people directly, just like the warmth of the sun. This means it is unaffected by wind, making it vastly more efficient and effective. You feel the warmth instantly, without waiting for the air to heat up. While the initial investment might be comparable to a high-end gas heater, the running costs and environmental impact are significantly lower.
This comparative analysis highlights the clear winner for cost-effective and targeted warmth in UK garden conditions. While a wood fire pit has an undeniable appeal, for pure heating efficiency and low running costs, infrared is the logical choice. A study of UK energy prices and comparative outputs confirms that electric infrared heaters are not only more eco-friendly but can also lead to substantial hourly savings.
| Heating Type | Power/Fuel | Cost per Hour | Heat Distribution | Wind Efficiency |
|---|---|---|---|---|
| Electric Infrared Panel (2kW) | 2000W | £0.60-£0.68 | Radiant (direct) | Excellent |
| Gas Patio Heater (13kg propane) | 15000W | £2.90-£3.84 | Convection (air warming) | Poor |
| Electric Halogen (600W) | 600W | £0.20 | Radiant (targeted) | Good |
| Wood Fire Pit | Variable | £1-£2 (fuel dependent) | Radiant + Convection | Moderate |
The Paving Slope Mistake That Floods 1 in 5 UK Patios During Heavy Rain
There is nothing that renders a patio unusable faster than standing water. A puddle-filled surface is not only unsightly and a slip hazard, but it can also lead to long-term damage like algae growth, frost heave, and damp issues at the base of your house walls. The root cause is almost always an incorrectly installed or non-existent drainage gradient. Many DIY installations and even some professional jobs fail to create a sufficient slope, or worse, slope the paving *towards* the house. This is a critical engineering failure that is all too common in the UK.
The principle is simple: water must be directed away from the building and towards a suitable drainage point, such as a lawn, a flowerbed, or a dedicated drain. The minimum standard for this is a 1:80 gradient. This means for every 80 units of horizontal distance, the paving should drop by 1 unit. In practical terms, UK paving industry standards recommend a fall of at least 12.5mm for every metre of patio width, with a 1:60 gradient (around 16mm per metre) being preferable for total peace of mind during a downpour.
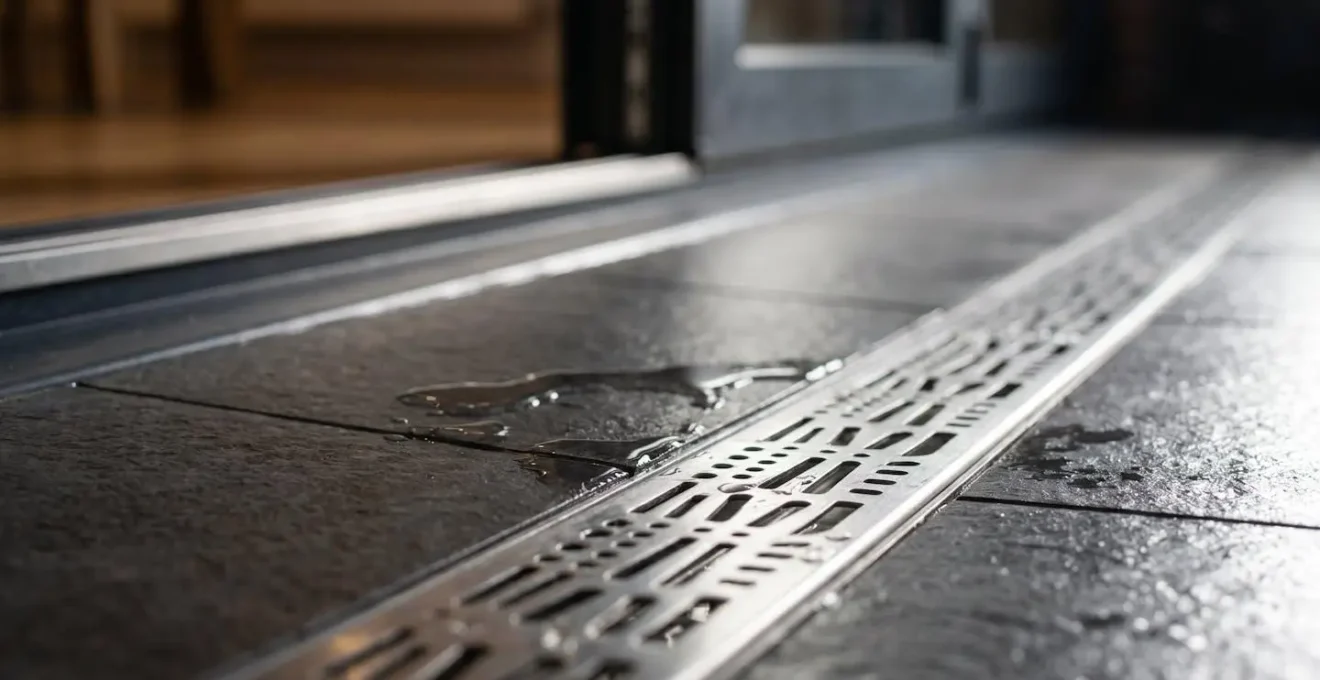
For patios situated directly against the house, especially with bi-fold or sliding doors where the threshold is level, a simple slope away from the house is not enough. The best practice, as shown in the detail above, is to install a linear channel drain right against the property. This acts as an interception line, capturing all surface water before it can ever reach the door threshold. This combination of a correct gradient and a channel drain provides a robust, professional solution that guarantees a dry and usable patio, regardless of the intensity of the British rain.
When to Lay a New Patio: The Spring Window UK Landscapers Recommend
Deciding to invest in a new patio is exciting, but the timing of the project is a strategic decision that can impact both cost and quality. Most homeowners naturally think of spring as the ideal time to start, envisioning a finished patio ready for summer. While spring is a viable window, it’s also the peak season for landscapers, leading to longer waiting lists and potentially higher quotes. To secure a quality contractor for a spring build, you should be seeking quotes and booking them in as early as January or February.
However, many experienced UK landscapers advocate for an alternative: an autumn installation (September-October). During this period, demand has typically subsided after the summer rush, meaning contractors often have better availability and material suppliers may offer better pricing. An autumn build also allows the sub-base and mortar the entire winter to settle and cure fully without the pressure of immediate, heavy use. This slow curing process can result in a stronger, more durable foundation for your paving.
There is one technical consideration to be aware of for spring installations: the increased risk of efflorescence. This is the appearance of white, salty deposits on the surface of new paving slabs. It’s a natural phenomenon caused by salts within the cement and sand being drawn to the surface as water evaporates. The cool, damp conditions of a typical British spring slow down this evaporation process, making efflorescence more likely to occur. While it is usually temporary and can be cleaned off, it can be an aesthetic concern for homeowners with a brand-new patio. An autumn build, with potentially drier and warmer conditions, can sometimes mitigate this risk.
- Plan Ahead for Spring: Start getting quotes from landscapers in January for a project start in March or April.
- Consider an Autumn Build: Take advantage of better contractor availability and potentially lower costs in September and October.
- Allow for Curing: A winter-long curing period for an autumn-built patio can lead to a more robust final structure.
- Be Aware of Efflorescence: Understand that the slow-drying conditions of spring can increase the likelihood of temporary white deposits on new paving.
Why Does Your Indoor Tile Clash With Your Outdoor Paving at the Bi-Fold Doors?
Creating a seamless « indoor-outdoor » flow is a primary goal for many modern home renovations, especially those featuring large bi-fold or sliding doors. The dream is a single, uninterrupted floor surface that visually connects the living space with the garden. However, this dream often turns into a jarring visual disconnect. The indoor tile that looked like a perfect match in the showroom suddenly clashes with the outdoor paving. This is rarely due to choosing the wrong colour, but rather a failure to account for two factors specific to the UK climate: the ‘wet look’ discrepancy and grout degradation.
Many natural stones and even some porcelains change colour dramatically when they get wet. A light grey stone can turn into a dark charcoal when it rains, instantly breaking the seamless effect you worked so hard to achieve. Before committing, you must test your chosen paving samples by soaking them in water and placing them next to your indoor tile. The second point of failure is grout. Using the same light-coloured grout inside and out is a common mistake. Outdoors, light grout is a magnet for dirt, grime, and green algae, and within a single season, it will become stained and unsightly, creating a stark, dirty border where the two spaces meet.
The professional solution is to use dedicated « indoor-outdoor » porcelain ranges. These are specifically designed to solve this problem, offering an identical visual appearance in two different finishes: a smooth tile with a lower slip rating (R9/R10) for indoors, and a matching but more textured, high-slip-resistance tile (R11 or PTV 36+) for outdoors. This guarantees a perfect visual match in all weather conditions. For the grout, always specify a darker, « shadow » colour for the outdoor installation from the very beginning. It will be far more forgiving and maintain a clean, consistent look for years.
- Test for the ‘Wet Look’: Always soak outdoor paving samples to see how their colour changes and compare this to your indoor tile.
- Specify Indoor-Outdoor Ranges: Choose porcelain tiles that offer the same design in both smooth indoor and textured outdoor (R11) finishes.
- Choose Grout Wisely: Opt for a darker grey or « shadow » coloured grout for the exterior paving to hide inevitable dirt and staining.
- Request Samples: Ask for samples of your chosen materials in both dry and saturated states before making a final decision.
Why Does Your « Weatherproof » Sofa Cushion Turn Mouldy Every Autumn?
It’s a familiar and dispiriting autumn ritual: bringing in your « weatherproof » garden sofa cushions only to find them damp, heavy, and speckled with unsightly black mould spots. The term « weatherproof » is one of the most misleading in the outdoor furniture industry. For most standard cushions, it simply means the outer fabric is « showerproof »—it will resist a light, brief shower. It does not mean the cushion can withstand persistent rain or the damp, humid conditions of a British autumn.
The problem is the foam inside. Standard furniture foam acts like a sponge. Once water penetrates the fabric’s seams or zippers, this foam becomes saturated. In the cool, damp air, it never fully dries out, creating the perfect breeding ground for mould and mildew. The cushion may feel dry on the surface, but it remains waterlogged within. This is why they feel unexpectedly heavy and develop that characteristic musty smell. No amount of fabric protector spray can solve this fundamental issue with the cushion’s core.
The genuine solution, used in high-end and marine-grade furniture, is a combination of two technologies: reticulated foam and solution-dyed acrylic or olefin fabrics. Reticulated foam has a completely open-cell structure, almost like a coarse filter. Water flows straight through it instead of being absorbed. A cushion filled with this foam can be saturated in a downpour and will drain and dry in a fraction of the time of standard foam. Paired with a breathable, water-resistant, and UV-stable fabric like Olefin, which resists fading and mildew growth, you get a cushion that is truly weatherproof. When buying new furniture, always ask the supplier specifically what type of foam is used in the cushions. This single detail is the true test of its all-weather credentials.
Key Takeaways
- Patio comfort in the UK is dictated by managing wind chill and thermal mass, not just air temperature.
- Efficient radiant heat (infrared) and precise drainage are essential engineering choices, not luxury add-ons.
- Long-term durability depends on choosing the right materials from the start, from high-slip-rating porcelain to furniture with welded aluminium frames and PE rattan.
How to Keep Rattan Garden Furniture Looking New After 5 British Winters?
Synthetic rattan is the UK’s most popular choice for garden furniture, prized for its classic look and promises of low maintenance. However, the market is flooded with low-quality options that look great for a season or two before cracking, rusting, and unravelling after exposure to a few British winters. The longevity of your investment depends entirely on the quality of two hidden components: the internal frame and the type of synthetic weave used.
The cheapest sets use bolted steel frames. Once the powder coating is inevitably scratched, water gets in, the steel rusts, and it expands. This expansion pushes the weave from within, causing it to split and fail. A high-quality set will always use a welded aluminium frame. Aluminium is lightweight, strong, and does not rust, ensuring the structural integrity of the furniture for years. Secondly, the weave itself is critical. Cheaper furniture uses PVC-based rattan, which becomes brittle and cracks when exposed to the UK’s freeze-thaw cycles and UV radiation. The gold standard is High-Density Polyethylene (PE) rattan, which is infused with UV inhibitors to keep it flexible and prevent it from fading and cracking.
Even with the best materials, an annual maintenance ritual is key to keeping it looking new. A deep clean with a soft brush and non-foaming cleaner removes the abrasive grit and grime that can wear down the weave’s surface. Once it’s completely dry, applying a specialist product like 303 Aerospace Protectant restores the UV protection and creates a dirt-repellent barrier. While high-quality PE rattan furniture can be left outside, using breathable covers or storing it during the harshest winter months will drastically extend its lifespan beyond the five-year mark, protecting your investment. Investing in a quality patio and furniture isn’t just a lifestyle choice; a well-maintained patio can add significant value to a UK property.
By shifting your perspective from simple decorating to thoughtful outdoor engineering, you can create a patio that truly serves as a valuable, year-round extension of your home. Start today by auditing your current space against these principles and plan your next upgrade with performance, not just aesthetics, in mind.