In summary:
- Build a ‘hydrological foundation’ with compost to make your soil a water-retaining sponge.
- Install a large water butt and connect it to a drip irrigation system for targeted watering.
- Choose plants with built-in drought adaptations, like silver leaves or deep taproots.
- Design borders using a ‘sequential colour matrix’ of plants that flower at different times.
- Avoid invasive plants and opt for sterile cultivars to create a low-maintenance, resilient ecosystem.
The familiar dread of a parched lawn and wilting flowers during a summer heatwave is a feeling many UK gardeners know too well. When the news of a hosepipe ban arrives, it can feel like a death sentence for the vibrant, colourful oasis you’ve worked so hard to create. The standard advice floods in: water in the evening, use a watering can, and maybe install a small water butt. While well-intentioned, these tips often feel like placing a sticking plaster on a much deeper issue. They treat the symptoms of a thirsty garden rather than addressing the root cause.
But what if the solution wasn’t about rationing and sacrifice, but about a fundamental redesign? What if the key to a lush, colourful garden that laughs in the face of a hosepipe ban lies not in how you water, but in building a resilient garden ‘operating system’? This approach moves beyond a simple checklist of chores and focuses on creating a self-sufficient ecosystem. It’s about transforming your soil into a reservoir, choosing plants that are genetically programmed to thrive in dry conditions, and harvesting every drop of rain to create a water-positive landscape.
This guide will walk you through the strategic components of this water-wise system. We’ll deconstruct the science behind why some plants survive and others don’t, explore how to build a powerful hydrological foundation from the ground up, and provide a blueprint for a garden that remains bursting with colour all summer long, using up to 50% less water. It’s time to stop fighting the drought and start designing for it.
This article provides a complete roadmap for creating a vibrant, water-efficient garden. Explore the sections below to master each component of your new garden operating system.
Summary: A Guide to a Resilient, Colourful, and Water-Wise Garden
- Why Does Your Lawn Need Feeding Every Spring Despite Composting All Year?
- How to Install a 500-Litre Water Butt in a Terraced-House Garden?
- Peat-Free or Traditional Compost: Which Grows Better Tomatoes in British Summers?
- The Buddleia Trap That Spreads Uncontrollably Into Neighbouring UK Gardens
- In What Order Should You Remove Lawn, Add Borders and Install Pathways?
- Why Does Your Lavender Thrive While Your Hydrangea Wilts in the Same Dry Spell?
- How to Oil Teak Garden Furniture With Non-Toxic Products Safe for Pets?
- How to Create a Colourful Border That Survives a 6-Week UK Hosepipe Ban?
Why Does Your Lawn Need Feeding Every Spring Despite Composting All Year?
The endless cycle of feeding a lawn, especially when you’re diligently composting kitchen scraps, can be frustrating. The issue often isn’t a lack of nutrients in your garden, but a problem with the soil’s ‘operating system’. A healthy lawn doesn’t just sit on top of the soil; it’s integrated with it. Your compost, when used to improve the soil *under* the lawn, does far more than just feed it; it builds a hydrological foundation. Conventional, compacted lawn soil acts like a concrete slab, causing water and nutrients from fertilisers to run off. In contrast, soil rich in organic matter acts like a sponge.
The science is clear: improving soil structure is the single most effective way to reduce a lawn’s dependency on both water and feed. Organic matter creates a network of pores that hold onto moisture, making it available to grass roots long after the rain has stopped. This means you water less, and the nutrients already present in the soil (and from your compost) are held in the root zone instead of being washed away. According to soil science research, every 1% increase in soil organic matter allows the soil to hold an additional 16,500 gallons of plant-available water per acre.
Instead of just top-dressing, consider aerating your lawn and raking in a fine layer of mature compost. This process, done over several seasons, fundamentally changes the soil’s capacity to support itself. The need for constant spring ‘feeding’ diminishes because you’ve created a resilient, self-sustaining ecosystem right under your feet, one that holds water and cycles nutrients naturally. Your lawn becomes less of a demanding monoculture and more of an integrated part of a healthy garden.
How to Install a 500-Litre Water Butt in a Terraced-House Garden?
In the compact setting of a UK terraced-house garden, space is at a premium, and a 500-litre water butt can seem like an impossible dream. Yet, this is a cornerstone of a water-positive design. The key is to think vertically and leverage even the smallest of roof areas. You don’t need a sprawling country house; a small shed or the rear extension of your terrace can be a surprisingly powerful rainwater-harvesting engine. It’s a shift in mindset: seeing rain not as a nuisance, but as a free, essential resource to be captured.
The potential is significant. According to RHS data, even in drier parts of south-east England, a small shed roof can collect between 2,500 and 3,500 litres of water annually. A 500-litre butt simply acts as your reservoir to buffer against dry spells. Installation involves finding a stable, level base (essential, as 500 litres of water weighs half a tonne) and using a rainwater diverter kit on a nearby downpipe. For maximum utility in a small space, elevate the water butt on a sturdy stand. This creates the necessary pressure for gravity-fed irrigation.
This elevation is what transforms the water butt from a passive container into an active part of your garden’s operating system. The visual below shows how this simple setup can power a highly efficient network.
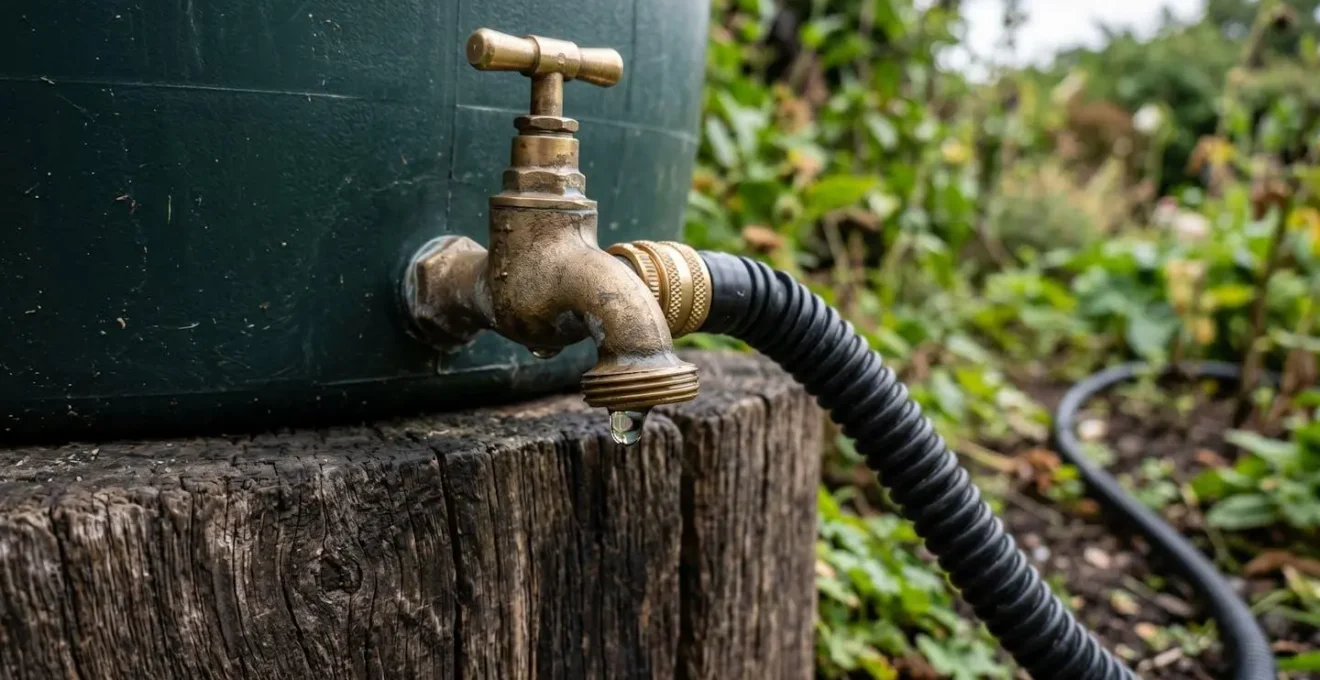
As you can see, a tap at the base of the raised butt can be connected directly to a drip or soaker hose. This system delivers water slowly and directly to the plant roots, eliminating waste from evaporation and runoff. It’s a closed-loop, automated solution that ensures your plants get the moisture they need, exactly where they need it, without you ever having to lift a watering can.
Peat-Free or Traditional Compost: Which Grows Better Tomatoes in British Summers?
For the eco-conscious gardener, the move to peat-free compost is a moral imperative. Peatlands are vital carbon sinks, and their destruction for horticulture is an environmental disaster. Yet, many gardeners have been disappointed by the performance of early peat-free alternatives, especially with hungry plants like tomatoes. The key is understanding that ‘peat-free’ is not a single product; it’s a category. Their performance hinges entirely on their composition, which directly impacts your garden’s water-retention capabilities.
Some peat-free composts, particularly cheap, poorly-made ones based on green waste, can lead to poor results. They can slump, become waterlogged, or run out of nutrients quickly. Indeed, a recent study tracking tomato performance showed a 40% failure rate in some peat-free mediums just four weeks after planting. This isn’t a failure of the peat-free concept, but a failure of specific formulations. The secret to success lies in choosing a medium that balances structure, nutrients, and water retention.
High-quality, modern peat-free composts are a world away from these early versions. Those based on coir (coconut fibre), wood fibre, and well-rotted bark create a stable, open structure that holds both air and water effectively. As experts from the industry note, « Some peat-free composts, particularly those made from coir, retain water effectively while offering good drainage. » For a thirsty crop like tomatoes in a typical British summer of unpredictable rain and sun, a coir-based mix provides the perfect buffer. It acts like a sponge, soaking up excess rain and then releasing it slowly to the roots during dry spells, preventing the boom-and-bust watering cycle that leads to split fruit and blossom end rot. Choosing the right peat-free mix isn’t just an ethical choice; it’s a strategic one for building a resilient, water-wise garden.
The Buddleia Trap That Spreads Uncontrollably Into Neighbouring UK Gardens
The common butterfly bush, *Buddleia davidii*, is a classic sight in UK gardens, prized for its ability to attract pollinators and thrive on neglect. This very resilience, however, is what makes it ‘the Buddleia trap’. Its prolific self-seeding is so aggressive that the plant is listed under Schedule 9 of the Wildlife and Countryside Act 1981, making it an offence to plant or otherwise cause it to grow in the wild. The tiny, wind-blown seeds can travel far, colonising railway lines, wasteland, and, most frustratingly, your neighbour’s pristine flowerbeds.
This doesn’t mean you must give up on its beautiful, nectar-rich flowers. The solution lies in smart plant selection—a core principle of adaptive planting. Research has revealed dramatic differences in fertility among cultivars. A study at Longwood Gardens found that a single flower head of the common ‘Potter’s Purple’ cultivar could produce over 40,000 seeds. In contrast, other cultivars produced a tiny fraction of that, and modern breeding has now given us entirely sterile varieties.
Choosing a sterile or near-sterile cultivar allows you to enjoy all the benefits of a Buddleia—drought tolerance, pollinator appeal, vibrant colour—with none of the invasive drawbacks. It’s a strategic choice that contributes to a more responsible and lower-maintenance garden ecosystem. Instead of spending your summers pulling up unwanted seedlings, you can relax and watch the butterflies. The following plan outlines how to manage existing plants and what to look for when buying new ones.
Your Action Plan: Taming the Buddleia and Choosing Wisely
- Choose sterile cultivars: Look for plants from the Lo & Behold series (‘Blue Chip Jr.’, ‘Pink Micro Chip’) or the Pugster series (‘Pugster Blue’, ‘Pugster Pink’), which produce little to no viable seed.
- Consider drought-tolerant substitutes: If you want to replace an old Buddleia, alternatives like Perovskia atriplicifolia ‘Blue Spire’ (Russian Sage) or Salvia nemorosa ‘Caradonna’ offer similar colour and pollinator value.
- Manage existing *Buddleia davidii*: For established invasive types, perform a ‘Chelsea Chop’ in late May. Pruning the growth back by a third to a half delays flowering and seeding, and encourages a bushier habit.
- Deadhead diligently: The most crucial task for existing plants is to remove all flower heads as they fade, before they have a chance to form and disperse their lightweight seeds.
In What Order Should You Remove Lawn, Add Borders and Install Pathways?
Redesigning a garden is exciting, but the wrong sequence of tasks can create double the work and compromise the health of your new landscape. The logical order is always to work from the ground up: hardscaping and soil preparation first, planting last. For a water-wise garden, this means establishing your hydrological foundation before anything else. Therefore, the correct order is: 1. Install pathways and any hardscaping. 2. Remove the lawn and prepare the new border soil. 3. Plant the borders.
Installing pathways first defines the space and prevents you from compacting your freshly prepared planting beds by walking all over them. Once the ‘bones’ of the garden are in place, you can turn your attention to the most transformative step: converting lawn into planting areas. Forget back-breaking digging. The most effective, eco-friendly method is sheet mulching, a ‘no-dig’ technique that builds superb soil structure while eradicating the grass.
This process is the practical application of building a water-retentive sponge right where your new plants will grow. It not only saves your back but also kick-starts a healthy soil ecosystem, full of worms and microbial life. The steps are simple and methodical:
- Layer cardboard directly over the existing lawn, ensuring you overlap all edges by at least 15cm to block out all light. This smothers the grass without any digging.
- Top the cardboard with a deep 10-15cm layer of good-quality compost or other well-rotted organic matter like leaf mould.
- Water the entire area thoroughly. This encourages the cardboard to start breaking down and helps the layers settle together.
- Leave it for at least three to six months. Over this period, worms will be drawn up to the organic matter, breaking down the cardboard and the dead turf beneath, enriching the soil.
- Once the lawn has fully decomposed, you can plant directly into the deep compost layer, giving your new drought-tolerant plants the perfect start in life.
By following this sequence, you ensure that your new borders are not just holes in the ground, but deeply fertile, moisture-retentive zones ready to support a thriving, low-water garden for years to come.
Why Does Your Lavender Thrive While Your Hydrangea Wilts in the Same Dry Spell?
It’s a common garden mystery: two plants, side-by-side in the same border, reacting completely differently to a dry spell. One, the Lavender, stands proud and fragrant; the other, a Hydrangea, is a drama queen of drooping leaves. The answer lies in millions of years of evolution. Plants from dry, sunny climates like the Mediterranean have developed a remarkable toolkit of physical adaptations to conserve water. This is the science behind adaptive planting. Understanding these features allows you to look at a plant and predict its resilience to drought.
A Hydrangea, with its large, soft, green leaves, is built for a life of ample moisture. These leaves have a huge surface area, through which water is lost rapidly via transpiration on a hot day. It’s like leaving a window wide open. In contrast, drought-tolerant plants have evolved ingenious ways to ‘close the window’. These adaptations are the secret to their survival, and they are often beautifully aesthetic.

This visual contrast in root systems is just one part of the story. The real magic happens above ground, in the leaves and stems. From reflective silver foliage to water-storing succulents, nature has engineered a variety of solutions to the problem of drought, as the following analysis from a water-wise gardening guide shows.
| Adaptive Feature | Function | Example Plants | Water Conservation Benefit |
|---|---|---|---|
| Silver/Grey Leaves | Reflective surface reduces heat absorption | Lavender, Santolina, Artemisia | Reduces transpiration by 30-40% |
| Hairy Leaves | Traps moisture at leaf surface | Stachys (Lamb’s Ear), Verbascum | Reduces evaporation from leaf surface |
| Fleshy/Succulent Leaves | Water storage in leaf tissue | Sedum, Sempervivum, Agave | Internal reservoir for drought periods |
| Deep Tap Roots | Access deep soil moisture | Eryngium, Echinacea, Lavender | Drought tolerance without surface watering |
| Reduced Leaf Area | Less surface for water loss | Needle-leaved conifers, fine grasses | Minimizes transpiration surface |
| Waxy Coating | Waterproof barrier on stems/leaves | Eucalyptus, many succulents | Conserves internal moisture |
How to Oil Teak Garden Furniture With Non-Toxic Products Safe for Pets?
Maintaining the rich, warm glow of teak furniture is a satisfying garden task, but for pet owners, the choice of treatment is critical. Many conventional teak oils and sealers contain volatile organic compounds (VOCs), chemical solvents, and metallic drying agents that can be harmful if ingested by a curious dog or cat who decides to lick or chew on a freshly treated table leg. Opting for non-toxic, pet-safe products is an essential part of an environmentally and family-conscious garden ‘operating system’.
The safest options are natural, plant-based oils that are 100% free of additives. Pure Tung Oil and Raw Linseed Oil are excellent choices. It’s crucial to choose ‘raw’ or ‘pure’ linseed oil, not ‘boiled’ linseed oil, as the latter often contains petroleum-based solvents or heavy metal catalysts to speed up drying time. These natural oils work by penetrating the wood grain to replenish its natural oils, providing water resistance without forming a synthetic film on the surface.
The application process is simple but requires patience. First, ensure the furniture is clean and completely dry. Lightly sand any weathered areas to open up the wood grain. Apply a thin coat of the pure oil with a clean, lint-free cloth, working it into the wood in the direction of the grain. Let it soak in for about 20-30 minutes, then wipe off all excess oil thoroughly. This last step is vital; any oil left on the surface will become a sticky, tacky mess. Allow the piece to cure for several days in a well-ventilated, dry place before exposing it to rain or use. While these natural oils take longer to dry than their chemical counterparts, the peace of mind in knowing your garden furniture is safe for every member of your family, furry ones included, is well worth the wait.
Key takeaways
- The foundation of a water-wise garden is not just about plants, but about building soil rich in organic matter that can act as a natural reservoir.
- Strategic plant selection is crucial. Choosing plants with visible drought-tolerant adaptations (like silver or hairy leaves) is the key to creating a border that thrives, not just survives.
- A complete ‘garden operating system’ integrates soil health, adaptive planting, and smart water harvesting (like water butts and drip irrigation) to create a resilient, self-sufficient, and colourful ecosystem.
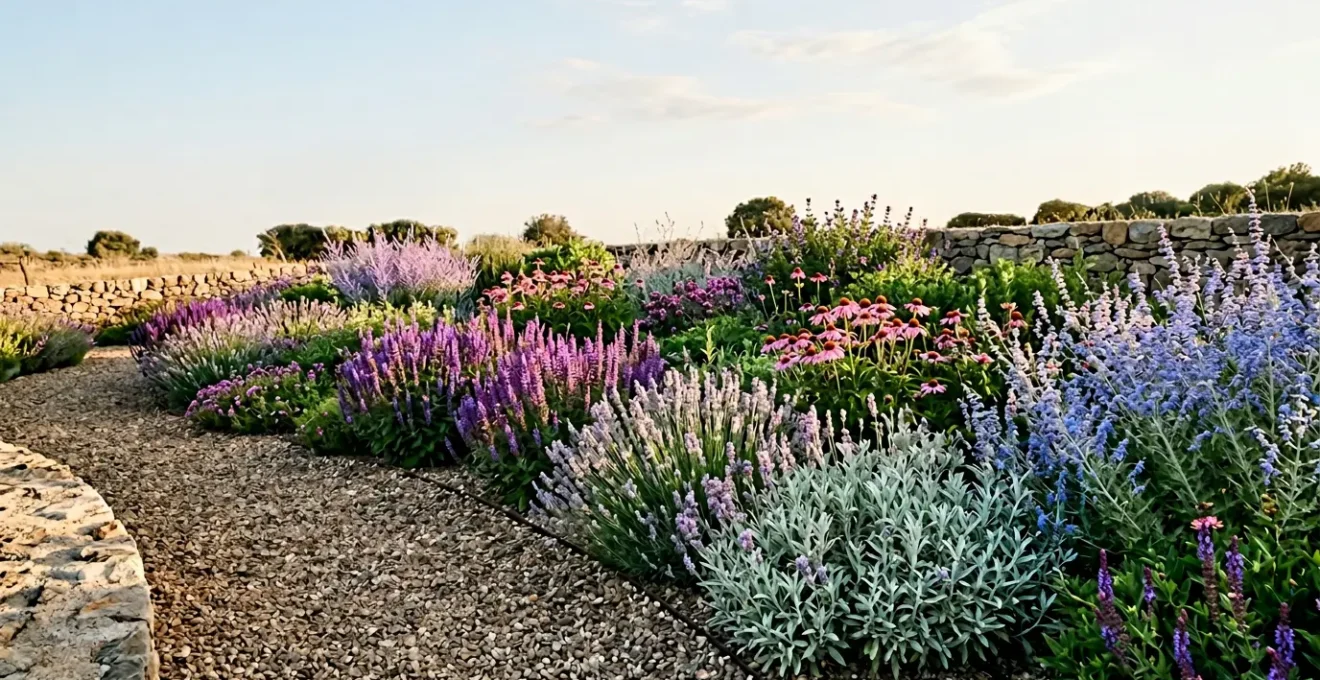
How to Create a Colourful Border That Survives a 6-Week UK Hosepipe Ban?
The ultimate goal of a water-wise garden is not a barren, gravelly landscape, but one that remains lush and vibrant through the driest spells. The secret to achieving continuous colour during a six-week hosepipe ban is not luck; it’s a carefully orchestrated plan. It combines the ‘hydrological foundation’ of great soil with the ‘adaptive planting’ principles we’ve discussed, all arranged in a sequential colour matrix. This is a planting plan designed to ensure that as one plant’s blooms fade, another is just beginning its display, creating a succession of colour from spring to autumn.
This strategy relies on selecting a diverse palette of drought-tolerant perennials and structuring them by height and flowering time. You create layers—low-growing groundcover at the front, mid-level plants in the middle, and tall, architectural plants at the back—and then you choose varieties within each layer that will perform in different months. The result is a dynamic, living tapestry that is always offering something of interest. This approach, detailed in comprehensive guides for drought-tolerant design, moves beyond just surviving and into active, beautiful thriving.
To make this truly resilient, this planting scheme must be paired with an efficient watering system for the initial establishment phase. A modern drip irrigation system, often powered by a water butt, is the final piece of the puzzle. These systems are incredibly efficient, as they can reduce water use by 50-70% compared to traditional sprinklers by delivering water directly to the roots. The following matrix provides a starting point for your own sequential colour plan.
| Month | Groundcover (0-30cm) | Mid-Level (30-90cm) | Tall (90cm+) |
|---|---|---|---|
| May | Sedum (Stonecrop) – succulent foliage | Alliums – purple spheres | Early Eryngium – steel-blue emerging |
| June | Delosperma (Ice Plant) – neon blooms | Salvia nemorosa ‘Caradonna’ – purple spires | Nepeta (Catmint) – blue clouds |
| July | Sempervivum (Hens & Chicks) – rosettes | Achillea (Yarrow) – flat umbels | Echinops (Globe Thistle) – metallic orbs |
| August | Thymus (Thyme) – carpeting flowers | Coreopsis (Tickseed) – golden daisies | Perovskia ‘Blue Spire’ – lavender haze |
| September | Low Sedum ‘Autumn Joy’ – russet tones | Gaillardia (Blanket Flower) – fiery blooms | Late Echinops – architectural seed heads |
By implementing this integrated ‘garden operating system’, you are not just preparing for the next hosepipe ban; you are investing in a beautiful, sustainable, and resilient garden for the future. Start today by assessing your soil and planning your own sequential colour matrix.