In summary:
- Create a seamless transition by focusing on a ‘visual gradient’ of texture and tone, not just direct colour matching.
- Prioritise year-round foliage colour (greys, bronzes, golds) over fleeting flowers to maintain the visual link for 12 months.
- Manage scale and space by using visually ‘light’ furniture and respecting circulation paths to make your garden feel larger.
- Combat the flat UK light by layering textures in similar tones and using black accents to add definition to grey schemes.
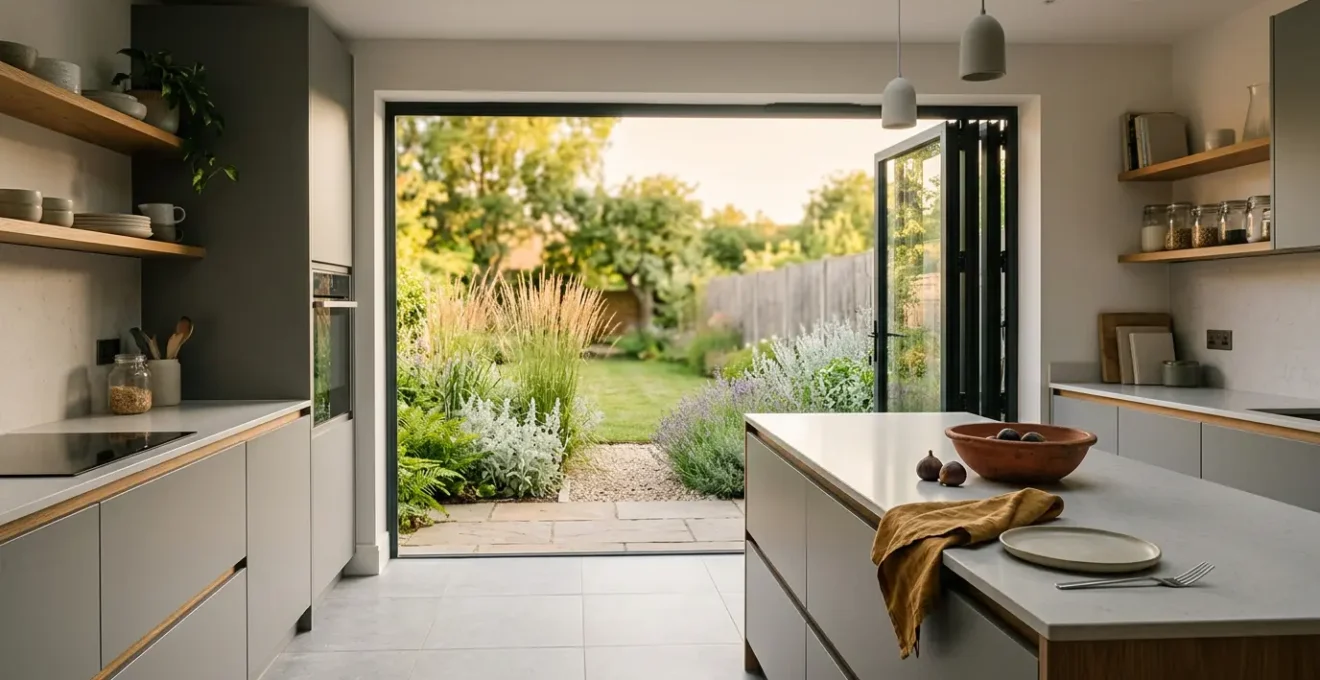
You’ve invested in the dream: a light-filled, open-plan kitchen extension with gleaming bi-fold doors that promise to unite your home and garden. Yet, when the doors are open, something feels wrong. The space doesn’t flow. The expensive indoor tiles seem to argue with the new patio, and the carefully chosen grey kitchen units feel disconnected from the vibrant green of the lawn. This jarring sensation is a common frustration for homeowners, turning the promise of seamless living into a daily aesthetic compromise. Many believe the solution lies in perfect colour matching or simply decluttering the kitchen, but these are superficial fixes.
The real issue is a failure to design the two spaces as one cohesive whole. The secret isn’t about finding the exact same tile for inside and out, or planting flowers that match your scatter cushions. The true art of indoor-outdoor design, especially in the variable light of the UK, is about orchestrating a deliberate visual and sensory gradient. It’s about creating a bridge of texture, light, and scale that dissolves the boundary of the glass, making the garden an authentic extension of your living space.
This guide moves beyond the platitudes to give you a strategic framework. We will deconstruct the common mistakes, from the crucial threshold choice to the scale of your furniture, and provide a holistic approach. We’ll explore how to build a plant palette that works with your interior design year-round, why your open-plan space still feels chaotic, and how to turn a soulless grey new-build into a layered, inviting home that you can enjoy, inside and out, for most of the year.
To help you navigate this design journey, the following sections break down the core principles for creating a truly harmonious indoor-outdoor connection. This structured approach will guide you through each critical decision, ensuring your home and garden finally speak the same visual language.
Summary: Creating a Harmonious Indoor-Outdoor Space
- Why Does Your Indoor Tile Clash With Your Outdoor Paving at the Bi-Fold Doors?
- How to Choose Border Plants That Complement Your Grey-and-Ochre Living Room?
- Porcelain or Natural Stone Paving: Which Matches Indoor Tiles and Survives Frost?
- The Dining-Table Size Mistake That Makes Your Garden Look Smaller Than Your Kitchen
- When to Plant New Borders: Before or After Your Kitchen Extension Is Finished?
- Why Does Your Open-Plan Kitchen-Diner Always Feel Chaotic Despite Decluttering?
- The All-Grey Palette Mistake That Leaves 80% of UK New-Builds Feeling Soulless
- How to Use Your Patio 8 Months a Year Despite British Weather?
Why Does Your Indoor Tile Clash With Your Outdoor Paving at the Bi-Fold Doors?
The threshold is the single most critical point in your indoor-outdoor scheme, and it’s where most designs fail. The common mistake is to focus solely on colour matching, assuming that a similar-toned tile will create flow. However, the different ways that light, and especially British rain, interact with various materials create an inevitable visual clash. A natural stone that looks perfect when dry can darken dramatically when wet, creating a stark, unintended border just when you want the connection most. The problem isn’t just colour; it’s a disconnect in texture, finish, and pattern.
A truly seamless transition is an illusion orchestrated through subtle consistency. The goal is to create a ‘visual gradient’ rather than an abrupt match. This involves thinking about the grout lines, the surface texture, and the material’s performance in all weather conditions. For instance, using the same width and pattern for your grout lines inside and out is a powerful subliminal cue that ties the two spaces together, even if the tiles themselves differ slightly. Similarly, opting for a smoother tile inside and a slightly rougher, non-slip version of the same range outside creates a sensory and practical transition that feels intentional. To be safe for UK weather, experts recommend that outdoor porcelain paving should have an R11 slip rating as a minimum.
Action plan: Achieving a seamless tile transition
- Material Testing: Test material samples outdoors in both wet and dry conditions before committing. Note how natural stone’s colour changes dramatically in rain, while porcelain remains consistent.
- Texture Gradient: Create a subtle gradient by selecting outdoor paving with a slightly rougher finish (minimum R11 rating) than your indoor tile to signal the transition.
- Grout Consistency: Match the grout line thickness and layout pattern (e.g., brick bond, stack bond) across the threshold. Use the same grout width for visual continuity.
- Range Specification: Consider using the same porcelain tile range but specify the indoor (smooth finish) and outdoor (textured finish) versions for a perfect pairing.
- Threshold Concealment: Use recessed threshold channels to hide the physical join, allowing bi-fold doors to sit flush when fully open and creating an unbroken floor plane.
Ultimately, the feeling of a ‘clash’ comes from a lack of holistic planning. By considering these practical and aesthetic details together, you can transform the threshold from a barrier into an invitation.
How to Choose Border Plants That Complement Your Grey-and-Ochre Living Room?
The second common error is treating the garden as a separate decorative project. You don’t need a garden full of fleeting yellow flowers to match an ochre cushion. This approach fails because it ignores the other 10 months of the year and overlooks the most powerful tool for creating a connection: foliage and structure. A successful planting palette creates a sensory bridge by echoing the interior’s colours and textures in a permanent, year-round framework, making the view from your sofa compelling even in the depths of winter.
For a grey-and-ochre scheme, the strategy is to prioritise plants with grey, silver, gold, and bronze foliage. These colours are constant and provide a stable visual link. Think of silvery-grey Stachys byzantina (lamb’s ear) or the architectural seed heads of grasses like Calamagrostis ‘Karl Foerster’, which catch the low autumn light. These aren’t just plants; they are living sculptures that carry the interior aesthetic outside. This concept is about building layers. Introduce golden Japanese forest grass (Hakonechloa macra ‘Aurea’) to subtly echo the ochre tones in spring, and position aromatic grey-leaved herbs like Artemisia near the doors to create a scent bridge that connects with kitchen aromas.

As this view of winter grasses demonstrates, the focus should be on texture and form. The feathery seed heads create intricate patterns against a grey sky, providing more visual interest than a bare flower bed. By choosing plants for their 12-month contribution, you ensure the garden always feels like a considered and integral part of your home’s design, not just an afterthought.
- Winter Structure (Dec-Feb): Plant Stachys byzantina (silvery-grey lamb’s ear) and evergreen grasses like Carex comans ‘Bronze’ for architectural winter interest visible from the sofa.
- Spring Gold (Mar-May): Introduce Hakonechloa macra ‘Aurea’ (golden Japanese forest grass) to echo ochre tones as new growth emerges in soft light.
- Summer Scent Bridge (Jun-Aug): Position aromatic grey-foliaged herbs (Artemisia ‘Powis Castle’, golden oregano) near the bi-fold doors to connect kitchen cooking aromas with the garden.
- Autumn Seed Heads (Sep-Nov): Allow grasses like Calamagrostis ‘Karl Foerster’ to develop architectural seed heads that glow against grey skies.
Porcelain or Natural Stone Paving: Which Matches Indoor Tiles and Survives Frost?
After establishing the principle of a ‘visual gradient’, the practical choice of paving material becomes paramount. For a UK homeowner, the decision between porcelain and natural stone isn’t just aesthetic; it’s a crucial test of durability against our damp, frost-prone climate. Both can be beautiful, but they behave very differently, and understanding these differences is key to a long-lasting, seamless design.
Natural stone, such as slate, sandstone, or limestone, offers undeniable character and unique, naturally occurring patterns. No two slabs are identical, which adds a layer of organic texture. However, its primary drawback is its porosity. Most natural stones absorb water, which has two significant consequences in the UK. Firstly, it can make the stone susceptible to frost damage; water seeps in, freezes, expands, and can cause cracking or flaking over time. Secondly, as mentioned, it causes the colour to darken significantly when wet, disrupting the visual continuity with your indoor floor.
Porcelain paving, on the other hand, is a manufactured product specifically engineered for performance. Its key advantage is its extremely low porosity. Because high-quality outdoor porcelain typically has 0.5% or less water absorption, it is virtually impervious to water. This makes it frost-proof and resistant to staining and algae growth. Crucially, its colour remains stable whether wet or dry, ensuring the visual connection to your interior is maintained regardless of the weather. Furthermore, modern porcelain can convincingly replicate the look of natural stone, wood, or concrete, offering aesthetic variety without the maintenance headache. The ability to find a range with both a smooth indoor finish and a textured, high-slip-resistance (R11) outdoor finish makes it the superior technical choice for achieving a truly seamless and durable indoor-outdoor link.
The Dining-Table Size Mistake That Makes Your Garden Look Smaller Than Your Kitchen
Once you’ve perfected the floor and the planting, there’s one more element that can shatter the illusion of space: furniture. The most common mistake is choosing an outdoor dining set that is too large and visually ‘heavy’ for the patio. A bulky, solid table and chairs can act like a visual wall, instantly stopping the eye and making the garden feel cramped and disconnected from the kitchen it’s meant to extend. The goal is not just to have a place to sit, but to preserve the feeling of openness you’ve worked so hard to create.
The solution lies in two principles: visual permeability and respect for circulation. First, choose furniture you can see through. ‘Leggy’ designs with slim tops and slender legs, or sets made from woven materials or metal slats, have low visual mass. They allow your eye to travel past them to the garden beyond, creating an illusion of more space. The ‘ghost furniture’ rule is also effective: in a typical UK garden with grey fences or brick walls, choosing a dark grey or black metal set allows it to recede into the background, making it feel less intrusive.
Second, and most critically, you must enforce proper circulation paths. A beautiful table is useless if you can’t walk around it comfortably. As a rule of thumb, UK design experts recommend 90cm minimum clearance between the edge of a table and any wall, fence, or other obstacle. This allows a person to walk past comfortably, even when someone is seated. Failing to leave this space creates a ‘trapped’ feeling, psychologically shrinking the area and discouraging its use. Before you buy, measure your patio and mark out the furniture footprint with its circulation path to ensure it truly fits the space.
- Choose ‘Leggy’ Designs: Select tables with slender legs and thin tops that allow you to see the garden through and beyond them, reducing their visual weight.
- Apply the ‘Ghost Furniture’ Rule: Opt for dark grey or black metal sets that recede against common UK garden backdrops like fences and walls.
- Enforce the 90cm Circulation Path: Ensure a minimum of 90cm of clear space around your dining set for comfortable movement, preventing the patio from feeling cramped.
When to Plant New Borders: Before or After Your Kitchen Extension Is Finished?
The question of timing is a major source of anxiety for homeowners undertaking an extension. Do you risk planting beautiful new borders only for them to be trampled by builders, or do you wait and live with a muddy building site for months? The strategic answer is a phased approach that protects existing assets and budgets for new planting in manageable stages. The single biggest mistake is failing to protect what you already have.
Before any work begins, your first action should be to identify and protect your most valuable garden assets. This includes any mature trees, established shrubs, or even a neighbour’s tree that provides a beautiful ‘borrowed landscape’ view. These elements are irreplaceable and add more value and maturity to a small UK garden than any amount of new planting. Work with your builders to erect protective fencing around the root zones of these key features. This is non-negotiable.
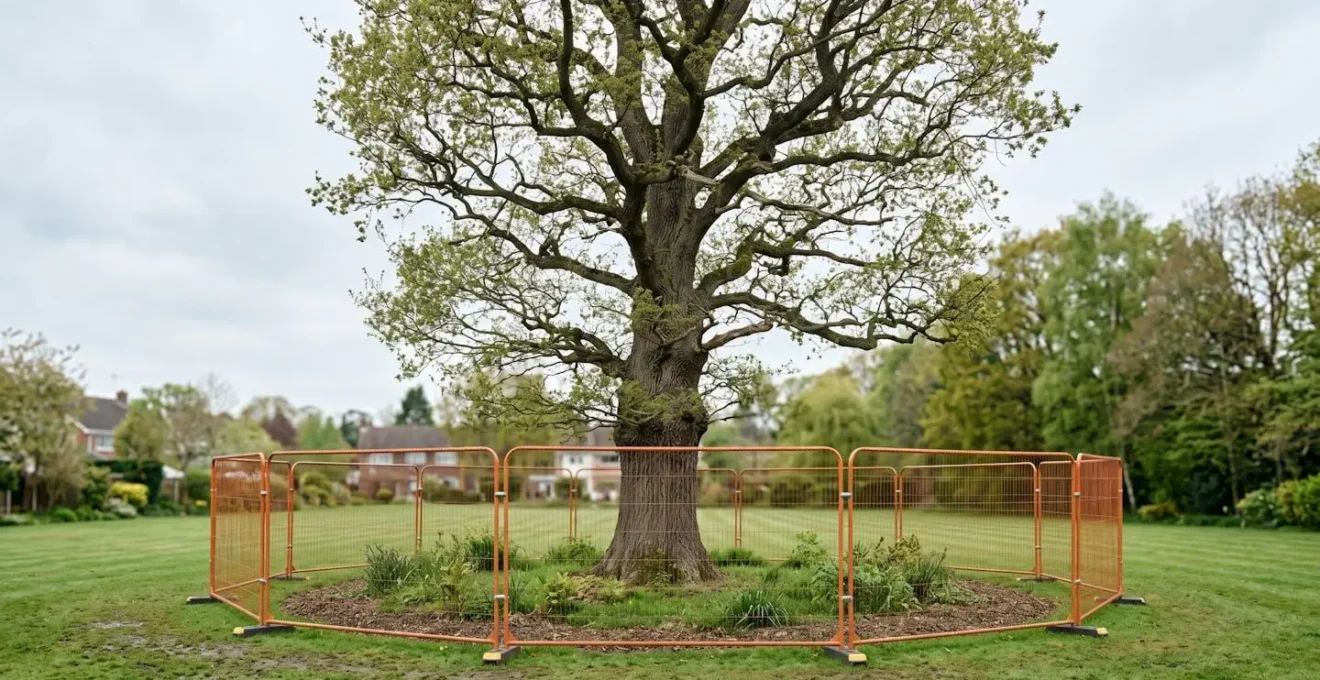
Once the build is complete, the first step is not planting, but soil remediation. Heavy machinery will have compacted the soil, making it impossible for new plants to thrive. You must budget to break up this compacted soil and incorporate organic matter. Only then can you begin the phased planting. In the first year (ideally the spring after the build finishes), focus on planting ‘The Bones’ of the garden: the structural evergreen shrubs, architectural grasses, and small trees that provide the year-round framework. This should account for about 60% of your planting budget. In the second year, you can add ‘The Flesh’: the perennials, ground cover, and seasonal bulbs. This staged approach makes the cost more manageable and allows you to live with the space and see how you use it before committing to the final details.
Why Does Your Open-Plan Kitchen-Diner Always Feel Chaotic Despite Decluttering?
You’ve decluttered relentlessly. Every surface is clear, yet the open-plan kitchen-diner still feels noisy, busy, and somehow chaotic. This common feeling isn’t a sign you need more storage; it’s a symptom of a lack of psychological and sensory zoning. In a traditional house, walls, doors, and different floor levels provide subconscious cues that separate the function of each room. In an open-plan space, these boundaries are removed, and without them, our brains perceive the entire area as one single, multitasking, and often overwhelming zone.
The solution is to subtly reintroduce these boundaries without building walls. This is achieved through clever visual and sensory tricks that define ‘rooms within a room’. Large, tactile rugs are the most powerful tool; a rug placed under the dining table and chairs clearly anchors the ‘dining room’, while a different, softer rug can define the ‘living zone’. These create distinct islands of activity. Similarly, lighting can act as a ceiling marker. A cluster of pendants over the kitchen island signals a work zone, a linear fixture defines the dining table, and soft table lamps create an intimate seating area.
Furniture arrangement is also key. The back of a sofa can be a highly effective, low-level ‘wall’, creating a clear but permeable division between the cooking and relaxing zones. Finally, don’t underestimate the impact of sound. UK extensions are often filled with hard surfaces—tiles, glass bi-folds, stone worktops—that cause sound to bounce around, creating a cacophony that contributes to the feeling of chaos. Introducing soft materials to absorb sound is essential. This can include large rugs, fabric Roman blinds instead of hard rollers, and even acoustic panels disguised as wall art. By calming the space acoustically, you restore a sense of order and tranquility that decluttering alone can never achieve.
- Visual Zoning with Rugs: Use large rugs to anchor distinct ‘rooms without walls’, creating psychological boundaries for dining and living zones.
- Lighting as Ceiling Markers: Install different pendant styles or heights to signal zone changes between cooking, dining, and living areas.
- Furniture Grouping for Flow: Arrange furniture, like positioning a sofa with its back to the kitchen, to create natural pathways and subtle divisions.
- Acoustic Solutions: Add soft materials like rugs, fabric blinds, and even acoustic wall panels to absorb sound and reduce the chaotic echo common in hard-surfaced spaces.
The All-Grey Palette Mistake That Leaves 80% of UK New-Builds Feeling Soulless
Grey has been the go-to neutral for a decade, and for good reason: it’s sophisticated and versatile. But there’s a downside. An all-grey scheme, especially in the UK’s often soft and flat natural light, can look flat, cold, and utterly soulless. When your grey kitchen, grey floor, and grey walls meet a grey sky through your bi-fold doors, the result is a monotonous landscape that lacks depth and personality. This is the single biggest aesthetic trap in modern UK extensions.
The antidote is not to abandon grey, but to treat it as a canvas that requires layers of texture, a ‘bridge’ colour, and sharp punctuation. First, to combat the flat light, you must layer multiple textures within the same grey family. Inside, this means a chunky grey knit throw on a smooth grey sofa, rough-hewn grey slate coasters, or a wooden bowl with a grey wash. Outside, this translates to silvery-grey foliage from plants like Artemisia. This creates depth and shadow, making the grey feel rich rather than dull. This approach aligns with broader shifts in design, as 2024 UK design trends show a move towards warm, saturated jewel hues and away from flat neutrals, indicating a collective desire for more depth and character.
Second, introduce a ‘bridge’ colour. This is a warm, natural tone—like ochre, terracotta, or a warm timber—that acts as a mediator between the cool grey interior and the vibrant green of the garden. A timber-topped dining table, terracotta pots on the patio, or an ochre art print are enough to warm up the entire scheme and prevent the jarring jump from monochrome to nature. Finally, use black as punctuation. Sharp black accents—in Crittall-style door frames, picture frames, light fittings, or even black-stemmed plants like Ophiopogon—give the grey scheme crisp definition. It stops the different shades of grey from blurring into a single, monotonous fog and gives the whole space a more graphic, intentional feel.
Key takeaways
- Transition from inside to out with deliberate texture gradients, not just by matching colours, for a more sophisticated flow.
- Create a year-round visual connection by prioritising the permanent structure and colour of architectural foliage over fleeting seasonal flowers.
- Preserve the illusion of space by using ‘leggy’ or dark-coloured outdoor furniture that possesses low visual weight.
How to Use Your Patio 8 Months a Year Despite British Weather?
You’ve created the perfect visual flow, but what’s the point if you can only enjoy it on a handful of warm, sunny days? The final step in creating a truly successful indoor-outdoor space in the UK is to make the ‘outdoor’ part usable for as long as possible. The goal is to transform your patio from a summer-only accessory into a functional ‘outdoor room’ you can comfortably use from March through to October. This is a priority for many, as recent industry data shows that over 50% of UK homeowners are undertaking renovation projects, with extended living space being a key driver.
Achieving this requires a strategic investment in three key areas: effective heat, layered lighting, and weatherproof convenience. First, heating must be functional, not just decorative. While a fire pit creates a lovely atmosphere, wall-mounted infrared heaters provide targeted, smoke-free warmth that makes sitting out on a crisp spring or autumn evening genuinely pleasant. Position them at seating height for maximum effect. Second, implement task-specific lighting zones. Dimmable downlights for dining, a directional reading light by a comfortable chair, and low-level ambient path lighting transform the patio from a ‘daylight only’ space into a functional evening environment.
Finally, convenience is king. If accessing outdoor cushions and throws is a chore, you simply won’t bother on a whim. Invest in smart, weatherproof storage like a built-in bench with a lift-up lid or a cedar chest. Quick access encourages spontaneous use. To take it one step further, identify or create your garden’s ‘sun trap’—a spot sheltered from the prevailing wind that captures the low spring and autumn sun. A retractable awning, a glass balustrade, or some pleached hedging can create a microclimate that extends your outdoor season by weeks. Even planting a winter-fragrant shrub like Sarcococca (Christmas Box) near the door maintains the sensory connection, rewarding you with beautiful scent every time you open the door for fresh air, even when it’s too cold to sit out.
Start by auditing your current space. Step outside with a notepad and identify your ‘sun trap’, your key views, and your biggest weather-related frustrations. This simple first step is the foundation of your new eight-month-a-year outdoor room.