The secret to transforming a generic new-build isn’t about spending more on decor, but investing smarter in foundational elements that build character from the ground up.
- Prioritise flooring and a single ‘hero’ furniture piece to add lasting value and define your open-plan space.
- Combat the ‘grey echo’ with layers of texture and material warmth, not just random pops of colour.
- Address the root causes of chaos, like poor acoustics and visible tech, to create a truly serene home.
Recommendation: Focus your budget on changes that are difficult to make later. Think like an architect, not just a decorator, to give your home a soul that reflects you and impresses future buyers.
You have the keys. The excitement of owning your first home, a pristine UK new-build, is immense. But as the boxes are unpacked, a quiet uniformity sets in. The same grey carpets, the same standard-issue kitchen, the same open-plan layout as every other house on the development. The immediate advice is always the same: add personality with cushions, paint a feature wall, buy some colourful art. While these touches have their place, they are often cosmetic layers on a foundation that remains generic.
This approach fails to address the core issue. True character isn’t just painted on; it’s architected in. The feeling of a home with soul comes from deeper, more structural decisions that influence how the space functions, feels, and even sounds. What if the key to unlocking your home’s potential wasn’t in spending a fortune on fleeting trends, but in making strategic, foundational investments that have a cascading effect on both your daily life and the property’s future resale value?
This guide moves beyond the superficial. We will empower you to think differently about your space, exploring the high-impact decisions that make the biggest difference. We’ll dissect why your expensive kitchen can still feel cheap, how a single piece of furniture can anchor an entire floor, and why tackling acoustics is more important than decluttering. Prepare to make smart, creative choices that transform your cookie-cutter box into a home that is uniquely, authentically yours.
To guide you through this transformation, we’ve structured this article to address the most pressing questions new-build owners face. The following sections provide a clear roadmap for making impactful, budget-conscious decisions.
Summary: A Strategic Guide to Personalising Your New-Build
- Why Do New-Build Kitchens Look Cheap Despite Costing £8,000 Fitted?
- How to Choose One Hero Furniture Piece That Anchors Your Entire Ground Floor?
- Developer Carpet Upgrade or DIY Engineered Wood: Which Adds More Resale Value?
- The All-Grey Palette Mistake That Leaves 80% of UK New-Builds Feeling Soulless
- When to Replace Flooring: Before or After Your 2-Year NHBC Warranty Expires?
- Why Does Your Open-Plan Kitchen-Diner Always Feel Chaotic Despite Decluttering?
- How to Choose a Smart Meter Display That Talks to Your Home Automation System?
- How to Hide Smart Home Tech So Your Living Room Looks Like a Home, Not a Showroom?
Why Do New-Build Kitchens Look Cheap Despite Costing £8,000 Fitted?
The £8,000 developer kitchen is a common source of frustration. You’ve paid a significant sum, yet the result often feels underwhelming and lacks the premium quality you envisioned. The core of the problem lies in the economics of mass development and a misunderstanding of where value truly lies in a kitchen. That developer price tag is a world away from the cost of a bespoke project; a 2024 UK Houzz study revealed that the median spend on a kitchen renovation has risen to £17,500.
So, why the cheap feel? It comes down to three factors. First, mass-produced cabinetry uses standard, inflexible sizes, leading to awkward gaps filled with oversized plastic plinths and plain filler panels. Second, the hardware is basic; thin laminate worktops, flimsy handles, and low-grade hinges and drawer runners betray the cost-cutting. Finally, the layout is often inefficient, designed for ease of installation across multiple plots rather than for ergonomic use in your specific home. There’s a lack of architectural empathy in their design.
However, you don’t need a full replacement. The key is strategic upgrading. Focus your budget on the elements you touch and see most. Replacing the worktops with a slim-profile laminate, solid wood, or quartz can instantly elevate the entire room. Changing handles to a heavier, more tactile material like brushed brass or matte black adds a custom feel. Finally, consider adding or replacing a few key doors with a complementary colour or style, or painting the existing ones with a durable cabinet paint to break the monotony. These are foundational investments that deliver a high-end feel for a fraction of the cost of a full refit.
How to Choose One Hero Furniture Piece That Anchors Your Entire Ground Floor?
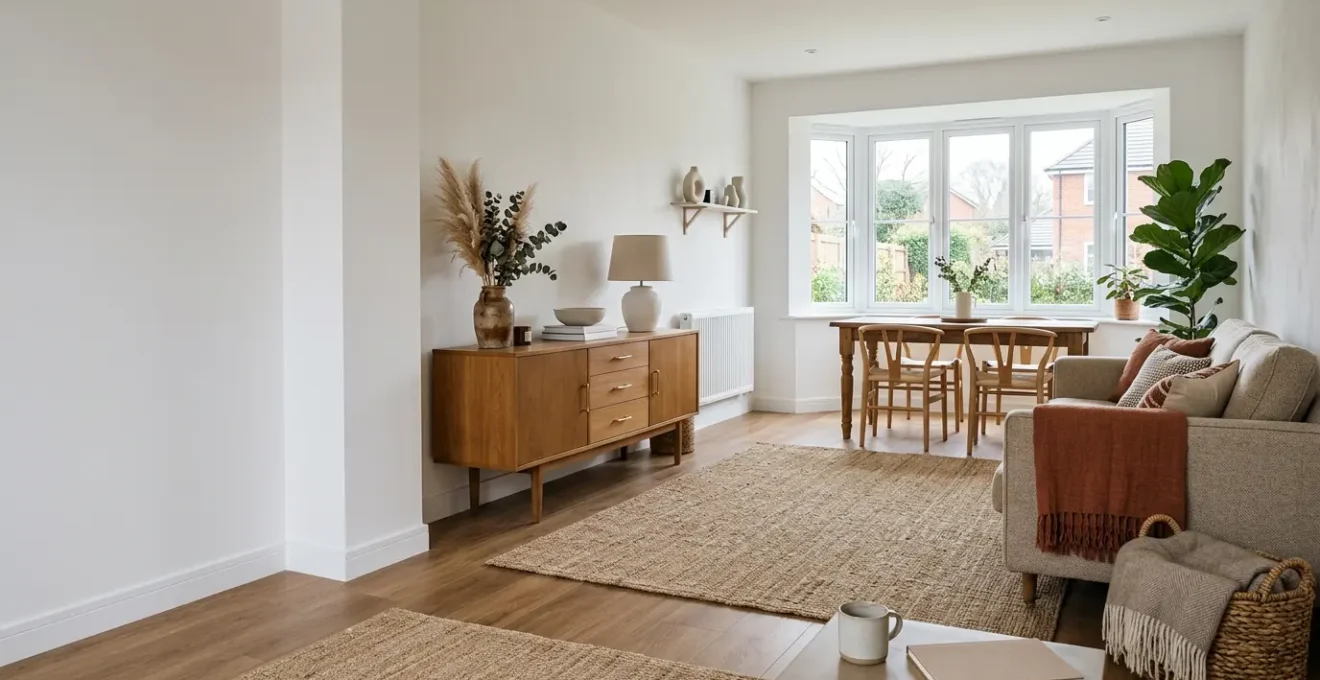
In the vast, undefined space of a new-build open-plan ground floor, furniture can feel like it’s floating aimlessly. The common mistake is to buy several small, disconnected pieces. The empowering, strategic solution is to invest in one significant ‘hero’ piece that provides both aesthetic and functional anchorage. This isn’t just a « statement piece »; it’s a hardworking anchor that creates systemic cohesion across zones.
This hero piece acts as a visual and practical bridge between the kitchen, dining, and living areas. A long, low sideboard or a large console table is the perfect candidate. Placed strategically, it can define the edge of a living or dining zone without a wall, creating a subtle psychological boundary. Its surface provides a curated display space that ties the different areas together, while its mass gives the entire floor a much-needed focal point and sense of permanence.

As the illustration demonstrates, the hero piece works in tandem with other elements like a large area rug to create distinct zones. When choosing your piece, consider its three key attributes: scale, material, and function. The scale must be generous enough to hold its own in the open space. The material should introduce texture and warmth—think rich wood, or a finish that complements the kitchen cabinetry. Functionally, it should solve a problem, whether it’s providing closed storage to hide clutter, or an open surface to act as a bar or serving station when entertaining. This single, smart investment does more to structure your ground floor than a dozen smaller items.
Developer Carpet Upgrade or DIY Engineered Wood: Which Adds More Resale Value?
One of the first major decisions a new-build buyer faces is flooring. Do you accept the standard-issue carpet, pay the developer’s premium for a slightly better one, or take the credit and tackle it yourself post-completion? When viewed through the lens of resale value, the answer becomes much clearer. While a plush carpet feels nice underfoot, it’s a highly personal choice that rarely adds significant value. Hard flooring, particularly wood, is consistently seen by buyers as a premium feature.
Making a foundational investment in quality flooring like engineered wood is one of the smartest financial decisions you can make. It immediately elevates the perception of the entire property, making it feel more permanent and luxurious than the sea of developer-grade carpet next door. This isn’t just opinion; it’s reflected in property valuations. Buyers are willing to pay more for a home that already has durable, attractive hard flooring installed. The following table breaks down the typical options, highlighting the clear winner for long-term value.
| Flooring Type | Typical Cost (per m²) | Resale Impact | Best For | NHBC Risk |
|---|---|---|---|---|
| Developer Carpet Upgrade | £25-£40 | Low to Neutral | Bedrooms in starter homes | None (warranty safe) |
| Engineered Wood (DIY) | £30-£60 | Moderate to High | Living areas, executive homes | Medium (subfloor warranty risk) |
| Luxury Vinyl (LVT) | £20-£45 | Moderate | Kitchens, high-traffic areas | Medium (installation-dependent) |
| Solid Hardwood (Professional) | £60-£120+ | Highest (1-10% value) | Premium properties, main reception | High (major alteration) |
As analysis on home resale value shows, the initial outlay for engineered or solid wood is higher, but the return on investment is undeniable. It transforms the aesthetic, provides superior durability for open-plan living, and is a major selling point. Opting for the developer’s carpet upgrade is the safe choice, but choosing to invest in wood flooring yourself is the smart one.
The All-Grey Palette Mistake That Leaves 80% of UK New-Builds Feeling Soulless
The ubiquitous all-grey interior has become the modern equivalent of the old « magnolia box. » While intended to be a neutral and sophisticated blank canvas, a one-dimensional grey palette often creates a flat, lifeless, and cold environment. It lacks the depth and warmth that make a house feel like a home. The good news is that this is recognised, with interior design experts confirming a major trend shift for 2024 away from monotonous grey and towards warmer, earthy tones.
But what if you’ve already inherited a sea of grey? The solution isn’t to frantically paint over it with random colours. The sophisticated approach is to work *with* the grey, transforming it from a flat backdrop into a rich, layered foundation. This is achieved not through colour, but through texture and material warmth. You need to create what designers call « architectural empathy, » making the space feel considered and tactile. The goal is to evolve your grey base into a more complex « Post-Grey » palette.
Instead of a single feature wall, think about a cohesive strategy that adds depth and interest throughout the space. The « Tone-on-Tone-on-Texture » method is a powerful way to achieve this:
- Layer multiple grey shades: Use a light grey on walls, a mid-tone grey on larger furniture like a sofa, and reserve a dark charcoal grey for small accents like trim or photo frames to create visual depth.
- Add architectural shadow: Install simple, modern wall panelling or moulding and paint it the exact same grey as the wall. This creates texture and dimension through the play of light and shadow, a subtle but highly effective trick.
- Introduce natural material warmth: This is the most crucial step. Pair your grey scheme with the warmth of oak or walnut wood tones, the softness of natural linen or wool textiles, and the organic feel of stone or ceramic textures. These materials counteract the coldness of grey.
- Vary surface finishes: Combine different sheens to create interest. A matte finish on the walls can be beautifully contrasted with velvet upholstery, a chunky wool throw, brushed metal lamp bases, and glossy ceramic accessories.
When to Replace Flooring: Before or After Your 2-Year NHBC Warranty Expires?
You’ve decided to invest in beautiful engineered wood flooring—a fantastic choice for value and aesthetics. But a critical question of timing arises, tangled with the complexities of the National House Building Council (NHBC) warranty. Should you do it immediately, or wait until the initial two-year builder’s defect warranty expires? Acting too soon could risk voiding parts of your warranty, but waiting means living with flooring you dislike.
The core principle of the NHBC warranty is crucial to understand. It covers defects in the builder’s workmanship for two years, and major structural issues for a further eight. As an analysis of NHBC warranty implications for alterations highlights, modifying your home doesn’t automatically void the entire warranty. However, the builder is no longer responsible for any problems *caused by your alteration*. If your new flooring installation damages the screed, introduces a damp issue, or blocks ventilation, the cost of rectifying that damage falls squarely on you. You are altering at your own risk.
This places the burden of proof on the homeowner. To proceed with confidence before the two-year mark, you must meticulously document everything. This protects you if an unrelated issue, like a major screed crack, appears later. You need to be able to prove it wasn’t caused by your flooring installers. This requires a systematic approach to risk mitigation.
Your Flooring Warranty Risk Mitigation Checklist
- Document pre-installation: Thoroughly photograph and video the existing subfloor and screed from multiple angles. Capture any existing hairline cracks or imperfections before any work begins. This is your baseline evidence.
- Verify screed curing: Ensure the subfloor is ready. Allow a minimum of one week per inch of thickness for concrete screeds and at least 21 days for sand-cement screeds to fully cure and dry before installing any non-breathable flooring.
- Use certified installers with their own warranty: Choose a reputable flooring company that provides its own insurance-backed warranty covering workmanship and any potential damage to the subfloor, not just a warranty on the flooring product itself.
- Prioritise a low-risk test area: If possible, test your approach and your chosen installer in a small, low-risk area like a downstairs WC or utility room before committing to the large, expensive open-plan ground floor.
- Keep all NHBC documentation: Maintain a complete file of all your NHBC inspection reports, correspondence, and completion certificates. This documentation may be vital if a future claim requires proving the pre-existing condition of the property.
Why Does Your Open-Plan Kitchen-Diner Always Feel Chaotic Despite Decluttering?
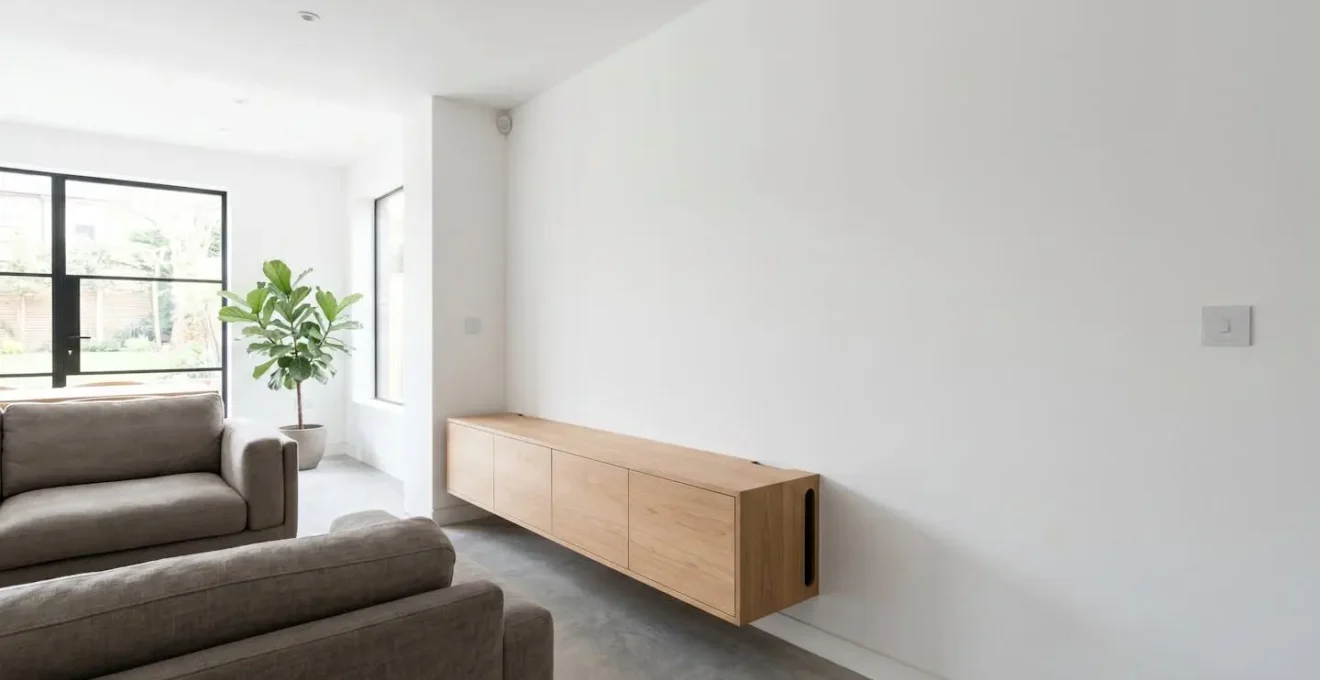
You’ve KonMari’d your surfaces and hidden every piece of clutter, yet your open-plan kitchen-diner still feels relentlessly chaotic and stressful. The problem often isn’t visual mess; it’s acoustic chaos. New-builds are a perfect storm of hard, reflective surfaces: plasterboard walls, laminate or LVT flooring, and glass doors. Sound from the clattering of pans, the whir of the extractor fan, and the television all bounce around the single large volume, creating a jarring, stressful soundscape.
Your brain has to work overtime to filter this sonic assault, leading to a subconscious feeling of anxiety and disorder. The solution is to introduce ‘acoustic texture’—soft, absorbent materials that soak up sound waves instead of reflecting them. This is about designing for the ear as much as the eye. By layering different sound-absorbing textiles, you can sculpt a calmer, more serene environment without building a single wall.

This close-up view shows how different textures work together to absorb sound. A thick rug with a quality underlay is the single most effective first step. Beyond that, consider fabric-backed dining chairs instead of hard wood or plastic. Heavy, lined curtains or fabric blinds do double duty, adding softness and blocking sound from outside. You can even hang large, textile-based art or dedicated acoustic panels on walls to make a significant difference. Combining these elements dampens the echo and creates a more intimate, zoned feeling, allowing for conversation in one area while someone else watches TV in another without a cacophony.
To truly reclaim your space from chaos, a multi-layered approach is needed. These ‘broken plan’ strategies help to define zones both visually and acoustically:
- Create acoustic zones: Install open-backed shelving units (like an IKEA KALLAX) between the kitchen and living areas. They absorb and diffuse sound without completely blocking light or sightlines.
- Layer sound-absorbing textiles: Combine a thick area rug with a high-performance acoustic underlay, choose fabric-backed dining chairs, and install heavy curtains or blinds.
- Use three-tier lighting: Install separate lighting circuits with dimmers for the cooking zone (task lighting), dining zone (ambient lighting), and living zone (mood lighting). Using light levels to visually separate areas is a powerful psychological trick.
- Establish functional stations: Contain the clutter of daily life by creating dedicated spots—a coffee station on the kitchen counter, a mail-drop zone by the door, and a tech-charging drawer—to prevent it from sprawling.
- Reorient around natural paths: Observe how you naturally walk through the space (e.g., from the kitchen to the garden door). Position furniture to respect these subconscious desire lines, ensuring the flow feels easy and unobstructed.
How to Choose a Smart Meter Display That Talks to Your Home Automation System?
As you make your new-build smarter, you’ll quickly encounter a frustratingly closed-off piece of tech: the In-Home Display (IHD) for your smart meter. This small screen, provided by your energy supplier, shows your real-time usage. However, it’s typically a dead end. It’s designed as a simple visual aid and almost never offers a way to export its data to more powerful home automation systems like Home Assistant, Apple HomeKit, or Google Home.
This deliberate limitation prevents you from creating truly intelligent automations, such as turning off high-draw appliances when your energy tariff is expensive or getting detailed historical usage graphs. You’re left with a ‘dumb’ smart display. The key to unlocking this data lies in bypassing the supplier-provided IHD entirely and connecting directly to the source: the UK’s national smart meter network, known as the Data Communications Company (DCC).
You need a third-party device that is authorised to connect to the DCC and equipped with a local API or MQTT capabilities. This allows it to securely pull your home’s energy data and make it available on your local network for your home automation hub to use. As the UK home automation community often discusses, this is the only real way to gain control.
Most supplier-provided displays are designed to work only within their own ecosystem. Third-party solutions like Hildebrand’s Glow IHD use the open DCC network to liberate your data.
– UK Home Automation Community, Smart Home Integration Discussion Forums
When choosing a device, search for terms like « DCC CAD » (Consumer Access Device) and check for compatibility with your specific home automation platform. Brands like Hildebrand (with their Glow IHD and CAD) are well-regarded in the UK for providing exactly this functionality. It’s a small, one-time investment that transforms your smart meter from a simple display into the central data source for a truly smart, energy-efficient home.
Key Takeaways
- Invest Structurally, Not Superficially: Prioritise your budget on foundational elements like flooring and key furniture that add tangible resale value and define the space.
- Texture is the Antidote to ‘Grey’: Combat the cold, flat feeling of modern palettes by layering varied materials—wood, wool, linen, metal—to create warmth and depth.
- Solve for Sound, Not Just Sight: In open-plan living, a sense of chaos is often caused by poor acoustics. Use soft furnishings like rugs, curtains, and fabric-backed chairs to absorb sound and create calm.
How to Hide Smart Home Tech So Your Living Room Looks Like a Home, Not a Showroom?
The final step in personalising your new-build is mastering the art of invisible integration. You’ve invested in smart lighting, voice assistants, and streaming devices, but now your living room is a tangle of wires, black boxes, and blinking LEDs. It looks less like a serene home and more like a tech showroom. The ultimate goal is for the technology to be felt but not seen, allowing the architectural and decorative elements of your home to take centre stage.
This requires moving beyond simply placing devices on shelves. It’s about thinking architecturally to conceal, recess, and blend technology into the fabric of the home. This can range from simple DIY hacks to more involved solutions. For example, motion sensors can be painted the same colour as your walls to become virtually invisible. Smart speakers can be hidden inside woven baskets or behind strategically placed photo frames (as long as the microphone isn’t obstructed). The most elegant solutions often involve modifying furniture to create dedicated, ventilated homes for your tech.
Achieving this clean, uncluttered look is surprisingly accessible, especially with budget-friendly and customisable furniture. IKEA units, for instance, are a blank canvas for clever tech concealment modifications. With a few simple tools, you can transform a standard media unit into a bespoke piece of integrated furniture.
- IKEA BESTA hack: Use a 50mm hole saw to drill cable management holes in the rear panel of a BESTA cabinet. Mount a surge-protected power strip to the inside back wall, containing all plugs and transformers neatly out of sight.
- Add smart ventilation: If you’re housing heat-generating equipment like a games console or AV receiver, install small, quiet PC-style ventilation fans (40mm or 80mm) in the top or rear panel, controlled by a smart plug, to prevent overheating.
- Create removable back panels: For easy access to cables, replace the flimsy hardboard back of a unit with a panel attached by magnetic catches or clips. This allows you to manage wiring without having to move the entire unit.
- Paint to integrate: For the ultimate built-in look, paint the media unit the same colour as your wall. This makes the furniture recede visually, feeling more like part of the room’s architecture.
- Install motion-activated lighting: Add motion-activated LED strip lighting inside the cabinets. This keeps the equipment dark and hidden when the doors are closed, but illuminates everything for easy access when you open them.
Start planning your foundational changes today to begin the journey of transforming your new-build from a generic property into a home with genuine character and lasting value.