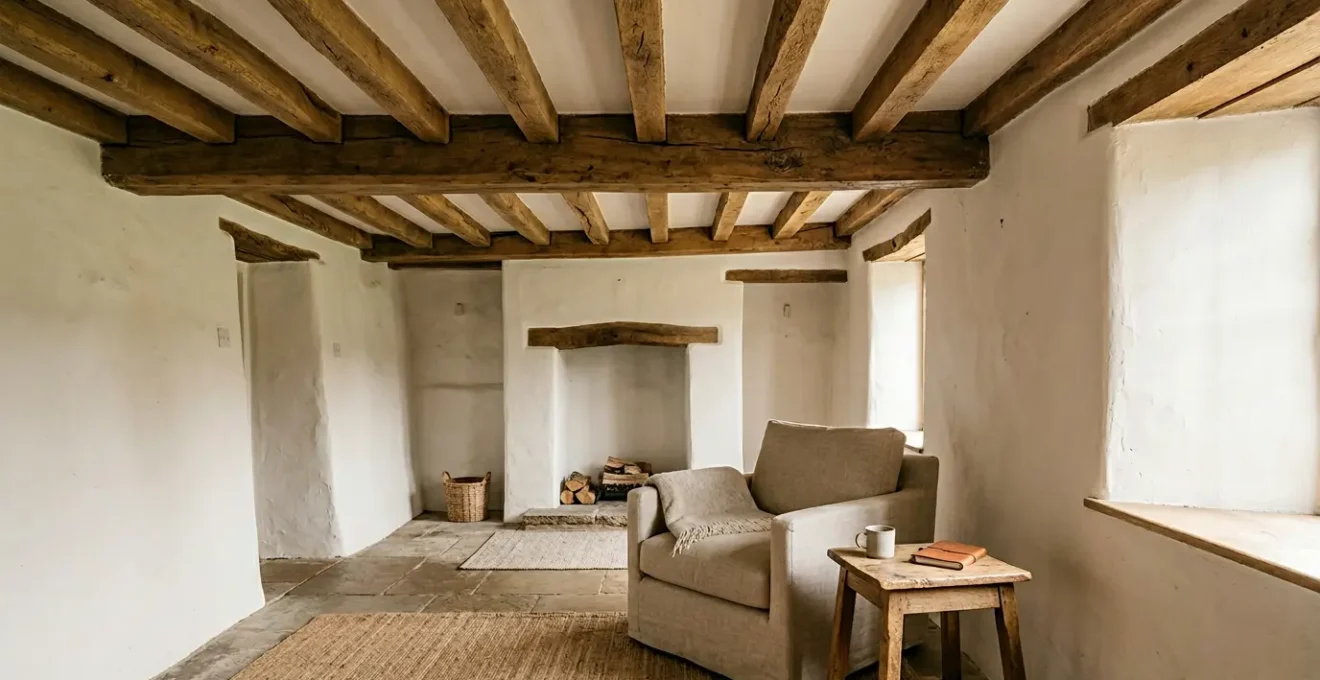
The key to celebrating dark beams in a low-ceiling cottage isn’t to paint them white, but to architecturally manage light and shadow to create an illusion of height and space.
- Treat the ceiling and walls as continuous « planes of light » that the beams intersect, rather than being obstructed by them.
- Establish a clear visual hierarchy, deciding if the beams are the main feature or a supporting element, and decorate accordingly to avoid clutter.
Recommendation: Instead of focusing only on the beams, assess and refine the Light Reflectance Value (LRV) of all surrounding surfaces—ceilings, walls, and floors—to amplify natural light and visually lift the space.
The owner of a characterful cottage faces a classic preservationist’s dilemma. You fall in love with the history etched into the original ceiling beams, yet live with the nagging feeling that their dark, heavy presence makes your low-ceilinged rooms feel cramped and oppressive. The immediate, almost instinctive reaction is to solve the problem with the most obvious tools: a pot of white paint to erase the darkness, or a collection of spotlights to wage a brute-force war against the shadows. These solutions are not wrong, but they are often a missed opportunity.
As a heritage restoration architect, I invite you to see this not as a problem to be solved, but as a design prompt. The true art lies not in concealing these structural elements, but in choreographing them. What if, instead of fighting the darkness, we made it a deliberate feature in a sophisticated play of light? The secret is to treat the beams as integral parts of the architecture, manipulating visual planes, managing focus, and celebrating material honesty to expand the perception of space. It’s about making a room feel lighter and taller, without sacrificing the very character you cherish.
This guide moves beyond simple fixes. We will explore how a consistent architectural philosophy can be applied to every structural decision in your home—from the curve of a hallway arch to the raw finish of a steel support—transforming potential problems into the defining, beautiful features of a modern, yet historically respectful, UK home.
To navigate this architectural journey, this article breaks down how to handle key structural elements as integral parts of your home’s design. The following sections provide detailed insights into turning potential challenges into celebrated features.
Summary: An Architect’s Philosophy on Integrating Structure into UK Home Design
- Why Does Your Hallway Feel Narrower After Adding a Statement Arch?
- How to Install a Steel RSJ for an Open-Plan Conversion Under UK Building Regs?
- Matte, Eggshell or Satin: Which Finish Makes Cornicing Pop in a North-Facing Room?
- The Feature-Overload Mistake That Makes Georgian Townhouses Feel Cluttered
- When to Reveal Hidden Fireplaces: Before or After Rewiring in a UK Renovation?
- How to Match Japandi Aesthetics to a Victorian Terrace Without Clashing?
- How to Choose Between NHL 2, NHL 3.5 and NHL 5 Lime for Your Stone Walls?
- How to Apply Lime Plaster in a Damp Stone Cottage Without It Crumbling?
Why Does Your Hallway Feel Narrower After Adding a Statement Arch?
The intention behind adding a statement arch is often to create a grand, inviting transition. Yet, sometimes the result is the opposite: the hallway suddenly feels constricted, the arch becoming a point of congestion rather than an elegant gateway. This phenomenon isn’t an illusion; it’s a predictable outcome of spatial psychology. Our brains are hardwired to interpret spaces based on a series of visual cues, and a transitional space like a hallway has a powerful ‘priming effect’ on our perception of the room that follows. An arch, especially a heavy or dark one, can inadvertently create a sense of compression that your mind carries into the next space.
The fundamental principles at play here are focus and flow. As architectural neuroscience suggests, our attention is guided by defined elements. A statement arch acts as a powerful focal point, drawing the eye and, in doing so, highlighting the boundaries of the space. If the arch is disproportionately bold compared to the hallway’s width or height, it visually ‘squeezes’ the perceived dimensions. The issue is not the arch itself, but its relationship to the surrounding architectural volume.
VR Study: How Corridors Alter Room Perception
This perceptual link was demonstrated in a fascinating study. Researchers used virtual reality to place participants in different corridor environments before they entered an identical room. The findings showed that corridors with darker, more atmospheric lighting heightened physiological responses and significantly altered how participants perceived the subsequent room. This confirms that transitional spaces like hallways aren’t neutral; they actively set the stage and can be architecturally ‘primed’ to make the next space feel larger or smaller, more welcoming or more intimidating. You can explore the full findings of the 2025 study published in Architectural Science Review to understand the deep connection between transitional zones and spatial experience.
To counteract this, the arch must feel like an organic part of the journey, not a barrier. This can be achieved by painting the arch, the hallway walls, and the ceiling in the same light, continuous colour to create a unified visual plane. This technique reduces the arch’s visual weight and encourages the eye to flow through it, rather than stopping at it. As leading research in the field notes:
Architectural elements like cohesion, focal points, and symmetry can guide visual attention and improve spatial cognition.
– Audrey Lustig Michael, The Role of Visual Attention in Architectural Design – Academy of Neuroscience for Architecture
By treating the hallway and arch as a single, cohesive entity, you transform a potential bottleneck into the elegant, flowing transition you originally envisioned.
How to Install a Steel RSJ for an Open-Plan Conversion Under UK Building Regs?
Removing a load-bearing wall to create a modern, open-plan living space is one of the most transformative projects in a UK home renovation. The key to this transformation is the humble Rolled Steel Joist (RSJ), a structural workhorse that carries the load once held by the wall. However, its installation is not a simple DIY task; it is a critical structural intervention governed by stringent UK Building Regulations. Approaching this work without due diligence is a recipe for structural failure and legal complications. The process must be methodical, well-documented, and professionally overseen from start to finish.
The first and most crucial step is to engage a chartered structural engineer. They will assess the loads from the floors, roof, and walls above and produce precise calculations and drawings for the correct size and specification of the RSJ, as well as the ‘pad stones’ it will rest on. These calculations are non-negotiable and form the basis of your application to the Local Authority Building Control (LABC) or a private Approved Inspector. Gaining approval, which can cost anywhere from £200 to £500 according to current UK building control data, must be done *before* any work commences. Furthermore, if the RSJ rests on a wall shared with a neighbour, you will almost certainly need a Party Wall Agreement, a separate legal process.
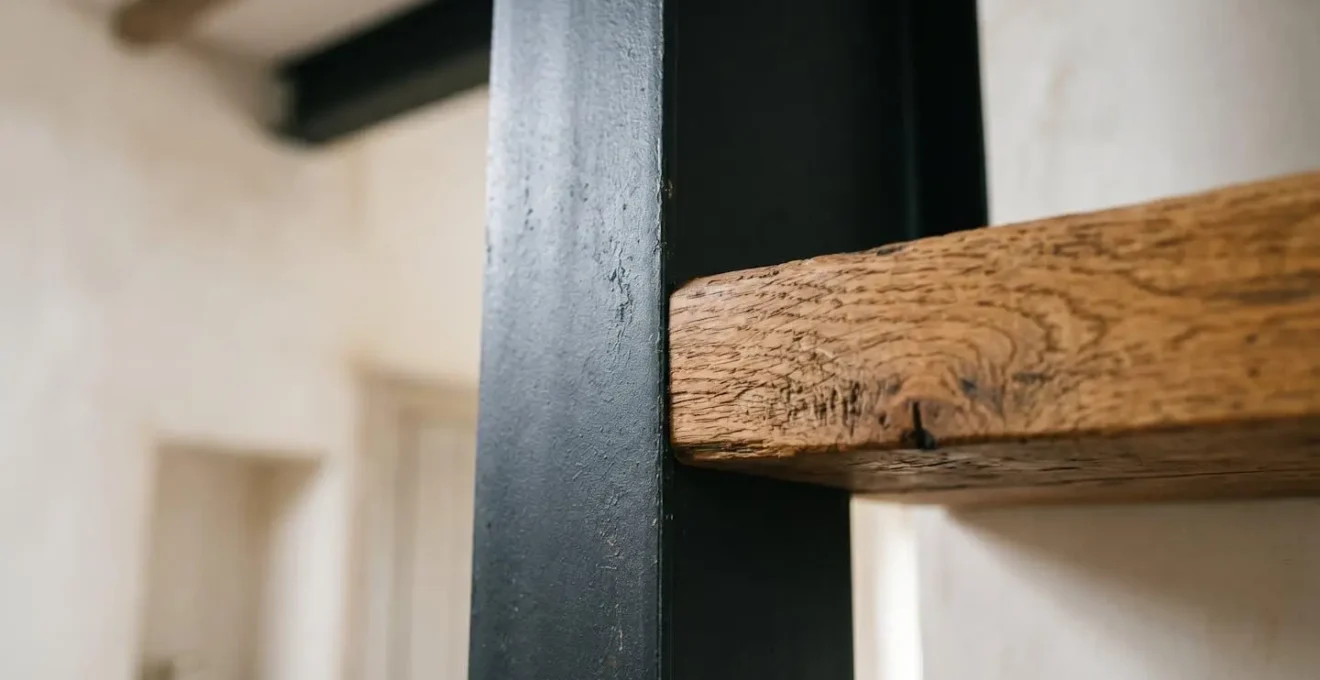
The installation itself is a phased operation that requires inspection at key stages. A building control officer will need to see the temporary supports (usually ‘acrow props’) before the wall is removed, and they will inspect the installed beam, its bearings, and its fire protection before it can be boxed in. Fire protection is critical; a residential RSJ must typically have a minimum of 30 minutes of fire resistance, usually achieved with specialist plasterboard or intumescent paint. Skipping any of these steps can invalidate your home insurance and create significant problems when you come to sell the property. A final completion certificate from building control is the only proof that the work was done safely and correctly.
Your Action Plan: UK Building Regulations Compliance Sequence for RSJ Installation
- Engage an Expert: Commission a chartered structural engineer (IStructE member) to produce load calculations and beam specifications before any work begins.
- Submit for Approval: Submit a Building Notice or Full Plans application to your Local Authority Building Control or use a private approved inspector for oversight.
- Address Shared Walls: If the RSJ will rest within a shared wall, arrange for a party wall surveyor consultation with your neighbour as required by the Party Wall Act.
- First Inspection: Schedule an inspection with your building control officer *before* wall removal to confirm that temporary support measures are adequate and safe.
- Install and Protect: Install the RSJ with its pad stones, ensuring correct bearing length, and apply mandatory fire protection (minimum 30-minute resistance using plasterboard or intumescent coating).
Following this rigorous process ensures not only the structural integrity of your home but also provides the legal and regulatory peace of mind that is essential for such a significant renovation project.
Matte, Eggshell or Satin: Which Finish Makes Cornicing Pop in a North-Facing Room?
North-facing rooms in the UK present a unique challenge for any designer. They receive cool, indirect light for most of the day, which can desaturate colours and flatten architectural details. When it comes to making ornate plasterwork like cornicing « pop, » the choice of paint finish is just as important, if not more so, than the colour itself. The goal is to maximise the available light and create subtle shadow play that defines the cornicing’s profile without introducing jarring reflections. The answer lies in understanding how different sheens interact with this specific quality of light.
A common mistake is to use a high-sheen paint like gloss or satin, assuming that its reflective quality will bounce more light around the room. In a north-facing room, this often backfires. The cool, flat light doesn’t create a warm sparkle; instead, it produces a cold, clinical glare that can highlight imperfections and make the surface feel plastic. The reflections are often patchy and distracting, breaking up the elegant lines of the cornicing. The best approach is to work *with* the softness of the light, not against it. This means moving towards lower-sheen finishes that diffuse light gently.
The hero in this scenario is a high-quality eggshell or a durable modern matte finish. Eggshell, with its very subtle lustre (typically 10-25% sheen), provides the perfect balance. It has just enough reflectivity to gently catch the light and create soft, defining shadows along the curves of the plasterwork, but not so much that it causes glare. A high-performance, scrubbable matte finish can be equally effective, providing a velvety, chalky depth that absorbs light beautifully, allowing the physical form of the cornicing to be the star. Whichever you choose, pair it with a paint colour that has a high Light Reflectance Value (LRV). For north-facing rooms, interior design professionals recommend an LRV of 60 or higher to ensure the surface reflects as much light as possible, combating the inherent gloom.
By choosing a low-sheen, high-LRV paint, you allow the cornicing’s own sculptural form to create the visual interest, resulting in a sophisticated, architectural definition that feels both intentional and timeless.
The Feature-Overload Mistake That Makes Georgian Townhouses Feel Cluttered
Georgian architecture is defined by its elegant proportions, symmetry, and a clear sense of order. From the graceful sash windows to the ornate cornicing and stately fireplace surrounds, each element was designed to contribute to a harmonious whole. However, a common mistake in modern renovations of these properties is what I call « feature overload. » In an enthusiastic attempt to honour the home’s history, every single period detail is highlighted, polished, and pushed into the spotlight. The result is a visual competition where nothing truly shines, and the room, despite its grand proportions, feels cluttered and chaotic.
The core principle of Georgian interior design was not opulence, but balance. Architectural details were the main event, and furnishings were often more restrained to complement, not compete with, the room’s inherent structure. As the design team at heritage paint specialists Mylands notes:
Georgian interior design was slightly simpler, letting the harmonious architectural details shine. The all important theme of balance.
– Mylands Design Team, How to style modern Georgian interior design – Mylands
To restore this sense of calm and order, one must adopt the principle of visual hierarchy. This means making a conscious decision about what the « hero » of the room is. In a classic Georgian reception room, this is almost always the fireplace. It is the architectural and social focal point. All other elements—the cornicing, the dado rails, the window architraves—should be treated as the supporting cast. They are essential for creating the overall character, but they should not clamour for equal attention.
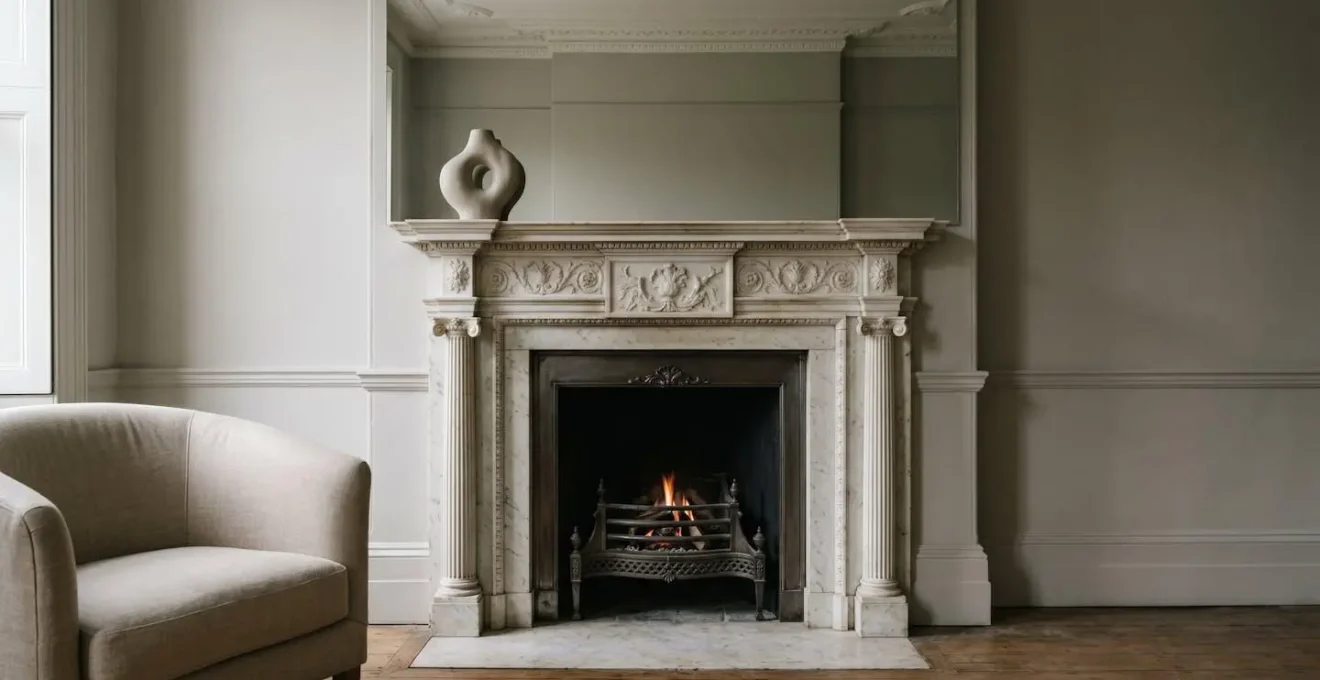
A practical way to achieve this is through a unified colour palette. Instead of painting the cornicing a brilliant white to contrast with the walls, consider painting the walls, cornicing, and skirting boards in the same sophisticated, soft neutral colour, perhaps using a slightly different sheen (e.g., matte on walls, eggshell on woodwork) to create subtle texture. This technique, known as « colour drenching, » blurs the lines between the elements, allowing the room’s overall volume and proportion to be appreciated. The fireplace can then be given more prominence, perhaps with a marble surround that stands out against the muted background, or by placing a single, significant piece of art or a mirror above it. By establishing one clear star, you allow all the other features to play their part in creating a cohesive, elegant, and restful space that feels true to its Georgian roots.
By editing your focus and choosing a single hero, you allow the inherent beauty of the room’s architecture to speak for itself, creating a space that is both impressive and serene.
When to Reveal Hidden Fireplaces: Before or After Rewiring in a UK Renovation?
The discovery of a hidden fireplace during a renovation is a moment of pure joy for any homeowner. It promises a new focal point, a connection to the past, and a significant boost to the property’s character. However, this excitement is often followed by a critical logistical question: at what stage of the project should it be fully revealed? Specifically, how does this « opening up » work align with a first-fix electrical rewire? The answer is that they should be done in tandem, with the fireplace reveal being a carefully phased process, not a single sledgehammer-swinging event.
The correct sequence is to treat the fireplace and its chimney breast as a potential service artery for your home. Trying to complete a full rewire and *then* opening up a fireplace is a recipe for frustration and rework. You will almost certainly need to chase new channels for sockets on either side of the new opening, or for a television and media point above it. Conversely, fully opening the fireplace before planning the electrics means you miss a golden opportunity. The open chimney breast provides an invaluable, hidden route to run cables vertically between floors or horizontally across a room without disturbing finished plaster on other walls.
Therefore, the ideal process is a phased one, planned in coordination with your electrician. The first step, even before the first-fix begins, is exploratory surgery. Make a small, careful opening in the plasterboard to confirm the fireplace’s existence, its size, and the condition of the lintel. This information allows you and your trades to plan effectively. During the first-fix, while the walls are already being chased and channels are being cut, the fireplace can be partially or fully opened. This allows the electrician to run all necessary cables for sockets, lighting, and media points within the newly exposed brickwork. It’s also the time to coordinate with a gas engineer if a gas fire is planned, or a chimney specialist to assess the flue and ventilation requirements under UK Building Regulations. Only after all the « dirty work »—structural assessments, chasing, lining the flue, and initial plastering—is complete should the final, decorative restoration of the fireplace begin.
- Phase 1 – Exploration: Make a small exploratory hole before first-fix electrics to confirm fireplace existence, condition, and exact location.
- Phase 2 – Structural Assessment: Engage a structural engineer or chimney specialist to assess stack integrity and ventilation requirements under UK regulations.
- Phase 3 – Services Planning: Coordinate with your electrician and any other installers (gas, media) to plan all cable and pipe runs through the opened chimney breast.
- Phase 4 – First-Fix Integration: Complete all electrical chasing, socket placement, and service routing while the walls are still open, using the fireplace reveal as a service route.
- Phase 5 – Ventilation Compliance: Install a flue liner or add an air brick as required by UK Building Regulations to prevent damp and ensure safe operation.
- Phase 6 – Full Reveal & Plastering: Complete the masonry work and full opening of the fireplace after the main « dirty work » is finished, followed by plastering the surrounding walls.
- Phase 7 – Final Finishes: The second-fix electrics, final fireplace restoration, and decorative completion should be among the last jobs to ensure a clean, high-quality finish.
By integrating the fireplace reveal into your first-fix schedule, you save time, reduce rework, and make the most of this wonderful architectural feature both aesthetically and functionally.
How to Match Japandi Aesthetics to a Victorian Terrace Without Clashing?
At first glance, the pairing of Japandi—a hybrid of Scandinavian function and Japanese rustic minimalism—with the ornate, decorative character of a British Victorian terrace seems like an architectural contradiction. One celebrates clean lines, neutral palettes, and uncluttered space; the other delights in intricate cornicing, decorative floor tiles, and elaborate fireplace surrounds. Attempting to force a minimalist aesthetic onto a maximalist canvas can lead to a space that feels sterile and disconnected from its historic shell. However, the bridge between these two seemingly disparate worlds is found not in their aesthetics, but in a shared, deeper value: a profound respect for craftsmanship and natural materials.
Instead of stripping the Victorian character away, the most successful approach is one of « Edit, Don’t Erase. » This philosophy involves identifying the most valuable and beautiful period features and making them the focal point, while simplifying the « noise » around them. This is precisely where the Japandi ethos can be a powerful tool. The Japandi focus on natural textures—light oak, worn stone, linen textiles, and ceramic—provides the perfect quiet, warm backdrop against which the rich Victorian details can truly sing. Imagine a stripped-back, wide-plank oak floor running up to an original, intricately tiled hearth. Or simple, unadorned linen curtains framing a tall sash window with its original wooden shutters. The contrast is what creates the magic.
Both styles celebrate well-made objects and the beauty of wood, stone, and textiles. The bridge is not about aesthetics, but about this shared value of craftsmanship and natural materials.
– Interior Design Philosophy, Senses of place: architectural design for the multisensory mind – Springer
The key is to use Japandi principles to create a calm, neutral canvas. This means uncluttered surfaces, a focus on high-quality, handmade objects, and a colour palette of soft greys, warm whites, and earthy tones. Against this serene background, the ornate Victorian cornicing, the deep skirting boards, or a cast-iron fireplace are no longer competing for attention. They are elevated to the status of architectural art, their craftsmanship and history given the space to be fully appreciated.
Contemporary Georgian Interior: Woolf Design Approach
This « Edit, Don’t Erase » principle is expertly demonstrated by WOOLF Interior Design, a practice specializing in historic properties. In their renovations, they meticulously retain and restore valued period features like timber sash windows and fireplaces. They then enhance these elements with modern interventions that align with a minimalist sensibility: creating open-plan kitchens, adding contemporary bathrooms, and flooding spaces with natural light via glass extensions. This approach of honouring craftsmanship while embracing clean, functional simplicity is the very essence of a successful Japandi-Victorian fusion.
Ultimately, the goal is not to create a themed room, but a layered, personal space where the clean, mindful living of Japandi provides a framework that allows the soulful, historic character of the Victorian architecture to shine.
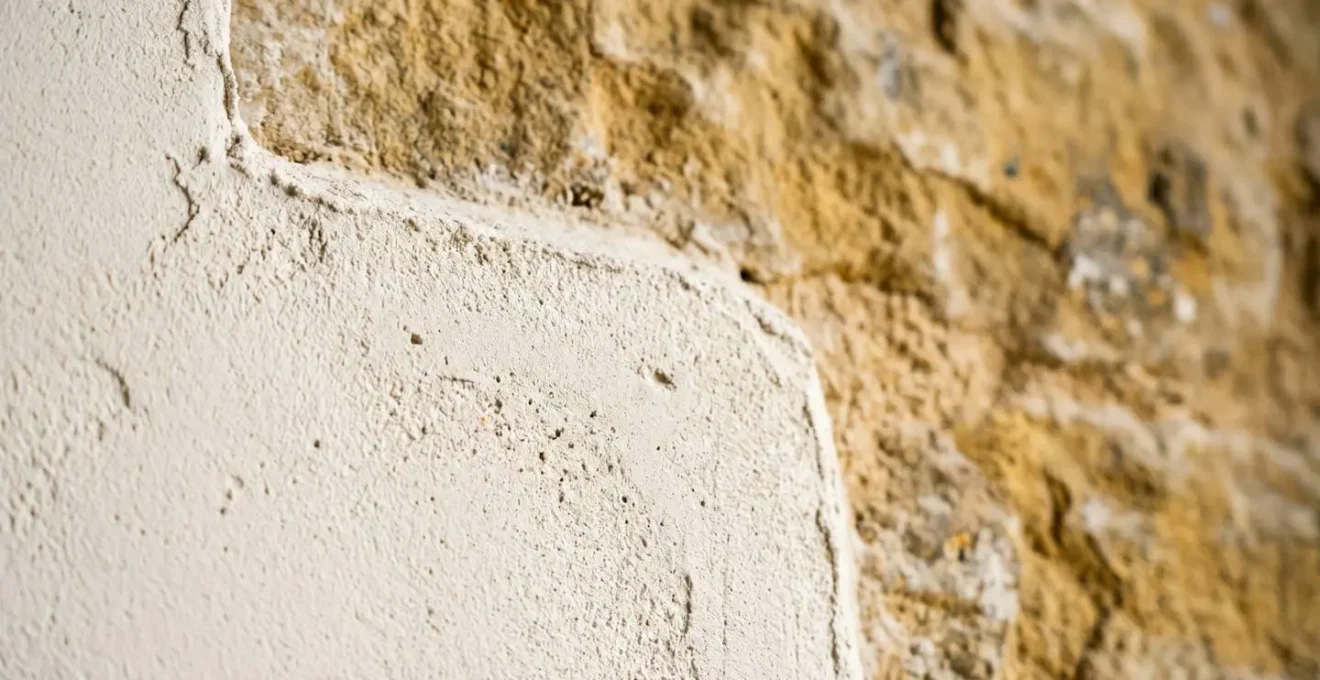
How to Choose Between NHL 2, NHL 3.5 and NHL 5 Lime for Your Stone Walls?
For anyone owning or restoring a traditional stone or brick cottage in the UK, understanding lime is fundamental. Unlike modern cement, which is rigid and impermeable, traditional lime-based mortars and plasters are soft, flexible, and « breathable. » This allows moisture to pass through the wall and evaporate away, a crucial function for managing damp in solid-walled buildings. However, not all lime is created equal. The key to a successful, long-lasting result lies in selecting the right grade of Natural Hydraulic Lime (NHL) for the specific job, stone type, and exposure level. Choosing the wrong grade can be as detrimental as using cement.
NHL is graded by its strength, with the number indicating its compressive strength in megapascals (MPa) after 28 days. The three main grades used in UK conservation are NHL 2, NHL 3.5, and NHL 5. A simple rule of thumb is that the mortar should always be softer and more porous than the masonry unit it is bonding. This ensures that any movement or stress will cause a crack in the cheap, easily replaceable mortar joint, rather than in the precious, historic stone or brick. As you move up the NHL scale, the lime becomes stronger, less flexible, and less breathable.
A guide from building regulations specialists provides a clear framework for selection. NHL 2 is the softest and most breathable. Think of it as a soft linen shirt, perfect for delicate applications. It’s the go-to choice for internal plastering or for pointing very soft materials like chalk, cob, or crumbling sandstone, especially in sheltered locations. NHL 3.5 is the versatile all-rounder, the durable denim of the lime world. It offers a good balance of strength and breathability, making it suitable for most general building and pointing work on common UK stones like Cotswold or Bath stone, and for most brickwork in moderate exposure conditions. NHL 5 is the strongest and least breathable, like a Gore-Tex jacket. Its strength is reserved for the most demanding situations: dense, hard stones like granite, engineering bricks, or for areas of severe weather exposure such as chimneys, parapets, and coastal walls.
| NHL Grade | Strength & Breathability | Recommended Stone Types | Typical Applications | Exposure Suitability |
|---|---|---|---|---|
| NHL 2 | Softest, most breathable (like soft linen) | Soft sandstone, chalk, cob, internal lime plaster | Internal walls, soft masonry repair, heritage restoration | Protected/internal only, low exposure |
| NHL 3.5 | Medium strength, balanced (like durable denim) | Most UK stone: Cotswold, Bath stone, medium sandstone, brick | General external pointing, most vernacular buildings | Moderate exposure, most UK climates |
| NHL 5 | Strongest, least flexible (like Gore-Tex) | Hard stone: granite, engineering brick, dense limestone | Chimneys, parapets, coastal/severe exposure, below DPC | High exposure, driving rain, sea walls |
By matching the lime to the stone and the location, you are working in sympathy with the original construction, ensuring the building can continue to breathe and stand strong for generations to come.
Key takeaways
- The key to managing period features is not concealment but ‘visual hierarchy’—deciding which element is the star (e.g., a fireplace) and which are the supporting cast (e.g., cornicing).
- Working with historic buildings requires using ‘breathable’ materials like lime plaster, which manage moisture and prevent damp, unlike modern cement or gypsum.
- Successful renovation projects depend on correct sequencing; for example, integrating a fireplace reveal with a first-fix rewire to use the chimney as a service route.
How to Apply Lime Plaster in a Damp Stone Cottage Without It Crumbling?
Applying lime plaster to the internal walls of a damp stone cottage is not merely a decorative choice; it is a critical act of building restoration. For centuries, lime was the only option, and historic houses were designed to work with it. These buildings need to ‘breathe’—to allow moisture that soaks into the solid walls from the ground and the driving rain to travel through the stone and evaporate from the surface. The most common reason for lime plaster failing, crumbling, or blowing off the wall is because this fundamental principle has been violated. The problem is rarely the lime itself, but what was there before it.
The number one enemy of a healthy stone wall is non-breathable material. Any existing gypsum plaster, modern paint, or, worst of all, cement render must be hacked off completely. These materials act like a plastic sheet, trapping moisture within the wall. When you apply breathable lime plaster over a damp wall that is sealed on the outside, you are simply directing all that trapped moisture to one escape point. The lime plaster becomes saturated, and the salts carried by the water crystallise on the surface, pushing the plaster off. The first step is always to liberate the wall and allow it to dry out as much as possible.
The application itself is a craft that requires patience, following the rule of « little and often. » Unlike gypsum, which can be applied in a single thick coat, lime must be built up in thin layers of no more than 10mm at a time. Before you start, you must control the ‘suction’ of the wall by dampening it with a fine mist spray; the wall should be damp, not wet. Each thin coat must then be allowed to cure slowly in a process called carbonation, where the lime reacts with carbon dioxide in the air to turn back into limestone. This can take several days per coat. Rushing this process by applying the next layer too soon is a primary cause of failure. The new plaster must be protected from sun, wind, and frost, and gently misted with water in warm weather to slow the cure and encourage a stronger finish. This slow, methodical process is the opposite of modern plastering, but it is the only way to achieve a finish that works in harmony with the building and will last for another hundred years.
By understanding and respecting the breathable nature of your historic home, you transform a damp problem into a warm, healthy, and beautiful living environment. Your next step is to begin auditing your own home’s materials and structure to see where these principles can be applied.