In summary:
- Focus your initial budget on a versatile cordless drill, not a large, single-purpose tool like a table saw.
- Leverage UK-based maker spaces and reclaimed materials to minimize costs and accelerate hands-on learning.
- Adopt the « Micro-Project Loop »: build small, complete projects weekly to develop skills and confidence systematically.
- Learn skill sequencing: master measuring, cutting, joining, and finishing in an integrated way, not as separate disciplines.
- Prioritise skill-building over attempting a complex « dream project » too early to avoid wasting expensive materials.
The desire to build something tangible with your own hands—a sturdy bookshelf, a simple side table, a custom picture frame—is a powerful one. Yet for many beginners in the UK, this ambition quickly collides with a wall of confusion. You’re told to « just watch videos, » but you drown in a sea of conflicting YouTube tutorials. You see lists of « essential » tools that would cost a fortune, and the fear of wasting expensive timber on a simple mistake is paralysing. This often leads to analysis paralysis, where the dream of woodworking never quite makes it off the screen and into the workshop.
The common advice often misses the most crucial point for a beginner. The goal isn’t to accumulate the most tools or to perfectly replicate a complex joint you saw online. The real challenge is building a foundation of practical skill and, just as importantly, the confidence to use it. What if the path to learning joinery in 30 days wasn’t about buying more, but about being smarter with less? What if there was a structured method to turn free and low-cost UK resources into real, tangible ability?
This guide is built on that very principle. We’re going to ignore the noise and focus on a strategic approach I call the « Micro-Project Loop ». It’s a system designed to get you from zero to building simple furniture within a month, using a minimal budget. We will explore how to make your first tool investment count, how to access incredible workshop facilities for less than the cost of a few planks of wood, and the correct sequence to learn skills so they actually stick. Forget the overwhelming lists and vague advice; this is your practical, 30-day roadmap to becoming a maker.
This article provides a complete roadmap for your first month. You’ll find a clear, step-by-step plan that covers everything from your initial tool budget to advanced restoration concepts, helping you build a solid foundation in joinery.
Summary: A Beginner’s 30-Day Joinery Plan
- Why Should Your First £150 Tool Budget Go to a Quality Drill, Not a Table Saw?
- How to Access a Maker Space in London for Under £50 a Month?
- YouTube Tutorials or Weekend Workshop: Which Teaches Upholstery Skills Faster?
- The First-Project Mistake That Wastes £200 in Materials Before Skills Are Ready
- In What Order Should You Learn Measuring, Cutting, Joining and Finishing?
- Hand-Cut or CNC Dovetails: Does the £200 Price Difference Reflect Real Durability?
- The Sanding Mistake That Ruins 1 in 3 Veneered Antiques During DIY Restoration
- How to Restore a Victorian Sideboard Without Erasing Its Original Character?
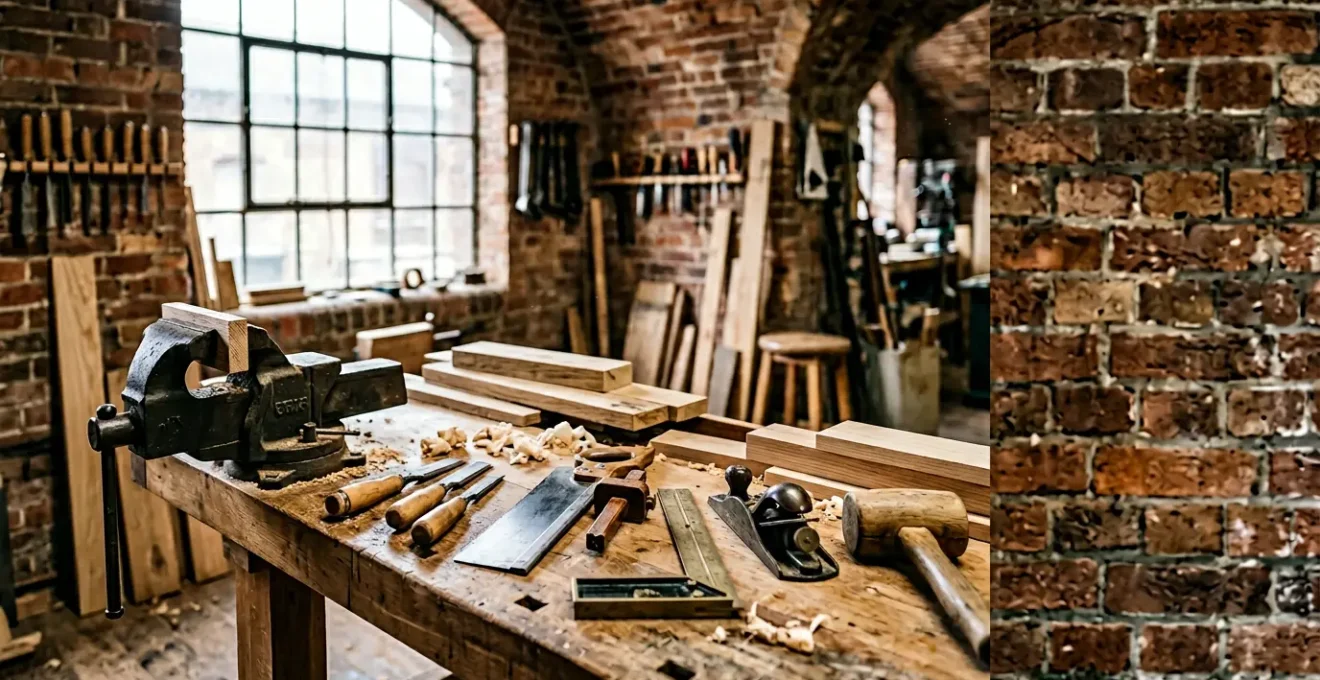
Why Should Your First £150 Tool Budget Go to a Quality Drill, Not a Table Saw?
As a beginner, it’s tempting to look at impressive workshop tools and think you need a table saw to be a « real » woodworker. This is the first and most common budget mistake. Your initial investment should be in versatility, not single-purpose power. For a budget of around £150, a high-quality cordless drill/driver is, without question, the most strategic purchase you can make. It’s the Swiss Army knife of your new toolkit, ready for action on day one.
Unlike a table saw, which is primarily for cutting boards to size, a drill opens up a world of possibilities immediately. As the team at Carmona Woodworking notes, its utility goes far beyond making holes:
A cordless drill / driver is something every household should have. Besides using it as a screwdriver, or for drilling holes of every size, you may discover there are other uses. With the right bit, you can mix concrete or paint, sand surfaces, grind metal, remove rust, and more!
– Carmona Woodworking, Must-Have Power Tools For Beginners
This versatility is crucial for a beginner. It allows you to tackle a wide range of simple projects, from assembling furniture with pocket holes to sanding and finishing, all with one tool. Furthermore, investing in a drill from a major brand (like DeWalt, Ryobi, or Makita) means you’re buying into a battery ecosystem. Your next tool purchase—a jigsaw or sander—can be a cheaper « bare tool » that uses the same battery, saving you significant money in the long run.
The following table breaks down why a drill offers far superior value for a beginner compared to a table saw, which requires more space, a larger budget, and extensive safety knowledge before it becomes truly useful. As this beginner value analysis shows, the choice is clear.
| Factor | Cordless Drill (£100-150) | Table Saw (£200+) |
|---|---|---|
| Versatility | Drilling, driving screws, sanding, polishing, mixing with attachments | Primarily ripping and crosscutting wood |
| Space Required | Handheld, minimal storage | Large footprint, requires dedicated workshop space |
| Portability | Battery-powered, work anywhere | Heavy, stationary, requires power outlet |
| Beginner Safety | Lower risk, easier to control | Higher risk, requires extensive safety training |
| First-Day Projects | Can build frames, boxes, furniture with pocket hole jig immediately | Limited use without complementary tools |
| Battery Ecosystem | Investment unlocks bare-tool purchases (jigsaw, sander) saving £££ | Standalone purchase with no ecosystem benefits |
How to Access a Maker Space in London for Under £50 a Month?
Now that you have your core tool, where do you use it? Many aspiring woodworkers in cities like London feel stuck due to a lack of space. The solution isn’t a bigger flat; it’s engaging in « Resource Arbitrage » by leveraging a local maker space. These shared workshops are one of the UK’s best-kept secrets for hobbyists. They give you access to thousands of pounds worth of professional-grade equipment—from table saws and planers to CNC machines—for a small monthly fee.
Imagine having access to a fully equipped woodshop without the cost of buying and storing the tools yourself. This is what maker spaces offer. They are collaborative environments where you can work on your projects, learn from other members, and often get free practice materials from community scrap bins. It’s the fastest way to bridge the gap between your ambition and your limited toolset.
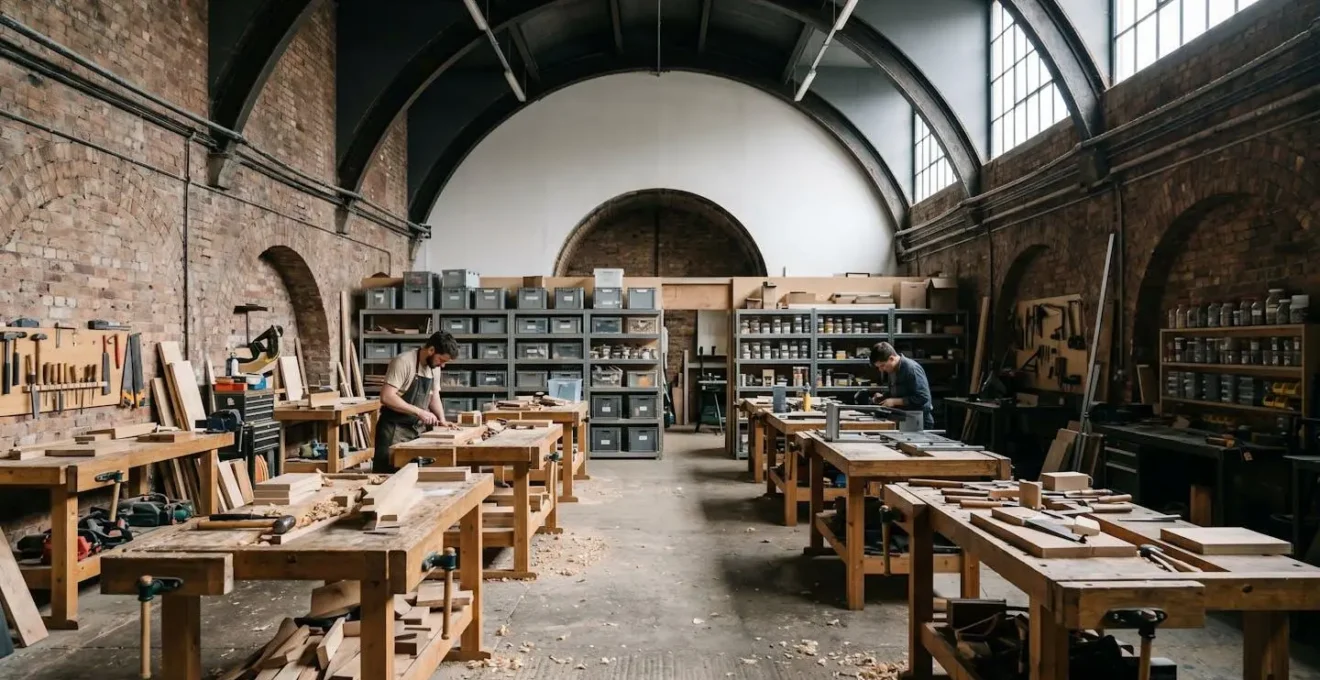
As you can see, these spaces are designed for creativity and collaboration. In London, several fantastic options provide access for well under £50 a month, making them incredibly budget-friendly. This directory of London maker spaces highlights how accessible they are. Many are volunteer-run and offer flexible membership models, including pay-what-you-can options. This approach dramatically lowers the barrier to entry, allowing you to experiment and build skills with professional tools from day one.
Here are some of the most affordable and well-equipped options for woodworking in London:
- London Hackspace (Park Royal): A standout for affordability with its pay-what-you-can model (£5-£40/month). After induction, you get 24/7 access to a full woodworking shop, laser cutters, and a supportive community.
- South London Makerspace (Herne Hill): This volunteer-run space has a strong focus on woodworking and offers public open evenings, allowing you to tour the facilities before committing.
- Artizan Street Library Maker Space (City of London): Offers subsidised rates for residents on low incomes, providing access to woodworking and other equipment during library hours.
- Open Workshop Network: A UK-wide directory that can help you find similar spaces outside of London, many of which offer pay-per-use or affordable monthly plans.
YouTube Tutorials or Weekend Workshop: Which Teaches Upholstery Skills Faster?
While this question is often posed for fabric-based skills like upholstery, the underlying logic applies directly to learning joinery. The debate between self-directed online learning (YouTube) and structured in-person feedback (a weekend workshop) is central to how quickly you’ll progress. Both have distinct advantages, and the « faster » method depends entirely on what part of the skill you’re trying to learn. As an instructor, I see that the most successful beginners don’t choose one; they blend both.
YouTube is unparalleled for theory mastery. You can watch a video on how to cut a mortise and tenon joint ten times, pausing and rewinding until the concept clicks. It’s free, available 24/7, and you can learn at your own pace. However, its greatest weakness is the lack of feedback. You can’t « feel » if you’re holding the chisel at the right angle or applying the correct pressure through a screen. This is where trial and error can become slow and costly.
A weekend workshop, on the other hand, is all about tactile skill development. An instructor can correct your posture, your grip, and your technique in real-time. This immediate feedback loop is the fastest way to build muscle memory correctly. The cost of a workshop (£80-£150) can often be less than the cost of expensive hardwood or fabric wasted on mistakes made while learning alone. A comparison of learning speeds makes this trade-off clear.
The optimal strategy is a hybrid approach. Use YouTube to learn the « what » and « why »—the types of joints, the theory behind wood movement. Then, book a short, focused workshop to learn the « how »—the physical feel of a sharp plane, the correct way to guide a saw. This combination maximizes your learning speed and minimizes expensive errors.
| Learning Factor | Free YouTube Tutorials | Weekend Workshop (£80-150) |
|---|---|---|
| Theory Mastery | Excellent – pause, rewind, review unlimited times | Limited – live demonstrations move at instructor pace |
| Tactile Skill Development | Slow – trial and error without feedback | Fast – immediate expert correction on fabric tensioning, stapling technique |
| Material Risk | High – mistakes on expensive fabric (£50+/metre) can exceed workshop cost | Low – practice on provided materials before using your own |
| Time to First Project | 2-4 weeks (including mistakes and re-dos) | 1 day – complete functional piece by end of session |
| Best For | Visual learners who thrive on self-paced repetition | Tactile learners who need hands-on feedback and ‘feel’ mastery |
| Optimal Strategy | Hybrid: Learn theory on YouTube (webbing types, knot tying), then book half-day workshop for fabric tensioning and stapling technique refinement | |
The First-Project Mistake That Wastes £200 in Materials Before Skills Are Ready
Every new woodworker has a « dream project » in mind—a beautiful oak coffee table, a sleek walnut desk. The single biggest mistake a beginner can make is attempting this dream project first. Your ambition outpaces your skill, and the result is often a pile of expensive, poorly cut hardwood and a major blow to your confidence. In fact, as experienced woodworkers point out, choosing inappropriate wood types is one of the most common and costly beginner errors.
Your first projects are for learning, not for creating heirlooms. The goal is to practice techniques without the fear of financial loss. Wasting £200 on premium timber before your skills are ready is a completely avoidable setback. Instead, you should focus on building your « Confidence Capital » with low-stakes materials.
The contrast is stark: the frustration of a costly mistake versus the satisfaction of a successful practice joint. To avoid the former, you must sidestep a few critical material and planning fallacies that trap beginners. The key is to de-risk your learning process by making mistakes when they are free.
Here are the three most common traps and how to avoid them:
- The ‘Dream Project, Wrong Timber’ Fallacy: Never buy expensive hardwood like oak or walnut for your first few projects. Instead, start with free reclaimed pallet wood (look for a « HT » stamp, which means it’s heat-treated, not chemically treated) from local UK businesses or cheap softwood like pine from a timber yard. Practice on these until your cuts are consistent and your joints are tight.
- Forgetting the ‘Digital Twin’: Before you cut a single piece of wood, build your project virtually. Use free software like SketchUp Free to create a 3D model. This powerful technique allows you to catch all measurement errors, generate a perfect cutting list, and optimize your material layout digitally, where mistakes cost nothing.
- The ‘Over-Engineered Joint’ Trap: It’s exciting to learn about complex dovetail joints, but they are often overkill for a simple beginner project. Match the joint’s complexity to the project’s real structural needs. A simple box or shelf can be made incredibly strong with basic butt joints and screws or a pocket hole jig, preventing wasted time and wood on failed complex joinery.
In What Order Should You Learn Measuring, Cutting, Joining and Finishing?
This is the most important strategic question for any beginner. The common approach is to try and master each skill in isolation, but this is slow and ineffective. The secret to rapid progress is to understand that these skills are not separate disciplines; they are an interconnected loop. The best way to learn is by completing this loop over and over on small, manageable builds. This is the Micro-Project Loop Method.
Instead of spending a week just practicing cutting, you spend the week building a tiny, complete project. You measure, cut, join, and finish one simple item. This process forces you to see how an inaccurate measurement in step one creates a gap in step three, and how a poor sanding job in step four ruins the finish. It builds a holistic understanding that theory alone can’t provide. As the experts at DIY Masters Woodworking state, progress comes from doing, not just studying.
Progress in woodworking doesn’t come from learning more theory. It comes from refining execution. Following step-by-step plans accelerates that learning.
– DIY Masters Woodworking, Why Most Woodworking Projects Fail Before They’re Finished
This philosophy of learning through execution is the core of your 30-day plan. By breaking down the learning process into a series of weekly micro-projects, you build muscle memory, problem-solving skills, and that all-important confidence with each completed item. Below is a structured plan to guide you through your first month.
Your Action Plan: The 4-Week Micro-Project Loop
- Week 1: The Phone Stand. Your first loop. Measure, cut, and join a simple pine phone stand. The goal isn’t perfection; it’s to complete the full cycle on one tiny project to understand how each skill impacts the next in a real-world context.
- Week 2: The Small Box. Time for iteration. Build a small box, adding a basic finish like oil or wax. This second loop solidifies your measurement and joinery skills while introducing the critical steps of surface preparation and finish application.
- Week 3: The Picture Frame. Introduce a new challenge: precision angles. Create a picture frame with mitered corners. This reinforces the « test-first » principle: measure, mark, cut a test piece from scrap, check the fit, adjust, and only then cut your final workpiece.
- Week 4: The Simple Shelf. Apply all your cumulative skills to build a simple shelf using pocket hole joinery. This project teaches you a vital lesson in planning: finishing decisions must be made before the first cut, as the choice of paint versus oil affects everything from sanding grit to glue selection.
Hand-Cut or CNC Dovetails: Does the £200 Price Difference Reflect Real Durability?
As you progress beyond your first 30 days, you’ll start to notice the finer details of furniture construction, and no joint is more revered than the dovetail. You’ll see high-end furniture boasting « hand-cut dovetails » with a significant price tag, while other pieces use visually perfect, machine-cut joints. For a beginner, it’s natural to wonder if the £200+ premium for hand-cut joints is about genuine durability or just old-fashioned romanticism.
Structurally, a well-made dovetail joint—whether cut by hand or a CNC machine—is exceptionally strong. The interlocking pins and tails create a mechanical lock that is incredibly resistant to being pulled apart. So, in terms of initial strength, there is no meaningful difference. The real distinction lies in longevity, repairability, and the story the piece tells.
A hand-cut dovetail is a mark of craftsmanship. Its slight, unique imperfections tell a story of human touch and skill. This « artisan status » is not just aesthetic; it has a practical benefit. Because they are unique, they are often easier to repair or replicate during a future restoration. In contrast, the perfect uniformity of machine-cut dovetails can make invisible repairs much more challenging. Therefore, over a lifespan of decades, the hand-cut joint often proves to have superior long-term durability simply because it is more restorable.
As this detailed comparison of dovetail joints outlines, the £200 price difference is less about initial strength and more about what you’re investing in. When you pay for hand-cut dovetails, you’re paying for an artisan’s time and a piece’s future repairability. When you learn to cut them yourself, you’re investing that £200 in your own « skill tuition, » acquiring an asset that appreciates with every project you build.
| Comparison Factor | Hand-Cut Dovetails | CNC/Machine-Cut Dovetails |
|---|---|---|
| Initial Structural Strength | Excellent – properly cut joints provide exceptional strength | Excellent – mechanically precise joints equally strong |
| Repairability Factor | High – unique imperfections make them easier to repair or replicate during future restoration | Lower – perfect uniformity makes invisible repairs more difficult |
| Long-term Durability | Superior – easier to restore = longer effective lifespan | Good – initial strength high but restoration challenges reduce practical longevity |
| Aesthetic Perception | Artisan status marker; variable spacing tells story of craft and authenticity | Precision manufacturing signal; uniform spacing appears factory-made |
| Typical Price Premium | +£200 per drawer or case piece | Standard pricing |
| What £200 Buys | Tuition fee for lifelong skill; appreciating asset in your capabilities | Single transaction; no transferable skill gained |
| Best Use Case | Bespoke furniture, heirloom pieces, artisan portfolio | Production cabinetry, consistent output, time-critical projects |
Key Takeaways
- Strategy Over Tools: A successful start in woodworking depends more on a smart learning strategy and resourceful material sourcing than an expensive tool collection.
- The Micro-Project Loop: Build confidence and practical skill by completing small, end-to-end projects weekly, rather than trying to master isolated skills or tackle a large project at once.
- Community Resources are Key: Leverage UK-based maker spaces for access to professional tools and use free, reclaimed wood for practice to dramatically lower the financial risk of learning.
The Sanding Mistake That Ruins 1 in 3 Veneered Antiques During DIY Restoration
Once you’ve built a few projects, you might feel confident enough to try your hand at restoration. You find a beautiful but tired-looking veneered sideboard at a flea market and think, « I can fix that. » This is where a little knowledge can be a dangerous thing. The most critical mistake a DIY restorer can make is treating a veneered piece like solid wood, especially when it comes to sanding. Veneer is often less than a millimeter thick—a fragile layer of beautiful wood glued to a cheaper substrate.
The impulse is to grab an orbital sander to quickly remove the old, flaky finish. This is a catastrophic error. A power sander can blast through that thin veneer in seconds, permanently exposing the substrate underneath and ruining the piece. The fragility of veneer cannot be overstated; it requires a delicate touch and a completely different approach to surface preparation.
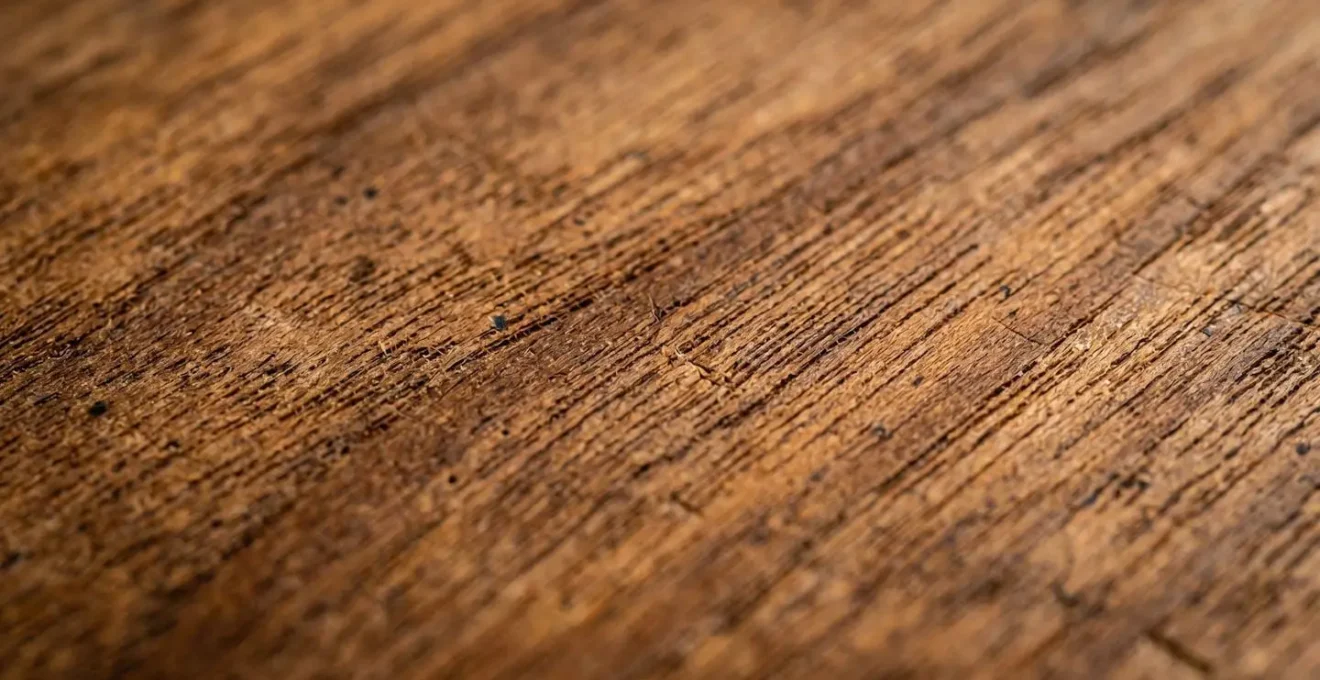
This macro view shows just how delicate the wood fibres are. Preserving this surface requires finesse, not force. Before you ever touch sandpaper to an antique, you must learn to diagnose the surface and choose the right method. Here are the three most common veneer sanding errors and their correct, conservation-minded alternatives:
- The Power Sander Catastrophe: Never, ever use an orbital or belt sander on old veneer. The correct and safe method is to first use a card scraper—a simple, flat piece of steel—to gently shear off the old finish. This is followed by light hand-sanding with a block to ensure even pressure and avoid sanding through.
- The Grit-Jump Illusion: Many beginners impatiently jump from a coarse sandpaper grit (like 80) directly to a very fine grit (like 220). This doesn’t remove the deep scratches left by the coarse grit; it just polishes the peaks, leaving the valleys. This results in a hazy, unprofessional finish. The correct method is a sequential progression through the grits: 120 → 150 → 180 → 220, ensuring each grit removes the scratches of the one before it.
- Sanding Without Diagnosis: Before any abrasive touches the surface, you must ‘read’ it. Use a low-angle light to check for lifting veneer, previous repairs, and to gauge its thickness. A wipe with a damp cloth (using mineral spirits, not water) will temporarily reveal the grain as it will look when finished, helping you form a safe and effective sanding strategy.
How to Restore a Victorian Sideboard Without Erasing Its Original Character?
The ultimate goal of a good restoration is not to make a piece look brand new. It’s to make it look beautifully old. A Victorian sideboard’s value and charm lie in its history—the small dings, the softened edges, the gentle crazing of the original finish. This is its patina, the physical story of its life. Erasing that character in the pursuit of a flawless, factory-new surface is the greatest tragedy in restoration.
The most thoughtful approach is one of « conservation-first. » This philosophy dictates that you should always use the least invasive method possible. Before reaching for strippers and sanders, you must take the time to understand what you’re looking at. Is it damage, or is it history? As woodworker Dan Stout explains in Family Handyman, this respect for the material is a learned skill.
Wood seems like a tough material. But as your woodworking progresses, you’ll learn to treat your materials with care. Your finished product and raw materials should be handled thoughtfully, and treated with the care appropriate for the stage and finish of a given project.
– Dan Stout, Family Handyman, The 10 Most Common Woodworking Mistakes Beginners Make
Applying this thoughtful approach means following a clear, conservation-led process. This isn’t about stripping away the past; it’s about gently cleaning it and only repairing what is truly broken, preserving the soul of the piece.
- The Conservation Cleaning First Principle: Before any aggressive action, start with a gentle cleaning. Use a soft cloth and a mild solvent like mineral spirits mixed with a little bit of boiled linseed oil, applied with #0000 steel wool. Work on a small, inconspicuous area first. You will be amazed at how often decades of built-up grime and wax will lift away to reveal a perfectly preserved original finish underneath, making a full-blown restoration completely unnecessary.
- Learn Patina vs. Damage: You must learn to distinguish between the two. Patina is the desirable evidence of age: softened corners, minor, stable cracks in the finish (crazing), and subtle colour variations. This is history and should be preserved. Damage is what needs repair: white water rings, deep gouges that break the wood fibres, or broken mouldings. Target only the damage.
- The Art of the Invisible Repair: When a part must be replaced or a repair made, the goal is to blend it seamlessly with the piece’s history. Source age-appropriate timber for repairs. Use natural dyes, like a strong tea or a solution of vinegar and steel wool, to artificially ‘age’ the new wood to match the old. The repair should respect the piece, not scream « I was fixed yesterday! »
Your journey from a complete beginner to a confident maker is not about a single destination but about embracing a process of continuous learning. Start today by choosing your first micro-project, and begin building your skills, one small success at a time.