Achieving a high-end custom wardrobe look for under £3,000 is less about cutting corners and more about smart, craftsman-level planning and material choices.
- A meticulously detailed joinery brief is your single most powerful tool for controlling costs and avoiding expensive changes down the line.
- Strategic material selection (like Moisture-Resistant MDF) and sourcing your own high-quality hardware are the two biggest levers for reducing your bill without sacrificing longevity.
Recommendation: For the ultimate balance of custom feel and budget control, consider a ‘hybrid’ approach: use standard IKEA PAX carcasses and commission a local joiner to build bespoke doors and a fitting framework around them.
That awkward alcove beside the chimney breast. The sloping ceiling in the loft conversion. The soulless, boxy bedroom in a new-build. These are the realities of UK housing that flat-pack furniture promises to solve, but so often fails to. You end up with a wardrobe that doesn’t quite fit, wasting precious space and looking like a compromise. The dream of a perfectly integrated, floor-to-ceiling built-in wardrobe feels like a luxury reserved for five-figure budgets and interior designers.
The common advice is to either wrestle with another IKEA PAX unit or brace yourself for an astronomical quote from a high-end firm. But what if there’s a middle way? As a joiner, I can tell you that getting that bespoke, characterful storage for under £3,000 is entirely achievable. The secret isn’t about finding the cheapest quote; it’s about becoming a smarter client. It’s about understanding where the real costs lie and making informed decisions on the three things that truly matter: the brief, the materials, and the hardware.
This isn’t about cutting corners on quality. It’s about allocating your budget intelligently, just as a craftsman would. This guide will walk you through the process from a joiner’s perspective, revealing the common pitfalls that inflate costs and the insider strategies that deliver a premium finish without the premium price tag. We’ll give you the knowledge to commission your project with confidence, ensuring the final piece not only fits your space perfectly but also your budget.
This article breaks down the essential steps and considerations for commissioning your perfect wardrobe. Follow this roadmap to navigate the process like a pro, from initial idea to final installation.
Summary: How to Commission a Smart, Budget-Friendly Custom Wardrobe in the UK
- Why Do Flat-Pack Wardrobes Never Fit Your 1920s Bay-Window Bedroom?
- How to Write a Joinery Brief That Prevents £500 in Change-Order Fees?
- MDF or Birch Plywood: Which Material Lasts 20 Years in a Humid UK Bathroom?
- The Hardware Markup Mistake That Adds 30% to Your Custom Kitchen Bill
- When to Book a Joiner: The 8-Week Lead Time Most UK Clients Underestimate
- The Sofa-Sizing Mistake That Blocks 40% of UK Living Room Doorways
- Why Do New-Build Kitchens Look Cheap Despite Costing £8,000 Fitted?
- How to Make a Cookie-Cutter New-Build in the UK Feel Unique Within Budget?
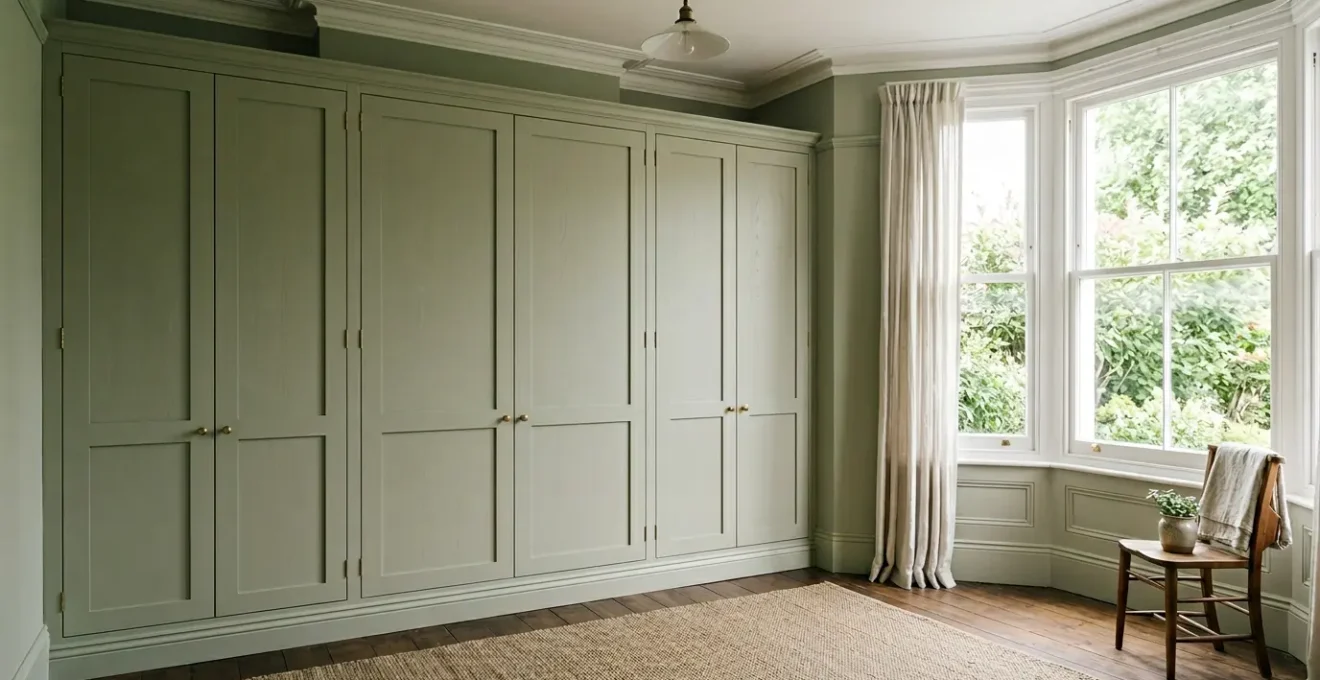
Why Do Flat-Pack Wardrobes Never Fit Your 1920s Bay-Window Bedroom?
The fundamental frustration with off-the-shelf furniture begins with a simple truth: standard-sized boxes don’t fit into non-standard holes. And British homes, particularly the millions of Victorian and Edwardian properties built before mass-production took hold, are gloriously non-standard. The problem is so widespread that a recent survey revealed that over 77% of UK residents feel modern homes lack adequate storage, a problem massively exacerbated by inefficient use of space.
A joiner sees a room not as flat walls, but as a collection of quirks. In a typical 1920s bay-window bedroom, you’re not dealing with a simple rectangle. You have:
- The Chimney Breast Alcoves: These twin recesses are rarely the same width or depth.
- Out-of-Plumb Walls: Old plaster walls are almost never perfectly vertical.
- Deep Skirting Boards & Picture Rails: These period features create stand-offs that prevent furniture from sitting flush against the wall.
- Uneven Floors & Ceilings: A 2cm or more height difference from one side of an alcove to the other is common.
A flat-pack wardrobe, designed for a perfect geometric world, simply cannot cope. The result is always a compromise: unsightly gaps that gather dust, wasted space above and to the sides, and a piece that looks like an afterthought rather than an integrated part of the room’s architecture. Architectural honesty—working *with* the room’s character, not against it—is the core principle of good joinery. Bespoke isn’t just about a custom size; it’s about creating a piece that looks like it has always been there.
How to Write a Joinery Brief That Prevents £500 in Change-Order Fees?
From a joiner’s perspective, the most successful projects—and the ones that stay on budget—always start with an excellent client brief. Vague instructions like « a wardrobe for the alcove » are a recipe for misunderstanding, delays, and costly « change orders. » A great brief isn’t a wishlist; it’s a briefing blueprint, a clear technical document that removes all ambiguity for the craftsman and protects your budget from creep.
Think of it as your primary tool for cost control. Every decision left unmade is a decision the joiner has to make for you, or worse, has to ask you about mid-project, often with cost implications. Providing a detailed brief allows a joiner to quote accurately and work efficiently. It’s the difference between a smooth process and a stressful one punctuated by unexpected invoices.
Your brief should be a simple document, supported by sketches or images, that clearly communicates your vision and technical requirements. The more detail you provide upfront, the less risk of misinterpretation. This is the single most important piece of homework you can do to guarantee you get what you want, for the price you were quoted.
Your Action Plan: The Perfect Joinery Brief
- Provide Precise Measurements: Include drawings with widths, depths, and heights. Crucially, note any variations—measure ceiling height at both ends of the wall, as a 2cm difference is common in UK period homes.
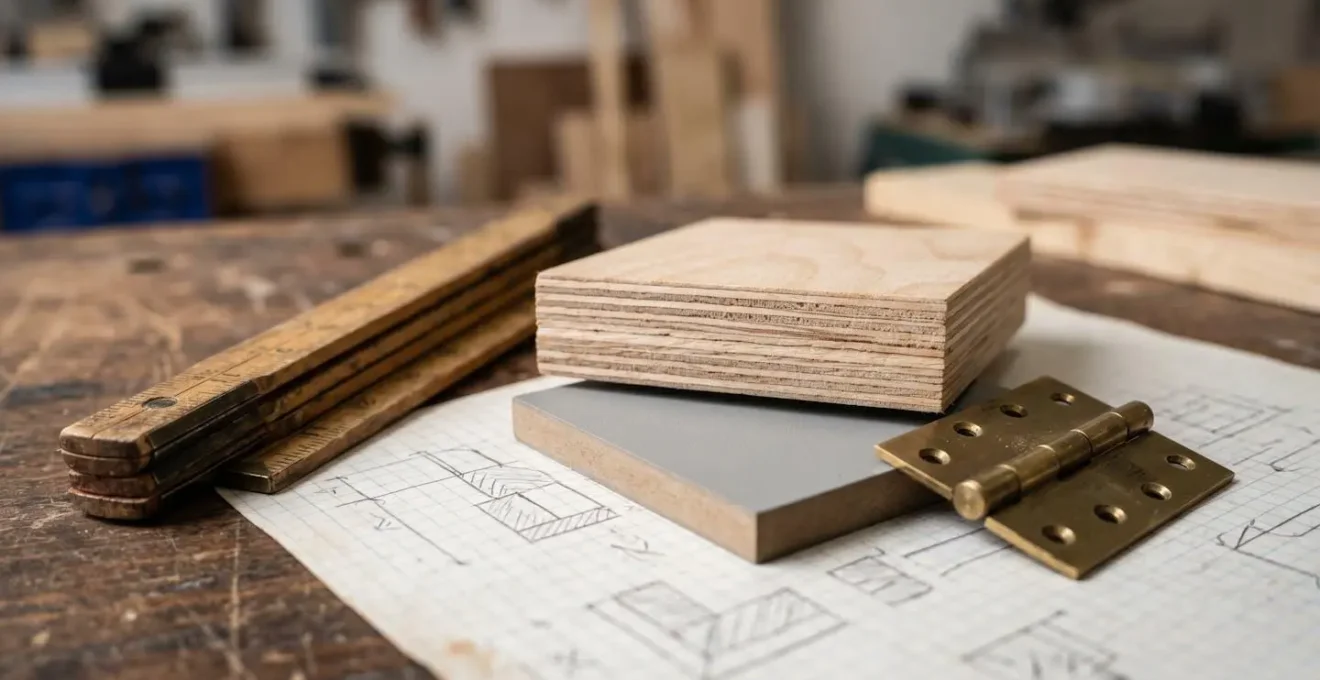
- Specify Exact Materials: Don’t just say « MDF. » Specify « 18mm Moisture-Resistant MDF (e.g., Medite MR) for the carcass, and 22mm for the doors. » This dictates quality and cost.
- Detail Hardware & Suppliers: Clearly state your requirements, such as « Blum soft-close hinges for main doors » and specify the handles you intend to use. If you’re supplying them, say so.
- Define the Finish: Be precise. « Spray-finished in Farrow & Ball Estate Eggshell, colour Railings » is a clear instruction. « Painted dark grey » is not.
- Include Visual References: A Pinterest board or a simple sketch is invaluable. Show the exterior look, but also a rough plan of the internal configuration (e.g., « double hanging rail on left, five shelves on right »).
MDF or Birch Plywood: Which Material Lasts 20 Years in a Humid UK Bathroom?
Material choice is a classic battleground in joinery, often presented as a simple trade-off between the cost-effectiveness of MDF (Medium-Density Fibreboard) and the premium strength of Birch Plywood. However, for a craftsman, the choice is about material intelligence: using the right material for the right job to maximise longevity and value. The humid environment of a typical, poorly ventilated UK bathroom is the ultimate stress test and provides a clear lesson for wardrobe construction.
Generic MDF will swell and disintegrate with the slightest exposure to moisture. However, not all MDF is created equal. Moisture-Resistant MDF (often called MR-MDF, like the green-tinted Medite MR) is a completely different beast. It’s engineered with a special resin to withstand humidity, making it the go-to for savvy joiners creating bathroom vanity units or wardrobes in damp-prone Victorian bedrooms. Birch Plywood offers superior structural strength, especially for long shelves, but its cost can be prohibitive for a sub-£3k wardrobe. For most built-in applications that will be painted, MR-MDF offers about 90% of the performance for a fraction of the cost, as this comparative analysis highlights.
| Property | Moisture-Resistant MDF (e.g., Medite MR) | Birch Plywood (WBP grade) |
|---|---|---|
| Moisture Tolerance | Good for humid environments with modern ventilation; not for direct water exposure | Better for high humidity; handles steam and temperature swings well |
| Structural Strength | Adequate for carcass and fixed shelving up to 90cm span | Superior for shelving over 90cm; better load-bearing capacity |
| Edge Sealing Requirement | Critical – unsealed edges absorb moisture like a sponge | Important – edges still vulnerable but less critical than MDF |
| Cost (2024-2025 UK) | £350-500 per linear meter for basic fitted units | £770-1,500+ per linear meter for premium units |
| Longevity in UK Bathroom | 10-15 years with proper sealing and ventilation | 20-30 years with appropriate finish |
| Finish Appearance | Smooth, ideal for painted finishes | Natural wood grain visible, works for stained or natural finish |
The key takeaway? For a painted built-in wardrobe, a well-constructed and properly sealed 18mm MR-MDF carcass is the intelligent, budget-aware choice. It provides the stability and moisture resistance needed for decades of service in a typical UK home, allowing you to allocate more of your budget to the parts you see and touch every day: the doors and the hardware.
The Hardware Markup Mistake That Adds 30% to Your Custom Kitchen Bill
Here is one of the biggest secrets in the world of custom joinery: the hardware. The hinges, handles, and drawer runners are the moving parts you interact with daily. They define the tactile quality of your wardrobe, but they are also a common area for hidden markups that can unnecessarily inflate your bill. This principle of hardware economics is just as true for a £3,000 wardrobe as it is for a £30,000 kitchen.
Many clients leave hardware decisions to the joiner, who will typically source items from a trade supplier and add a markup of anywhere from 20% to 50% for the service. While this is standard practice, you can achieve significant savings by sourcing the ‘jewellery’ of your wardrobe yourself. This is especially true for handles and knobs, where the consumer market offers a vast range of styles and prices. While joiners get good trade prices on functional hardware like hinges (e.g., from Blum or Hettich), the decorative elements are where you can make a big impact on the final cost.
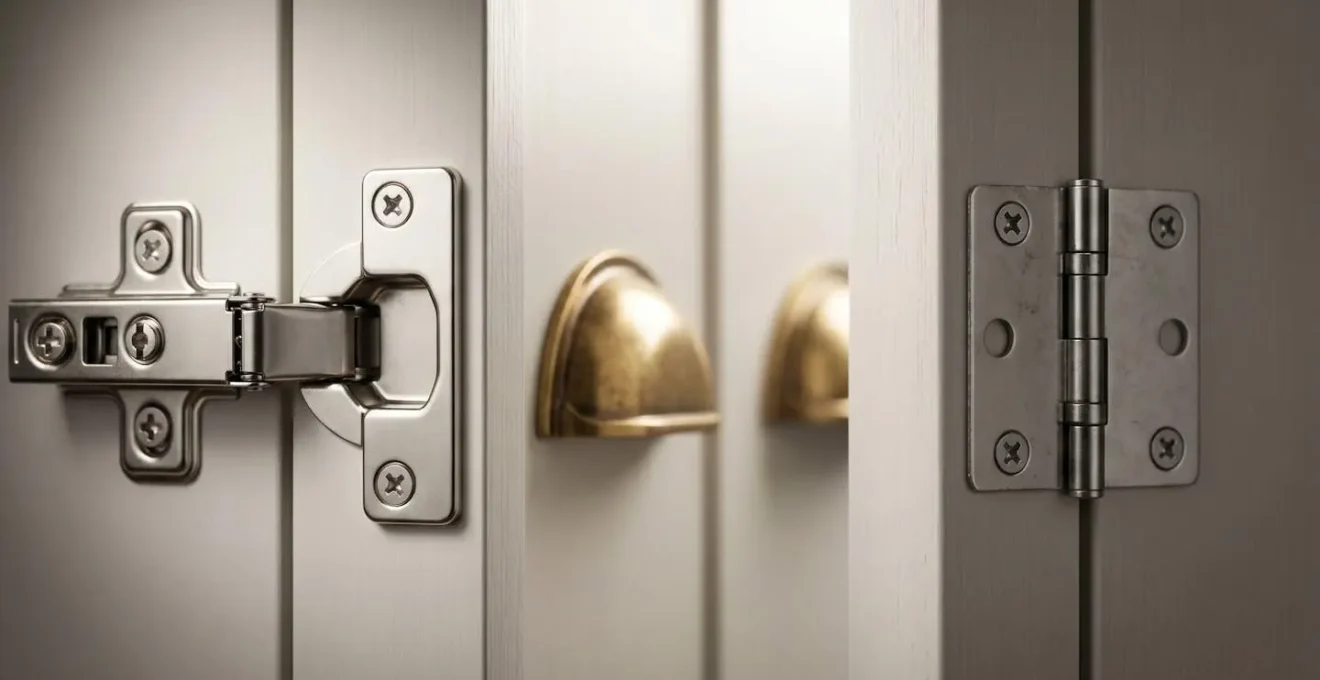
The trend for warm metal finishes means beautiful, solid brass or bronze hardware is more accessible than ever. By purchasing these yourself online or from specialist retailers, you pay the direct-to-consumer price and simply provide them to your joiner for fitting. You still get the high-quality feel, but you’ve cut out a middleman and potentially saved hundreds of pounds. Just be sure to specify your choice in the brief so the joiner knows what to expect. For functional hardware, trust your joiner’s recommendation—a good quality soft-close hinge is a non-negotiable for a premium feel—but take control of the decorative pieces.
When to Book a Joiner: The 8-Week Lead Time Most UK Clients Underestimate
Once you have a perfect brief and a clear vision, the instinct is to find a joiner and get started immediately. This is where many homeowners hit a wall of reality: the good ones are always busy. Project timeline realism is crucial. Most independent joiners and small workshops in the UK have a lead time of at least 6-12 weeks from a confirmed order to the start of installation. This buffer accounts for a backlog of work, material ordering, and the actual workshop time to build your project.
This lead time can be a source of frustration, but it can also be a significant financial risk if not managed correctly. An informal quote given today may not be valid in three months’ time when the joiner is actually ready to start. Material prices fluctuate, and a tradesperson’s day rate can change. This is a common story among homeowners, with one recounting a particularly stark experience with delays and repricing:
The builder indicated costs would be around 3-12% higher than his original quote when work recommenced. Nine months later after selling our property, the quote came back – 100% higher!
– UK Self-Build Homeowner, PistonHeads UK Forum
To avoid this, seek a formal, written quote that specifies its validity period (usually 30-60 days). Once you accept and pay a deposit, you lock in the price. It’s also wise to be aware of regional price differences; industry analysis shows that joinery costs in London and the South East are often 20-30% higher than in other parts of the UK. When you contact a joiner, your first question shouldn’t just be « how much? » but also « what’s your current lead time? » This manages your own expectations and helps you plan your project effectively.
The Sofa-Sizing Mistake That Blocks 40% of UK Living Room Doorways
Every furniture delivery driver has a horror story about a beautiful new sofa stuck in a narrow Victorian hallway. It’s a classic mistake, but one that applies just as critically to large, pre-assembled wardrobe sections. You can design the most stunning built-in unit, but it’s worthless if the components can’t physically get into the room. This is especially true for older UK properties with tight stairwell turns, narrow corridors, and smaller-than-standard doorways.
A professional joiner will conduct a site survey, but you can speed up the process and de-risk your project by providing a simple photo survey along with your initial brief. This isn’t about getting millimetre-perfect measurements yourself; it’s about flagging potential access issues early. A quick set of photos and rough measurements of the journey from your front door to the final installation point is incredibly valuable. This allows the joiner to design the wardrobe in manageable sections that can be safely transported and assembled on-site.
Forgetting this step can lead to costly on-the-day problems, such as needing to remove a door frame or, in worst-case scenarios, realising a large carcass section simply won’t fit. Taking ten minutes to document the access route demonstrates foresight and helps your joiner plan the construction and installation logistics effectively, saving time and money for everyone.
Action Plan: The Joiner’s Site Access Photo Survey
- Main Entry Doorway: Take a photo of your front door opening with a tape measure held across its narrowest point (usually the door frame itself). Pre-1950s UK terraced houses often have doorways under 80cm wide.
- Corridor Tightest Point: Identify and photograph the narrowest part of your hallway, often near a radiator or where a wall juts out.
- Stairwell Turn Radius: Take photos of any staircase turns from both below and above. This is often the most critical point of failure for large items.
- Bedroom Doorway & Clearance: Photograph the final doorway, again with a tape measure. Note how far the door can swing open and if there are any immediate obstructions inside the room.
- Ceiling Height at Pinch Points: Note the ceiling height at the bottom of the stairs and on any landings, as this is where tall items need to be tilted.
Why Do New-Build Kitchens Look Cheap Despite Costing £8,000 Fitted?
The question of value is central for homeowners in new-build properties. The developer-fitted kitchens and wardrobes often come with a hefty price tag on paper, yet they can feel disappointingly generic and start showing wear within a few years. The reason is simple: the focus is on speed of installation and maximising developer profit, not on longevity or quality.
A common experience for new-build owners is seeing the tell-tale signs of cost-cutting emerge after just a year or two. This is what you’re often paying for in a standard developer package:
New-build developments typically install wardrobes with thin MDF carcasses (15-18mm instead of quality 18-25mm), vinyl-wrapped doors that peel in humid conditions, generic hardware prone to failure, and excessive filler panels that waste 15-20% of potential storage space. These cost-cutting measures result in wardrobes that look dated within 3-5 years.
– Developer Wardrobe Quality Experience
This creates a false economy. The initial custom wardrobe might seem more expensive than a flat-pack alternative or a developer « upgrade, » but the long-term value is vastly superior. A solid, custom-built wardrobe made from quality materials like 18mm MR-MDF and fitted with reliable hardware is an investment designed to last 20-30 years, not 3-5. It eliminates wasted space from filler panels and is built to the exact character of your room. When you consider the cost of replacing a cheap wardrobe two or three times over its lifespan, the bespoke option often proves to be the more financially prudent choice in the long run.
Key takeaways
- A detailed, unambiguous joinery brief is your most powerful tool for controlling costs and ensuring a successful outcome.
- Smart material selection, such as using Moisture-Resistant (MR) MDF for painted finishes, delivers long-lasting quality without the expense of premium plywood.
- The ‘hybrid’ model—using affordable IKEA carcasses with custom-made doors and framework from a joiner—offers the best value-for-money to achieve a bespoke look on a budget.
How to Make a Cookie-Cutter New-Build in the UK Feel Unique Within Budget?
So, how do you escape the « sea of beige » in a new-build home and inject genuine character without an enormous budget? The answer lies in a clever, hybrid approach that combines the cost-efficiency of mass-produced components with the skill of a local craftsman. This strategy is the ultimate expression of being budget-aware while still achieving a truly bespoke, integrated look that elevates the entire room.
This method has become increasingly popular with savvy UK homeowners who want to put their own stamp on a new property. It delivers the high-end aesthetic of full custom joinery for a price that is often much closer to high-street flat-pack solutions. The key is to deconstruct the wardrobe into its core components and spend money where it has the most visual impact.
Case Study: The IKEA PAX Hybrid Custom Wardrobe Strategy
The hybrid approach, detailed in a recent furniture cost analysis, involves using standard IKEA PAX carcasses as the internal structure of the wardrobe. These are incredibly cost-effective (£400-£800 for a large unit). The magic happens when you then commission a local UK joiner to build and fit custom elements around them. This typically includes a custom plinth to raise them off the floor, a cornice at the top to meet the ceiling, and filler pieces to seamlessly connect to the walls. Most importantly, the joiner crafts bespoke doors, which can be shaker-style or plain, and spray-paints the entire assembly in your chosen colour. Since a UK joiner’s day rate is around £250-£280, the labour for this customisation is surprisingly affordable. The total cost often lands between £1,500 and £2,200—far less than full custom joinery but worlds away from a standard flat-pack look.
This strategy gives you the best of both worlds: the robust and affordable internals from IKEA, and a perfectly fitted, beautifully finished exterior that looks like a piece of high-end architectural joinery. It’s the single most effective way to add value and personality to a new-build bedroom on a sub-£3,000 budget.
Now you have the craftsman’s blueprint for success. The next logical step is to take these insights and begin drafting your own brief, measuring your space, and researching the hardware that will bring your vision to life. Start planning your project with this newfound knowledge and commission your perfect wardrobe with confidence.