The common belief is that a statement pendant’s job is to look beautiful. The reality is that its primary role is to be a high-performance ‘light engine’ that sculpts the atmosphere of your room.
- A fixture’s material (opaque vs. translucent) dictates light distribution, creating either focused task lighting or ambient glow.
- Modern smart technology can retrofit vintage fixtures with full dimming capabilities without any rewiring, preserving character while adding function.
Recommendation: Before falling for a silhouette, analyse its potential for glare, shadow, and its ability to integrate into a layered lighting scheme. Treat it as functional art, not just decoration.
You’ve found it. The perfect sculptural pendant. It’s a breathtaking cascade of brass, a dramatic sweep of hand-blown glass, a piece of art that promises to be the focal point of your room. You install it, flick the switch, and… disappointment. The light is harsh, or it casts gloomy shadows, or it barely illuminates the room at all. This experience is frustratingly common for design lovers who discover that the most beautiful fixtures are not always the most functional. The market is saturated with pendants designed for their looks alone, often neglecting the fundamental physics of light.
The standard advice to « match your decor » or « check the dimensions » is superficial. It treats the fixture as a static object, an accessory. But a light fixture is an active, dynamic tool. Its purpose is to shape perception, create mood, and enable tasks. This guide reframes the selection process. We will move beyond simple aesthetics to analyse your pendant as a ‘light engine’. We will dissect how its material, form, and technology dictate its performance. The goal is to empower you to choose a statement piece that not only captivates the eye but also masterfully engineers the atmosphere of your home, ensuring your investment works as hard as it looks beautiful.
This article provides a detailed roadmap for evaluating sculptural lighting not just as an object, but as a functional tool. You’ll find practical advice on everything from solving shadow problems to integrating smart technology and creating a layered lighting scheme for modern, multi-use spaces.
Contents: Choosing a Pendant That is Both Beautiful and Functional
- Why Does Your Designer Pendant Leave Your Dining Table in Shadow?
- How to Retrofit Dimming Into a Vintage Brass Chandelier Without Rewiring?
- Single Statement Pendant or Multi-Drop Cluster: Which Suits a 3 m Ceiling Height?
- The Naked-Filament Mistake That Causes Eye Strain at Your Kitchen Island
- When Do UK Lighting Showrooms Discount Sculptural Fixtures by Up to 50%?
- How to Layer Lighting in One Room That Serves as Lounge, Office and Dining Area?
- Curved or Angular Silhouettes: Which Softens a Boxy UK New-Build Living Room?
- How to Balance a Sculptural Coffee Table With Functional Seating in 20 m²?
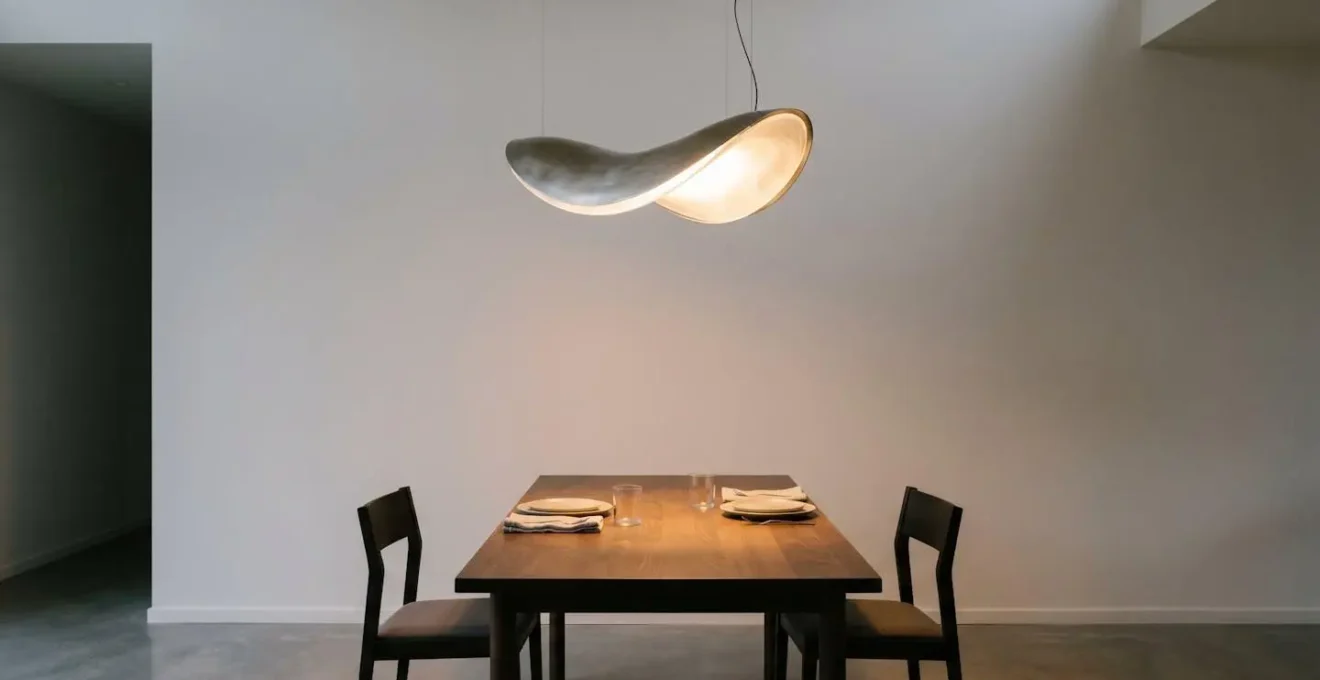
Why Does Your Designer Pendant Leave Your Dining Table in Shadow?
The most common failure of a statement pendant, particularly over a dining table or kitchen island, is poor light distribution. You have a pool of intense light directly below the fixture, while the surrounding area is cast in dramatic, often unhelpful, shadows. This happens when the fixture is chosen for its shape, not its light-engine properties. The culprit is almost always the material. Pendants made from opaque materials like spun metal, concrete, or ceramic are designed to be downlights. They create a focused, theatrical beam, which can be fantastic for highlighting an object but is terrible for general illumination.
Conversely, fixtures made from translucent or diffused materials—such as frosted or ribbed glass, fabric, or parchment—are designed to provide ambient light. They scatter light in a much wider, softer pattern, reducing harsh contrasts and filling the room with a gentle glow. The problem arises when a beautiful opaque fixture is expected to perform the job of a diffuser. It simply cannot; its design is to direct, not to disperse. Understanding this distinction is the first step in diagnosing your lighting issue.
Correcting this involves layering. If your hero pendant is an opaque downlight, you must supplement it. This doesn’t necessarily mean expensive rewiring. Think about adding discreet accent lighting, such as slim picture lights on a nearby wall, or placing elegant, rechargeable table lamps on a sideboard to fill in the shadowy corners. In a kitchen-diner, a mirrored or high-gloss splashback can work wonders by bouncing the directed light back into the space. Finally, adjusting the pendant’s height can have a significant impact; lowering it slightly concentrates its light more effectively on the task surface, which can make the surrounding shadows feel less like a flaw and more like an intentional, atmospheric choice.
How to Retrofit Dimming Into a Vintage Brass Chandelier Without Rewiring?
You’ve acquired a stunning vintage brass chandelier, but it has one major flaw: its all-or-nothing switch floods the room with a flat, overly bright light. The thought of chasing new wiring into your walls for a dimmer switch is daunting and expensive. Fortunately, modern technology offers an elegant and non-invasive solution: smart bulbs. This approach completely bypasses the need for a traditional wall dimmer by building the dimming mechanism directly into the bulb itself.
The process is remarkably simple. First, identify your chandelier’s bulb fitting. In the UK, vintage fixtures most commonly use E14 (small Edison screw) candle bulbs or B22 (bayonet cap) bases. Once you know the fitting, you can select compatible smart bulbs from brands like Philips Hue, LIFX, or WiZ. The key is to choose bulbs that not only dim but also offer colour temperature control. For a brass fixture, a range of 2200K to 2700K will allow you to produce a beautiful, warm, golden glow that enhances the metal’s character. Simply install the bulbs, leave the original wall switch permanently in the ‘ON’ position, and control the brightness and warmth wirelessly via a smartphone app or a small remote.
Expert Insight: The Smart Bulb Bypass
Smart bulbs are a game-changer for renters or anyone hesitant about electrical work. They contain a miniaturised computer and dimming circuit that takes control away from the wall switch. This not only provides wireless dimming but also eliminates the flickering or buzzing that can occur when incompatible LED bulbs are used with old dimmer switches. However, there is one critical rule: never install smart bulbs on a circuit that is already controlled by a physical dimmer switch. The conflicting signals can permanently damage the electronics within the bulbs, negating your investment. The system works by having a standard, non-dimming switch that is always on, giving full power to the bulb, which then manages the dimming internally.
Before you commit, perform one final check. Verify the maximum wattage rating of your chandelier (often found on a small label on the fixture itself) and ensure the combined power draw of all your new smart bulbs does not exceed it. This ensures safe, long-term operation for your beautifully modernised vintage piece.
Single Statement Pendant or Multi-Drop Cluster: Which Suits a 3 m Ceiling Height?
With a generous 3-metre ceiling, common in Victorian or Edwardian UK homes, you have the vertical space to make a dramatic statement. The primary choice is between a single, large-scale sculptural pendant or a multi-drop cluster. The decision hinges on the atmospheric effect you wish to create. A single large pendant acts as a commanding focal point. It has significant « visual weight » and creates a sense of stability and grandeur. It’s a singular, bold statement that anchors the space, ideal for positioning over a dining table or in the centre of a formal living room.
A multi-drop cluster, by contrast, creates a sense of dynamic movement and vertical rhythm. It draws the eye upward and can make a high ceiling feel more intimate and engaging. Clusters are particularly effective in double-height spaces, stairwells, or corners of a room that need visual interest. With a 3m ceiling, you have the perfect canvas for a staggered cluster, where pendants are hung at varying heights to create a cascading, waterfall-like effect. This feels more organic and artistic than a cluster where all pendants hang at a uniform level, which can feel more formal and rigid.
This image illustrates the different spatial impacts of a single large fixture versus a multi-drop cluster in a room with significant ceiling height.
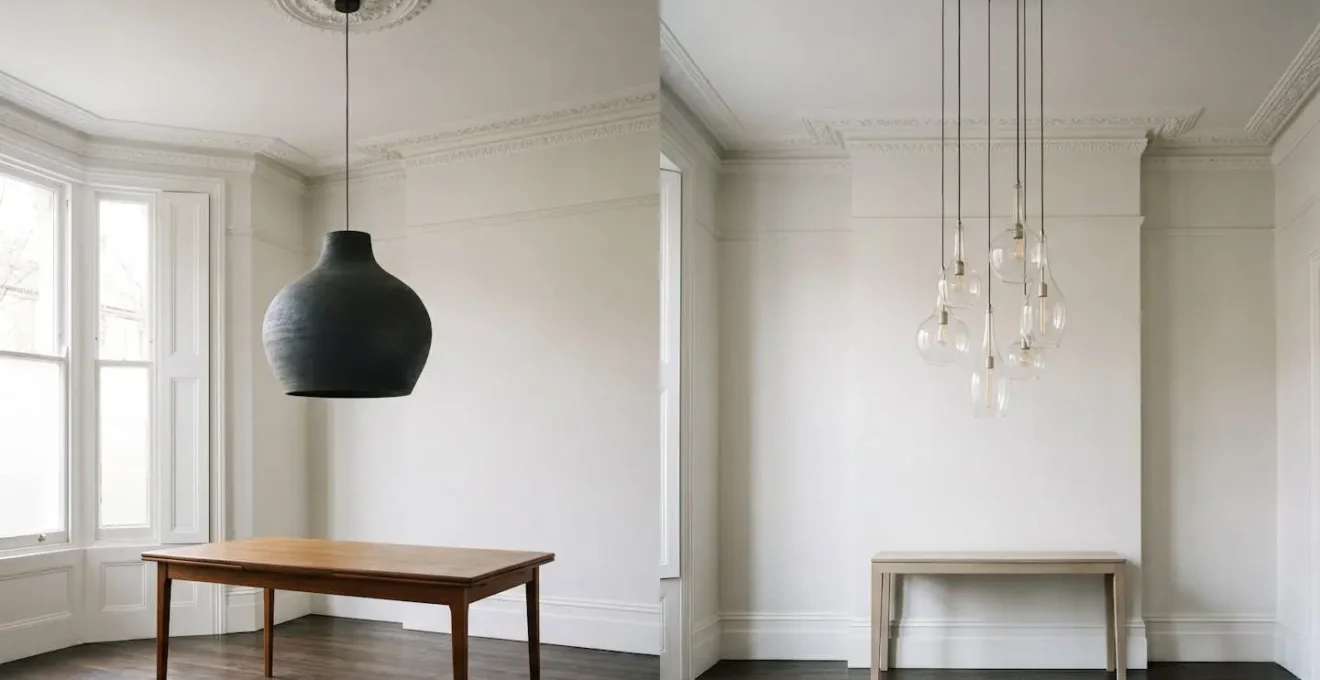
Ceiling height is the critical factor. While your 3m ceiling is ideal, it’s important to note that UK lighting specialists advise that cluster pendants require at least a 2.6m ceiling height to be effective. In rooms with standard 2.4m ceilings, a cluster can feel oppressive and visually cluttered, making a single, lower-profile fixture a much better choice. For your space, the choice is purely aesthetic: do you want a singular, powerful anchor or a dynamic, playful sculpture of light?
The Naked-Filament Mistake That Causes Eye Strain at Your Kitchen Island
The rise of the industrial-chic aesthetic brought with it the ubiquity of the naked filament « Edison » bulb. Hung in simple cord sets or minimalist glass shades over kitchen islands, they offer a warm, vintage appeal. However, they introduce a significant functional problem: glare. When you are sitting or standing at a kitchen island, these exposed, clear bulbs are often directly in your line of sight. Your eyes are forced to constantly adjust to the intense point of light, which is a major cause of visual discomfort.
This isn’t just a matter of annoyance. The intense brightness and, in the case of some cheap LEDs, imperceptible flickering, can have physiological effects. As multiple studies have confirmed, long-term exposure to light flicker and glare can lead to eye strain, headaches, blurred vision, and general fatigue. A kitchen island is a primary task area used for food preparation, reading, and conversation. Exposing yourself to direct glare in such a space fundamentally compromises its functionality. The « art » of the fixture is actively working against its purpose.
Fortunately, you don’t have to abandon the aesthetic entirely. There are several ways to mitigate glare from naked-filament pendants, moving from a basic fix to an optimal solution.
Your Action Plan: Reducing Glare from Filament Bulbs
- Good: Replace your standard clear Edison bulbs with versions that are labelled as Extra Warm White (under 2700K) and have a lower lumen output. This reduces the harshness and brightness contrast without changing the fixture.
- Better: Use half-chrome or frosted filament bulbs. Half-chrome bulbs have a mirrored tip that blocks the harsh downward glare completely, redirecting light upwards. Frosted versions diffuse the light, softening it while keeping the vintage bulb shape.
- Best: The ideal solution is to choose a better ‘light engine’ from the start. Select pendant fixtures with deep-shade designs where the bulb is recessed high up and out of direct sightline. Alternatively, opt for fixtures with built-in diffusers. Then, add dedicated, shadow-free task lighting for your work surfaces with under-cabinet LED strips.
This tiered approach allows you to balance aesthetics with visual comfort, ensuring your kitchen island is a pleasant and functional space, not a source of daily eye strain.
When Do UK Lighting Showrooms Discount Sculptural Fixtures by Up to 50%?
Investing in a high-end sculptural pendant can be a significant financial commitment. However, with strategic timing, it is possible to acquire these designer pieces at a substantial discount, sometimes up to 50% off. The key is to understand the UK’s retail and design industry calendar. High-end showrooms don’t discount randomly; their sales are tied to the launch of new collections and the clearance of floor stock.
The most significant opportunities arise immediately after major industry trade events. Keep an eye on these key periods:
- Post-London Design Festival (late September/October): This is when many brands launch their new season’s collections. To make space, showrooms often sell off previous season’s stock and ex-display models.
- Post-Clerkenwell Design Week (late May/June): Similar to the autumn festival, this major London-based event prompts retailers to clear out older designs to make way for new lines they’ve just ordered.
- January Sales: The traditional post-Christmas clearance remains a prime time for discounts as retailers look to shift current inventory.
- Black Friday (November): While historically focused on electronics, this event has been increasingly adopted by UK home decor retailers. Discounts on high-end designer lighting are becoming more common, though the best deals are often on more mid-range brands.
Beyond these sale periods, there is another powerful strategy: building a relationship with your local high-end lighting showroom. Ex-display models are a source of incredible bargains. These fixtures have been on the showroom floor and may have minuscule imperfections, but are often sold at a significant reduction. These sales are rarely advertised online. By visiting stores like Heal’s, Holloways of Ludlow, or The Conran Shop and speaking directly with the staff, you can inquire about upcoming floor stock sales. Expressing interest in a particular piece can put you at the top of the list when it’s time for it to be replaced.
How to Layer Lighting in One Room That Serves as Lounge, Office and Dining Area?
In modern UK homes, a single open-plan room often has to function as a living room, home office, and dining area. The biggest mistake is trying to light this multi-purpose space with a single, central pendant. This « one-size-fits-all » approach inevitably fails, leaving the room feeling flat, poorly lit for tasks, and devoid of atmosphere. The solution is ‘Atmospheric Engineering’ through layered lighting. This involves creating three distinct vertical zones of light that can be controlled independently: ambient, task, and accent.
The sculptural pendant plays the role of providing the main ambient (or general) light. But for a multi-use space, it must be dimmable and ideally have adjustable colour temperature. The other layers are built around it. Task lighting is non-negotiable for work and dining areas. This means a dedicated, directional desk lamp for the office zone and ensuring the main pendant can be focused and brightened over the dining table. Accent lighting is the final, mood-setting layer. This includes low-level table lamps, floor lamps, and picture lights that create pools of warm, intimate light for relaxing in the evening.
This image demonstrates how vertical layers of light—from ceiling to mid-level to low-level—work together to define zones and create a comfortable atmosphere in a multi-functional room.

The most effective way to manage these layers is with a smart lighting system. Systems like Philips Hue or Lutron allow you to program ‘scenes’ that instantly adjust all the lights in the room to a pre-saved configuration with a single touch or voice command.
- Home Office Scene: The main pendant provides bright, cool-white light (around 3500K) for general alertness, supplemented by a focused desk lamp. The target illumination here is a functional 50-75 lumens per square foot.
- Dining Scene: The pendant dims to a warm, inviting glow (around 2700K) focused directly over the table, with an atmospheric target of 20-30 lumens per square foot. Other lights are dimmed or off.
- Lounge Scene: The overhead pendant is turned off entirely. Only low-level accent lighting from table and floor lamps is active, creating a cosy and relaxed ambiance with just 10-20 lumens per square foot.
By thinking in scenes rather than individual switches, you transform a single physical space into multiple functional and atmospheric zones.
Curved or Angular Silhouettes: Which Softens a Boxy UK New-Build Living Room?
UK new-build properties are often criticised for their « boxy, » characterless rooms with uniform right angles. A common piece of design advice is to introduce curved forms—round mirrors, arched doorways, sofas with soft lines—to soften these hard edges. It follows that a sculptural pendant with a curved, organic silhouette would be the natural choice. While a spherical or flowing fixture certainly can add softness, it’s not always the most effective strategy. Sometimes, fighting fire with fire is more impactful.
Counter-intuitively, a complex angular or geometric fixture can be more powerful at ‘breaking the box’. While a simple sphere adds one contrasting shape, a multi-faceted sputnik, starburst, or complex cluster pendant introduces multiple lines and focal points. According to lighting design principles, these fixtures create more dynamic and dramatic shadow play across the flat planes of the walls and ceiling, adding a layer of visual interest and complexity that a simple curved shape cannot. A cluster of angular pendants hung at staggered heights, for example, creates a strong vertical movement that distracts the eye from the room’s simple geometry.
Whichever silhouette you choose—the gentle contrast of a curve or the dynamic complexity of an angle—the key to successful integration is the « design echo » principle. This prevents the statement pendant from feeling like an isolated object. The goal is to create intentional cohesion without overwhelming the space:
- Select Your Dominant Form: Decide if your hero piece will be primarily curved or angular.
- Echo the Form in Accents: Repeat your chosen silhouette in 2-3 smaller, supporting items. For a curved pendant, this could be a rounded vase or a circular cushion pattern. For an angular fixture, use geometric-patterned textiles or a faceted side table.
- Vary the Scale: Ensure the « echo » items are of a different scale to the pendant to create visual rhythm, not monotonous repetition.
- Practice Restraint: Limiting the echoes to just a few key pieces creates a sophisticated, cohesive look. Any more, and the room risks looking like a caricature of a theme.
Key Takeaways
- Analyse the ‘Light Engine’: Prioritise a pendant’s material and construction (the ‘light engine’) over its shape to control light quality, direction, and shadow.
- Embrace Layering: A single statement pendant cannot light a room alone. Combine it with task and accent lighting, managed through ‘scenes’, to create a functional and atmospheric space.
- Form Follows Function: Choose a fixture’s silhouette (curved vs. angular) and scale (single vs. cluster) based on your room’s architecture and the specific atmosphere you wish to engineer.
How to Balance a Sculptural Coffee Table With Functional Seating in 20 m²?
In a compact UK living room of around 20 m², every design choice carries immense weight. The question of how to balance major furniture pieces is critical. This challenge is amplified when your hero piece is not a sofa or a chair, but a light fixture. If your sculptural pendant is the star of the show, every other element, including the coffee table and seating, must play a supporting role. Trying to have a statement pendant, a statement coffee table, *and* a statement sofa in a small space will result in visual chaos.
The « one hero piece » strategy is essential. With the pendant designated as the hero, the goal for all other furniture is to achieve visual lightness. This means selecting pieces that don’t occupy a lot of visual space. Look for sofas and chairs with slim legs that raise the body of the furniture off the floor, allowing light and air to flow underneath. Choose a coffee table made from transparent materials like glass or acrylic, or one with a very slender frame. These pieces serve their function without cluttering sightlines.
This same principle of « visual permeability » should be applied to the hero pendant itself. In a 20 m² room, a large, solid, opaque pendant can feel heavy and lower the perceived ceiling height. A better choice is a fixture you can see through. This could be a wireframe design, a delicate cluster of small glass orbs, or an open-form geometric structure. These fixtures make their statement through form and complexity rather than solid mass, preventing them from visually dominating the limited space. The final step is to create harmony through materials. Instead of matching shapes, link your hero pendant to the supporting furniture with a common material thread. For example, a brass pendant can be subtly echoed in the thin brass legs of a coffee table or the frame of a nearby mirror. This creates a cohesive and intentional design without overwhelming the eye.
To put these principles into practice, start by auditing your space not for what it looks like, but for how the light performs and makes you feel. Identify the problem areas—the glare, the shadows, the lack of atmosphere—and use the strategies outlined here to select a new ‘light engine’ or adapt your existing one. This is the path to transforming your room from simply decorated to truly designed.