Tired of furniture that falls apart? The frustration with wobbly drawers and failing joints ends when you learn to see furniture not as a consumer, but as a craftsman. The secret isn’t just looking for ‘solid wood’ or ‘dovetails,’ but understanding the language of construction—how a joint resists force, how wood grain tells a story of authenticity, and how even unseen stitches predict a piece’s lifespan. This guide will teach you to read those signs and invest in furniture built to be inherited, not replaced.
There’s a unique kind of disappointment that comes from a drawer front pulling off in your hand, or the slow, creeping wobble of a sideboard you once loved. You thought you’d bought quality. It said ‘solid oak’ on the label. But after a few short years, the staples are pulling out, the glue is failing, and you’re left with an expensive piece of firewood. Many will tell you to simply « look for dovetails » or « buy solid wood, » but this advice is dangerously incomplete. It doesn’t arm you against the clever loopholes of modern mass-production.
The truth is that spotting quality is about developing an eye for detail and understanding the ‘why’ behind the ‘what’. It’s about reading the subtle language of the piece, from the way a joint is cut to the way a thread pierces leather. The real key to buying furniture that lasts a generation isn’t about trusting the marketing label; it’s about trusting your own informed judgment. It’s about learning to think like the person who built it.
This guide will move beyond the platitudes. We will explore the mechanical honesty of different joints, teach you how to perform discreet quality checks in a showroom, and reveal the difference between genuine craftsmanship and clever imitation. You will learn not just to identify a dovetail, but to judge its character and what it says about the entire piece of furniture.
This article provides a detailed roadmap for inspecting furniture, empowering you to distinguish heirloom-quality pieces from their disposable counterparts. Below, you will find a summary of the key areas we will cover, from the secrets of joinery to the tell-tale signs in upholstery.
Summary: How to Spot Quality Dovetails That Signal a Drawer Built to Last 50 Years?
- Why Does Your Solid-Oak Sideboard Use Dowels Instead of Dovetails?
- How to Test Drawer Joints in a Furniture Store Without Looking Suspicious?
- Hand-Cut or CNC Dovetails: Does the £200 Price Difference Reflect Real Durability?
- The « Solid Wood » Label Loophole That Hides Chipboard Underneath in UK Stores
- When Is the Best Season to Buy Antique Furniture With Stable Joints in the UK?
- Why Do Hand-Sewn Seams Look Uneven but Last Twice as Long?
- The Sanding Mistake That Ruins 1 in 3 Veneered Antiques During DIY Restoration
- How to Verify Genuine Hand-Stitched Leather on a UK High-Street Armchair?
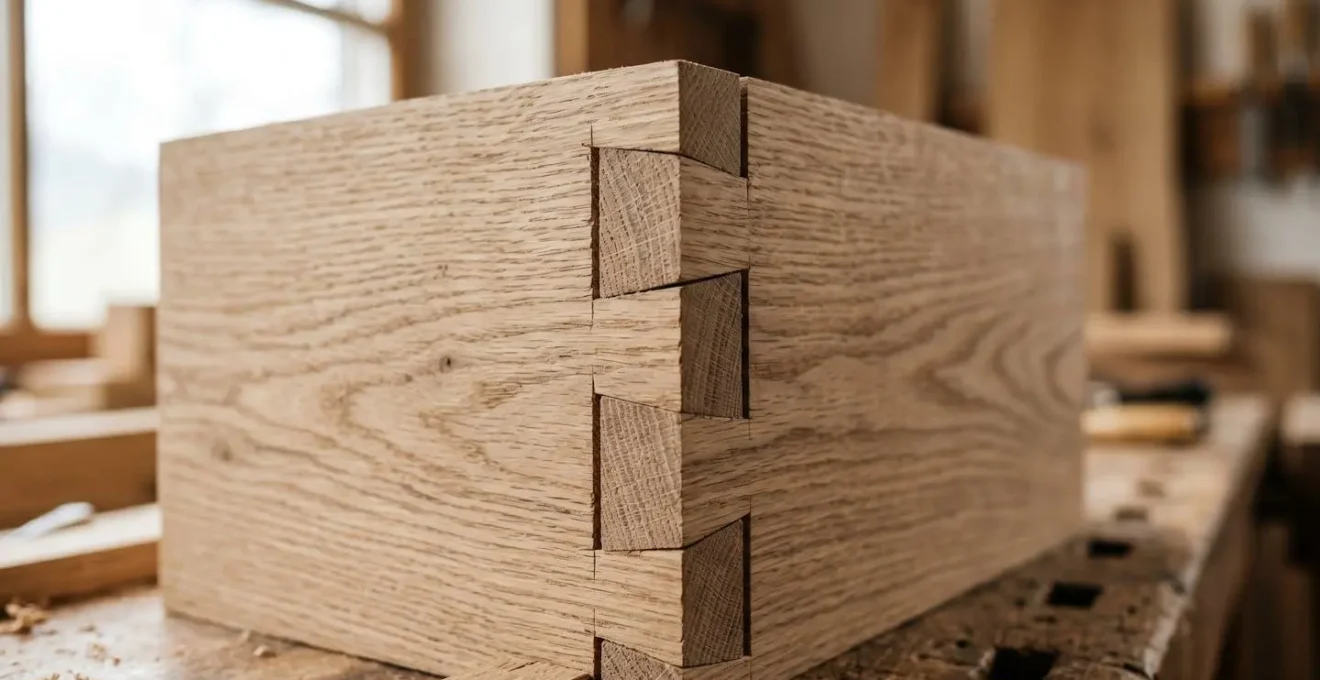
Why Does Your Solid-Oak Sideboard Use Dowels Instead of Dovetails?
The answer often comes down to cost and pressure. In furniture making, a joint’s first job is to resist the forces applied to it. For a drawer that is pulled open and pushed shut thousands of times, the primary force is tension—a pulling force. This is where the dovetail joint reveals its genius. The angled ‘tails’ and ‘pins’ of the joint interlock mechanically, meaning the joint is physically incapable of pulling apart. In fact, it’s one of the few woodworking joints that becomes stronger under load. Research consistently shows that dovetail joints provide superior tensile strength, making them the undisputed champion for high-stress applications like drawer construction.
Dowels, on the other hand, are cylindrical pins inserted into corresponding holes, held primarily by the friction of a tight fit and glue. While effective for alignment and resisting shearing (sideways) forces, they offer very little mechanical resistance to being pulled apart. When used in a drawer corner, a dowel joint relies almost entirely on the glue. Over time, as glue ages or wood moves with humidity, that bond can weaken, and the joint will fail. When you see dowels used on the drawers of a ‘solid-oak’ piece, it’s a clear signal of cost-cutting. The manufacturer has prioritized production speed and lower expense over long-term structural integrity, hoping the consumer won’t know the difference.
Action Plan: Your Joint Hierarchy Assessment
- Identify High-Stress Zones: Pull a drawer out completely. The corners where the front and sides meet are the highest stress points. This is where quality is non-negotiable.
- Evaluate Joint Appropriateness: Look for dovetails here. Their presence indicates a commitment to quality. Staples, nails, or simple glued butt joints are major red flags signaling a focus on cost over longevity.
- Assess Mechanical Resistance: On the main frame of the furniture, look for mortise and tenon joints (a protruding tenon fitting into a mortise hole). These are designed to resist the ‘racking’ forces that make furniture wobble.
- Check Dowel Application: Seeing dowels isn’t always bad. In quality furniture, they are often used for alignment in conjunction with stronger joints, or in low-stress areas. They should never be the sole, primary joint in a high-stress location like a drawer corner.
Essentially, choosing dowels over dovetails for a drawer is a conscious compromise. It’s a sign that the maker’s priority has shifted from creating a generational piece to simply getting a product out the door. It’s the first clue you should look for.
How to Test Drawer Joints in a Furniture Store Without Looking Suspicious?
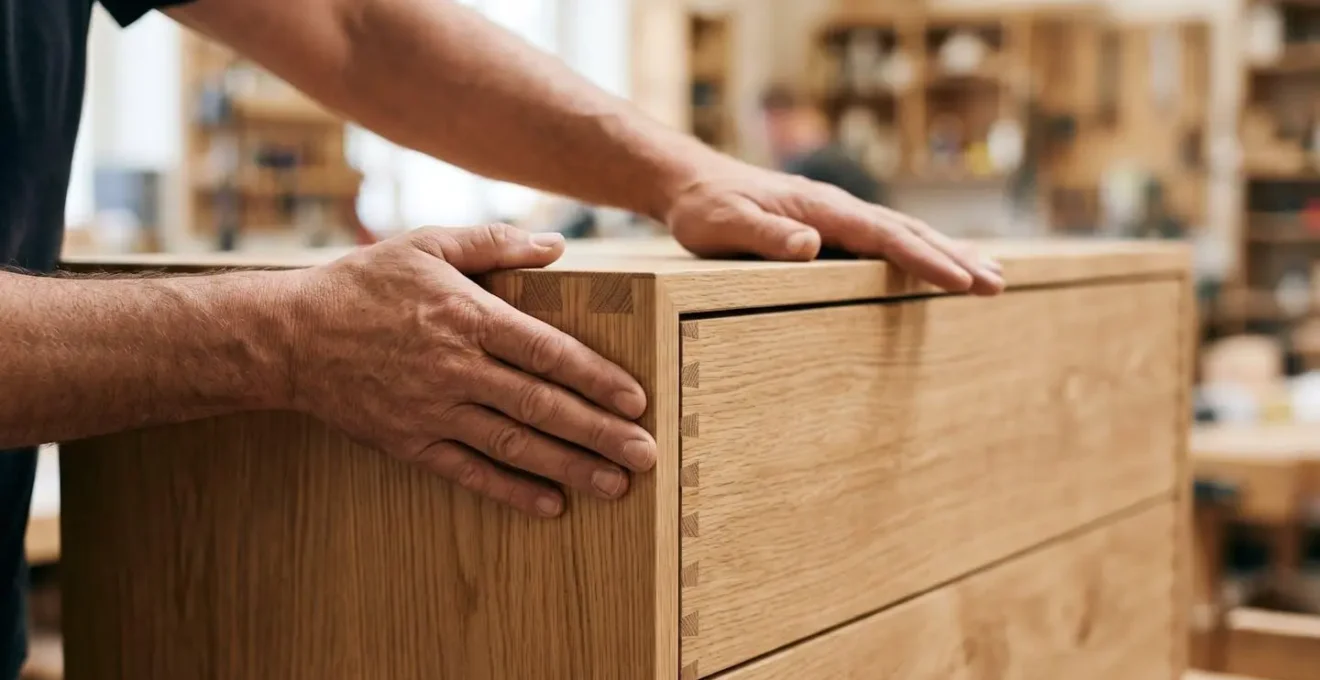
The showroom floor is not a workshop, and you can’t start disassembling furniture. The key is a subtle, targeted test that mimics years of use in seconds. Forget grabbing a corner and shaking violently. The professional’s method is the ‘racking test,’ and it’s all about applying opposing pressure to test for movement in the joints. This test directly challenges the joinery that prevents a piece from twisting out of square.
To perform the test discreetly, place your palms on opposite top corners of the drawer front (or the top of a small cabinet). Now, gently push with one hand while pulling with the other. Apply smooth, steady pressure, not a sudden jerk. What you are feeling for is any hint of give, creaking, or movement. A well-joined piece will feel like a single, solid block of wood. It will resist this racking force completely. If you feel any twist, wobble, or hear the protest of a stressed joint, you have found a weakness. As furniture industry analysis shows, if furniture feels sturdy when you lean on it or open a drawer, good joinery is the reason. Cheap furniture fails at the joints first because stress is concentrated on weak fasteners instead of being distributed across the structure.
This subtle test is far more informative than a general wiggle. It specifically targets the diagonal rigidity of the case or drawer, which is provided almost entirely by the corner joints. A poorly joined piece will flex, indicating that the joints are not doing their job of transferring the load through the wood itself, but are instead relying on weak glue or flimsy fasteners. It’s a quiet test that speaks volumes about the piece’s future.
Perform this test on a few different pieces in a store, and you will quickly develop a feel for the difference between a rock-solid piece and one that’s already on its way to failing.
Hand-Cut or CNC Dovetails: Does the £200 Price Difference Reflect Real Durability?
Once you’ve found dovetails, the next level of connoisseurship is distinguishing between those cut by hand and those by a CNC machine. From a purely structural standpoint, a well-executed machine-cut dovetail is incredibly strong and will likely outlast the owner. The debate, therefore, is not solely about durability but about aesthetics, cost, and the story of craftsmanship.
Machine-cut dovetails, often made with a router and a jig or a CNC machine, are defined by their perfect uniformity. The pins and tails will be identical in size, spacing, and angle. They are a sign of efficient, precise manufacturing. Hand-cut dovetails, by contrast, carry the subtle signature of the maker. The lines may not be perfectly uniform, and crucially, the craftsman can make decisions a machine cannot. As woodworking experts note, the tell-tale sign is often the size of the pins.
With hand cutting you can make small pins, much smaller than with CNC because the cutter size limits you. This is how you can usually tell if a dovetail was machine cut or hand cut.
– CNC Woodworking Forum Contributors, Vectric Customer Forum Discussion on Dovetail Cutting Methods
This ability to create thin, delicate pins is considered a mark of high skill and aesthetic refinement. Functionally, there is little to no durability difference. The £200 price difference, therefore, is not paying for a stronger joint. It is paying for the time, skill, and artistry of the craftsman. It’s a statement of value. As one professional cabinetmaker noted, while it’s an outdated process for commercial work, it’s the only method he chooses when building for his own family—a testament to its value beyond pure metrics. The choice is less about good vs. bad and more about valuing precision manufacturing vs. individual artistry.
For a buyer focused solely on a 50-year lifespan, a quality machine-cut dovetail is more than adequate. For a buyer who values the story and the visible touch of a human hand, the premium for hand-cut joints is a worthy investment in artistry.
The « Solid Wood » Label Loophole That Hides Chipboard Underneath in UK Stores
The term « solid wood » should be a guarantee of quality, but it’s often used to mislead. A piece can be constructed from a cheap core material like chipboard or MDF and covered with a very thin layer of real wood—a veneer. Since the surface is technically wood, some retailers will stretch the definition. The key to not being fooled is to learn how to spot the difference, and the secret is in the grain continuity.
Wood is a natural, organic material. The grain pattern you see on the top of a solid wood board is part of a three-dimensional structure. Therefore, that grain pattern should flow and wrap around the edge of the board in a continuous, logical way. Think of it like a loaf of marbled bread; when you slice it, the marbling continues through the slice. On a veneered piece, the top surface and the edge are two separate pieces of material applied independently. The grain pattern on the top will come to an abrupt stop at the corner, and the edge will either have a completely different, often repetitive, pattern (edge banding) or show the layered, sawdust-like texture of the chipboard core.
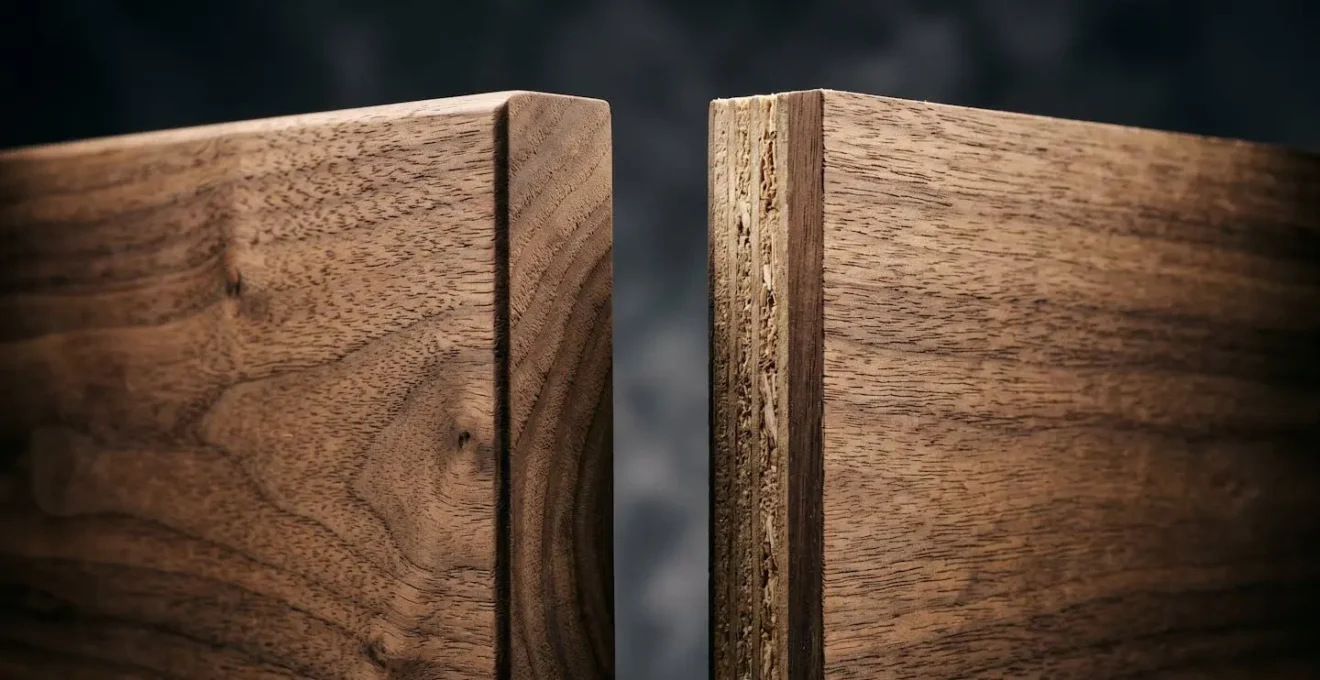
As expert woodworkers at Parkman Woodworks advise, « Solid wood displays continuous grain patterns that flow naturally across surfaces and wrap around edges. Veneered furniture shows mismatched or abruptly ending grain patterns at edges. » Look closely at tabletops, drawer fronts, and cabinet sides. The corners are where the truth is revealed. If the grain doesn’t wrap, it’s not solid. It’s also wise to inspect the underside of a piece, where manufacturers are less likely to apply a convincing finish. You can often see the raw core material there.
This isn’t to say veneer is always bad—high-end marquetry is an art form—but when it’s used to disguise a cheap core on a piece labelled « solid wood, » it’s a deliberate deception you are now equipped to uncover.
When Is the Best Season to Buy Antique Furniture With Stable Joints in the UK?
When buying antique furniture, you’re not just buying a design; you’re buying a history of exposure to the elements, primarily humidity. Wood is hygroscopic, meaning it absorbs and releases moisture from the air, causing it to expand in the damp UK summer and contract in the dry, centrally-heated winter. This seasonal movement is the number one enemy of old joinery.
Over decades, this cycle of expansion and contraction puts immense stress on joints. Glue can become brittle and fail, tenons can loosen in their mortises, and drawers can stick or become sloppy. The most stable and well-preserved antiques are those kept in environments where humidity is controlled. According to the National Parks Service, the ideal environment for wooden objects is a stable relative humidity between 35 to 65 percent, a range often difficult to maintain in a typical home.
So, when is the best time to buy? The conventional wisdom is to inspect and buy antique furniture at the end of winter or in early spring. During this period, the wood has been living in its driest state for months due to indoor heating. It has contracted as much as it’s going to. This is when any problems with the joinery will be most apparent. Joints that are loose, gaps that have opened up, and cracks that have formed will be at their most obvious. A piece that is still tight and solid at the end of a long winter is a piece with well-made, resilient joints. Buying in the humid summer can be deceptive; the wood may have swelled to temporarily tighten a loose joint, hiding a problem that will reappear come winter.
Evaluating an antique in its driest state allows you to buy with confidence, knowing its joints have survived the worst the climate can throw at it and are ready for the next century.
Why Do Hand-Sewn Seams Look Uneven but Last Twice as Long?
In a world of machine-made perfection, the slight unevenness of a hand-sewn seam can be mistaken for a flaw. This is a profound misunderstanding of the craft. The durability of hand-stitching, particularly the saddle stitch used in high-end leatherwork, lies in its structure. Each stitch is formed with two needles and a single thread, creating a series of interlocking knots within the leather. If one stitch is somehow abraded and breaks, the stitches on either side of it hold firm. The seam will not unravel. It’s a system with built-in redundancy.
A machine stitch, by contrast, is typically a lockstitch, which uses two separate threads (a top thread and a bobbin thread) that loop around each other. It’s fast, efficient, and produces a perfectly uniform line. However, its weakness is that it creates a continuous chain. If a single stitch in that chain breaks, the tension is lost, and the entire seam can quickly pull apart, like pulling a thread on a cheap jumper. The perfection of the machine-stitched line is a sign of speed, not strength.
This principle is analogous to the difference between solid wood and veneered particleboard. As experts from Parkman Woodworks note, « Solid wood furniture can be sanded down and refinished multiple times over its lifetime. This is furniture that can last for generations while developing rich patina and character as it ages. » In the same way, a hand-stitched seam can be repaired stitch by stitch. A failed machine-stitched seam on a cheap sofa often means the entire panel, or even the whole piece, is a write-off. The slight ‘imperfection’ of the hand-sewn line is the visible evidence of a stronger, more resilient, and ultimately more repairable construction—a hallmark of true, lasting quality.
Therefore, when you see those slightly angled, subtly irregular stitches on a leather armchair, recognise them not as flaws, but as the proud signature of a superior construction method designed for longevity.
Key takeaways
- True quality is in construction, not labels. Prioritise dovetail joints in high-stress areas like drawers for their superior tensile strength.
- Learn the ‘racking test’ to feel a joint’s integrity in-store and check for ‘grain continuity’ to expose fake solid wood.
- The best time to buy antiques is late winter when dry air reveals loose joints, giving you the most honest assessment of condition.
The Sanding Mistake That Ruins 1 in 3 Veneered Antiques During DIY Restoration
The desire to restore a tired piece of furniture is admirable, but enthusiasm combined with an electric sander is the leading cause of death for veneered antiques. The single most catastrophic mistake a DIY restorer can make is failing to recognise they are working with a veneer and sanding right through it into the less-attractive substrate wood beneath. This error is almost always irreversible.
The danger lies in the thickness of the material. While older, 18th-century veneers could be thicker, modern furniture veneers are incredibly thin. According to furniture restoration specialists, they are usually less than 1mm in thickness, with popular measurements between 0.6 to 0.8 mm. That’s thinner than a credit card. An orbital sander with an aggressive grit can remove that much material in a matter of seconds, leaving a patch of exposed MDF or plywood that is impossible to hide. Before you ever touch a sander to an old piece of furniture, you must identify if it is veneered.
If you have a veneered piece, the restoration process must prioritize preservation over aggressive removal. The goal is to remove the old finish, not the wood itself. A professional workflow always avoids heavy sanding:
- Identify Veneer First: Before any work begins, confirm the material. Check edges for grain continuity and look for signs of a substrate layer.
- Use Chemical Strippers: A gentle chemical stripper is the primary tool. It dissolves the old lacquer or varnish without touching the veneer.
- Employ Solvents and Fine Steel Wool: After stripping, use a solvent like mineral spirits and #0000 steel wool to gently clean away the residue.
- Sand as a Final, Gentle Touch: If any sanding is required at all, it should be the very last step, done by hand with very fine grit sandpaper (320 or higher). This is for smoothing the surface for the new finish, not for material removal.
The sander is a powerful tool, but in the context of veneer restoration, its power is most often destructive. The true craftsman’s tools here are patience and chemical strippers.
How to Verify Genuine Hand-Stitched Leather on a UK High-Street Armchair?
On the bustling UK high street, amidst a sea of « leather-look » and bonded leather, finding genuine quality requires a detective’s eye. Verifying hand-stitching is a key indicator that you’ve found a piece where craftsmanship was prioritised. Just as a cabinet-maker hides the best joints where they do the most work, a good upholsterer’s best work is often just out of sight. The advice for spotting wood joinery holds true for upholstery: you have to know where to look. As Laurel Crown Furniture experts say, « Solid wood drawers commonly feature dovetail joints… Open the drawer… and search the left or right side of the pulled-out drawer. »
To verify hand-stitching, you must do the equivalent. Don’t just look at the main seams on the top of the cushions. Flip a cushion over. Look at the seams along the zipper, or on the underside of the armrest. These are the areas where manufacturers often cut corners, switching to faster machine stitching where they think no one will look. A piece that features consistent, high-quality stitching in these hidden areas is a sign of true commitment to quality throughout.
What are you looking for? First, the angle. Hand-sewn saddle stitches tend to lie at a slight angle, creating a pleasing diagonal pattern. Machine stitches are almost always perfectly perpendicular to the seam. Second, look at the thread itself. Hand-stitching often uses a thicker, waxed linen or polyester thread that sits proudly on the surface of the leather. Machine thread is often thinner and pulled tighter into the hole. Finally, look for the ‘cast’ of the stitch—the two distinct, parallel rows of holes made by the saddler’s pricking iron or awl. The thread will pass through these holes at an angle. The result is a seam that is not just decorative but is a fundamental part of the chair’s structure, built for a lifetime of use. Indeed, research on traditional joinery longevity shows that well-made pieces can last for over 100 years, a standard to which quality stitching also aspires.
By taking the time to inspect these hidden details, you are applying the same rigorous standards a craftsman would. It’s the most reliable way to ensure the armchair you buy today will be a cherished part of your home for decades.