In summary:
- Treat your balcony’s weight limit as a strict « structural budget » to avoid serious safety risks.
- Automated, solar-powered watering systems are essential for holiday-proofing your garden and ensuring consistent moisture.
- The choice between fabric and modular planters is a material science decision; UV-stabilised panels offer the best 5-year value in the UK climate.
- Proper drainage engineering is non-negotiable to prevent a « cascading failure » that drowns plant roots from the top down.
- Strategic « microclimate stacking » allows you to grow a wide variety of herbs by matching them to the sun, wind, and water conditions at different heights.
The dream is potent for any city dweller: stepping out onto a small balcony and being greeted by a wall of fragrant, fresh herbs. The idea of snipping your own rosemary for a roast or mint for a mojito feels like the ultimate urban luxury. Yet, for many, this vision quickly collides with a harsh reality of withered plants, water-stained floors, and the feeling that you simply lack the « green thumb » required.
Conventional gardening advice often falls short. Suggestions like « find a sunny spot » or « water regularly » are almost meaningless on a 15th-floor balcony where the sun is intense, the wind is relentless, and a two-week holiday can spell doom for every plant. The truth is, a thriving urban micro-garden isn’t born from intuition alone. It’s an engineered ecosystem, a high-performance system designed to operate within a unique and challenging environment.
But what if the key wasn’t a mystical green thumb, but a solid understanding of basic engineering principles? What if you could approach your balcony garden not as a hopeful gamble, but as a solvable design challenge? This guide reframes the entire process. We will move beyond horticulture platitudes and delve into the critical, often-overlooked mechanics: the physics of weight distribution, the hydraulics of automated watering, the material science of planters, and the biology of roots confined in a vertical space.
By mastering these concepts, you can systematically design a garden that not only survives but thrives, transforming that compact 2m² space into the productive, green oasis you’ve always imagined. This is your engineering blueprint for conquering the urban jungle.
Contents: Your Engineering Blueprint for a 2m² Urban Oasis
- Why Does Your Fully Planted Vertical Garden Risk Breaching Balcony Load Limits?
- How to Automate Watering for a Vertical Planter When You Travel for 2 Weeks?
- Modular Panel or Fabric Pocket System: Which Lasts 5 Seasons Outdoors in the UK?
- The Hidden Overflow Mistake That Drowns Roots in 70% of DIY Vertical Gardens
- In What Order Should You Plant Salads, Herbs and Trailing Flowers in a Vertical Garden?
- Why Does Your Modular Sofa Void the Tenancy Deposit on Wooden Floors?
- How to Install a 500-Litre Water Butt in a Terraced-House Garden?
- How to Cut Garden Water Use by 50% Without Sacrificing Colour in Summer?
Why Does Your Fully Planted Vertical Garden Risk Breaching Balcony Load Limits?
Before a single seed is planted, the most critical piece of garden engineering begins: understanding your structural budget. A balcony is not solid ground; it’s a cantilevered platform with a strict weight limit. A lush, mature vertical garden, saturated with water after a downpour, can weigh hundreds of kilograms. Ignoring this fact doesn’t just risk a fine; it risks structural failure. The weight of the structure, soil, water, and mature plants all add up, creating a significant static load.
In the UK, residential balconies are typically designed to support a minimum imposed load, but this varies. For instance, new builds must meet specific standards, where the minimum uniformly distributed load for balconies is stipulated by building regulations at 1.5 kN/m². This sounds technical, but it’s a finite number that you must respect. You must also account for dynamic loads: the weight of people, furniture, and even the pressure exerted by strong winds. The common mistake is underestimating the weight of saturated compost; a 50L bag can weigh between 40-50kg when fully wet.
Calculating your total load is a non-negotiable first step. It transforms gardening from guesswork into a responsible, safe project. You must become your own project manager, auditing the weight of every component before you build. To stay well within safe limits, your total calculated weight should never exceed 70-80% of the balcony’s stated capacity.
- Step 1: Identify your balcony’s load limit by checking the developer’s ‘Home User Guide’ for new builds, contacting the freeholder/management company for period conversions, or consulting council records for ex-local authority flats.
- Step 2: Calculate the weight of your vertical garden structure and empty planters. Weigh a sample planter or check manufacturer specifications.
- Step 3: Estimate saturated compost weight. A 50L bag of saturated peat-free compost weighs approximately 40-50kg. Multiply by the number of bags needed.
- Step 4: Add mature plant weight (typically 1-3kg per herb plant).
- Step 5: Account for dynamic loads including people (average adult: 70-90kg), furniture, and environmental forces.
- Step 6: Total your weights and ensure the sum stays below 70-80% of the stated load limit to maintain a safety margin.
How to Automate Watering for a Vertical Planter When You Travel for 2 Weeks?
The second law of urban gardening states that the driest heatwave of the year will coincide perfectly with your two-week holiday. For a vertical garden, with its limited soil volume and increased exposure to sun and wind, this is a death sentence. Manual watering is simply not a resilient strategy. The solution lies in engineering a closed-loop, automated system: mastering your garden’s vertical hydrology.
Automated irrigation, particularly solar-powered drip systems, is the single best investment for a thriving balcony garden. These systems are not just for convenience; they provide the consistent, low-volume watering that prevents the damaging wet-dry cycle common in container gardening. A good system uses a small solar panel to power a pump that draws water from a reservoir, delivering it directly to the root zone of each plant via a network of drippers. This dramatically reduces water waste and ensures plants get exactly what they need, even when you’re hundreds of miles away.
Choosing the right system depends on your specific needs, from the number of plants to the height the water needs to be pumped. It is crucial to calculate your water needs accurately; for a London summer, a 30L reservoir can support 10-12 plants for 14 days, but this should be increased in full-sun locations.
To help you choose, this table compares popular solar-powered irrigation systems available in the UK, analysing their capacity and key features for balcony environments.
| System | Capacity | Power Source | Price Range (£) | Best For |
|---|---|---|---|---|
| Gardena AquaBloom | Up to 20 plants, 4m height | Solar panel + rechargeable batteries | £60-£80 | Balconies with 14 preset watering programmes |
| Irrigatia SOL-C12 | 12 x 20L pots or 12m row | Solar + weather responsive | £75-£95 | Automatic weather adaptation, 200L reservoir lasts 3 weeks |
| PowerBee Solar Drip System | 50 drippers | Solar + battery backup | £50-£70 | Budget option with timed watering control |
| DIY Gravity-Fed (B&Q/Screwfix parts) | Customizable | None (gravity) | £15-£30 | Low-tech, reservoir positioning critical for pressure |
Your Holiday-Proofing Action Plan: Final Checks Before Departure
- Calculate Reservoir Volume: For London summer evaporation (3-5mm/day), a 30L reservoir supports 10-12 plants for 14 days. Increase to 40-50L for full sun.
- Set Up Redundancy: Install capillary matting at the base of pots as a passive backup water source in case the primary system fails.
- Test the System: Run the complete watering cycle for at least 48 hours before you leave to spot leaks, blocked drippers, or incorrect flow rates.
- Check Dripper Positioning: Ensure each dripper delivers water to the root zone, not onto leaves, to prevent scorching and waste.
- Final Top-Up and Seal: Top up the reservoir right before leaving and add a floating ball or lid to minimize evaporation from the water surface.
Modular Panel or Fabric Pocket System: Which Lasts 5 Seasons Outdoors in the UK?
Choosing your vertical garden’s structure is a long-term material science decision, not just an aesthetic one. In the demanding UK climate—with its damp winters, freeze-thaw cycles, and surprisingly strong summer UV—the wrong material can degrade in just a couple of seasons, wasting your investment and effort. The two dominant options, fabric pockets and rigid modular panels, have vastly different performance profiles over a five-year period.
Fabric pocket systems are often cheaper initially but are highly susceptible to the UK’s dampness. The fabric retains moisture, making it a perfect breeding ground for algae and mould. More critically, during winter, water trapped in the fabric fibres can freeze and expand, physically damaging both the material and the delicate plant roots within—a phenomenon known as frost-shattering. Conversely, standard plastic modular panels can become brittle and crack after 3-4 years of sun exposure due to UV degradation. The superior choice is often UV-stabilised modular panels, which incorporate protective additives to withstand years of sunlight and offer the structural integrity needed to survive freeze-thaw cycles.
This macro photograph highlights the difference in material degradation. On one side, the frayed, discoloured fabric shows organic growth and structural breakdown. On the other, the UV-stabilised panel retains its integrity, demonstrating superior resilience to the elements.

An in-depth analysis of vertical garden durability confirms that material selection is paramount, with inert substrates and robust structures showing significantly longer lifespans. This is not just about looks; it’s about protecting your investment and the health of your garden’s ecosystem. The total cost of ownership over five years often reveals that the more durable, initially more expensive option is the most economical in the long run.
This table breaks down the true cost of ownership for both systems in a typical UK climate, factoring in the need for replacement.
| System Type | Initial Cost | Expected Lifespan (UK Climate) | Replacement Frequency | 5-Year Total Cost | Key Degradation Factor |
|---|---|---|---|---|---|
| Fabric Pocket System | £30-£40 | 2-2.5 years | Every 2 years | £75-£100 | Algae, mold, frost damage to fabric |
| Standard Plastic Modular Panels | £60-£80 | 3-4 years (without UV protection) | Once at year 4 | £120-£160 | UV embrittlement, cracking |
| UV-Stabilized Modular Panels | £80-£100 | 5-7 years | None in first 5 years | £80-£100 | Minimal degradation with protective air gap |
The Hidden Overflow Mistake That Drowns Roots in 70% of DIY Vertical Gardens
The most common and catastrophic failure in DIY vertical gardens is not under-watering, but over-watering caused by a single, hidden drainage failure. This creates a « cascading failure » effect where a blocked drainage hole in one pocket at the top causes water to overflow, saturating every single pocket below it. This constant waterlogging starves roots of oxygen, creating anaerobic conditions perfect for root rot pathogens like Phytophthora and Pythium to thrive. The result: an entire wall of plants can be wiped out from one tiny blockage.
It is a cruel irony of balcony gardening that the symptoms of root rot—wilting, yellowing leaves—are often mistaken for underwatering, prompting the gardener to add even more water and accelerate the plant’s demise. The key is to learn to diagnose the problem correctly. Healthy roots should be firm and white or tan; rotted roots are dark, mushy, and often have a foul, swampy smell. Proper drainage engineering is therefore as crucial as the watering system itself, as confirmed by research from commercial horticulture drainage.
To prevent this, you need a planting medium designed for the realities of UK weather—capable of handling both summer dry spells and sudden downpours. Standard potting compost is often too dense and retains too much water. A specialised blend is required to ensure sharp drainage and maintain air pockets for roots.
Case Study: The UK Rain-Ready Planting Medium
To combat the risk of waterlogging from sudden deluges, experienced UK vertical gardeners use a specific soil recipe. A blend of 50% peat-free compost (for nutrients), 30% perlite (to create large air pockets for drainage and oxygen), and 20% coir (for moisture retention without compaction) creates the perfect balance. This mix is light enough to manage the structural budget while being porous enough to allow excess water from a heavy downpour (20-30mm in an hour is not uncommon) to flow through the system rapidly, preventing the activation of root rot spores.
Knowing how to spot the early signs is critical. This diagnostic guide helps you distinguish between a plant that is thirsty and one that is drowning.
- Root Appearance: Healthy roots are firm and white. Rotted roots are dark brown/black, soft, and mushy.
- Leaf Symptoms: Root rot wilting persists even in moist soil. Underwatering wilting recovers quickly after watering.
- Soil Moisture: Stick your finger 2-3cm deep. Waterlogged soil feels constantly saturated and cold.
- Drainage Test: Pour water into the top pocket. If it takes more than 2-3 minutes to drain, your system is failing.
- Trace the Source: In a vertical system, always trace symptoms upward. A problem in the bottom pocket often originates from a blockage much higher up.
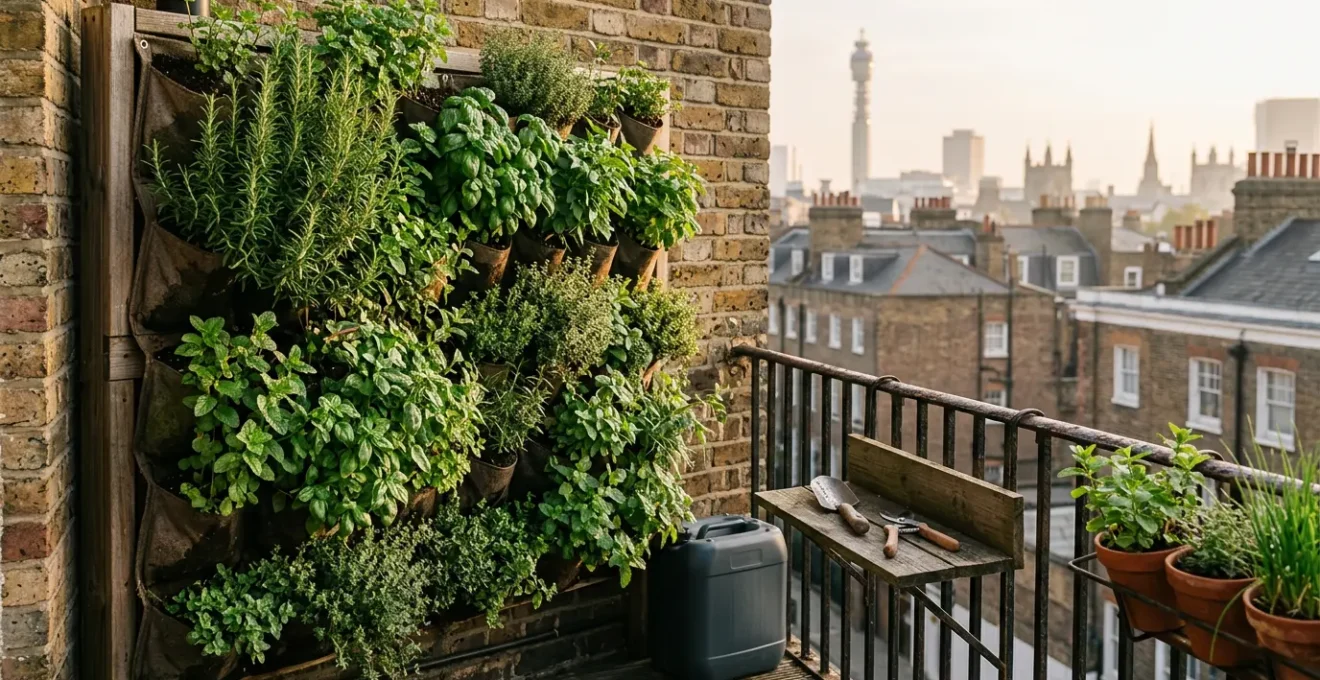
In What Order Should You Plant Salads, Herbs and Trailing Flowers in a Vertical Garden?
Once you’ve engineered the structure, hydrology, and soil, the final layer of design is biological: strategic planting. A vertical garden is not a uniform environment; it’s a stack of distinct microclimates. The top tiers receive the most intense sun and wind, and dry out the fastest. The middle tiers are more sheltered with moderate sun. The bottom tiers are the shadiest, coolest, and retain the most moisture from the overflow of the tiers above. Success lies in microclimate stacking—matching the right plant to the right level.
This means abandoning random planting and instead creating a purposeful layout. Sun-loving, drought-tolerant Mediterranean herbs like Rosemary, Thyme, and Oregano belong at the top. They thrive in the bright, dry conditions. Moisture-loving herbs like Mint and Parsley are perfect for the middle tiers, where they receive partial sun and benefit from consistent moisture. Finally, shade-tolerant salads like Lettuce and Spinach excel in the cool, damp conditions at the bottom, which also helps prevent them from bolting (flowering prematurely) in the summer heat.
You can even use planting for structural purposes. A row of trailing Nasturtiums on the most wind-exposed side of your balcony can act as a living windbreak, shielding more delicate plants like Basil positioned immediately behind them. This is garden engineering at its most sophisticated: using plants as functional components of the ecosystem. To do this, you must first map your balcony’s unique sun exposure over a full day.
Beyond individual placement, you can create « guilds »—groups of plants that benefit each other. This is a step towards a truly symbiotic garden system.
| Guild Name | Plant Combination | Positioning | Primary Benefit |
|---|---|---|---|
| Urban Pollinator Guild | Borage (top), Chives (middle), trailing Nasturtium (edge) | South/Southeast facing, full sun tiers | Supports London bees and beneficial insects, edible flowers for garnish |
| Cocktail Gardener’s Guild | Mint (middle-shaded), Lemon Verbena (top), flowering Violas (bottom) | Mixed sun exposure, Mint in partial shade to control growth | Fresh cocktail ingredients: Mojitos (Mint), herbal infusions (Verbena), edible garnish (Violas) |
| Mediterranean Kitchen Guild | Rosemary (top), Thyme (top), Basil (middle-sheltered), Oregano (top) | Maximum sun exposure, Basil shielded from wind by Rosemary | Classic cooking herb combination, drought-tolerant, windbreak protection |
| Salad Bowl Guild | Lettuce (bottom), Rocket/Arugula (bottom), Chervil (middle), edible Pansies (bottom) | Lower tiers with 3-5 hours sun, cooler microclimate | Continuous salad harvest, shade tolerance, ornamental appeal |
Why Does Your Modular Sofa Void the Tenancy Deposit on Wooden Floors?
While the question mentions a modular sofa, the principle is critically important for any urban renter installing a significant feature like a vertical garden. Misunderstanding your tenancy agreement is one of the fastest ways to lose your deposit. Landlords and management companies are primarily concerned with two things: unauthorised structural alterations and damage to the property. A heavy, water-filled vertical garden can potentially violate both.
Many tenancy agreements have clauses that forbid drilling into walls, which would rule out many wall-mounted systems. Even a « freestanding » system, if heavy enough, could be considered a « structural load » that requires written permission. Furthermore, the risk of water damage is a major concern. A single overflowing planter or a slow leak can cause permanent stains, rot on wooden decking, or even damage to the property of the neighbour below. From the landlord’s perspective, a vertical garden is a liability until proven otherwise.
Protecting your deposit requires proactive communication and meticulous documentation. Before you buy anything, you must become an expert on your own lease. Treat this as another piece of garden engineering: legal and logistical prep work. Requesting permission in writing and documenting the ‘before’ condition of your balcony are your two most powerful tools in any potential dispute at the end of your tenancy.
This checklist outlines the key steps every renting gardener should take to ensure their green oasis doesn’t lead to a financial headache.
- Review ‘Affixing Items’ Clauses: Check for rules on drilling. Opt for freestanding systems or high-strength, rated outdoor command strips if necessary.
- Check ‘Structural Alterations’ Restrictions: Your heavy vertical garden might require written landlord permission.
- Examine Balcony Use Limitations: Some leases specify maximum weight limits or restrict storage. Ask the property manager for these guidelines.
- Document ‘Before’ Condition: Take clear, timestamped photos of the balcony surface, walls, and flooring before installation.
- Use Protective Measures: Always use large, non-porous plant saucers under all containers. Elevate planters on pot feet (5-10cm) to allow airflow and prevent water trapping.
- Request Permission in Writing: Email your landlord or agent with a clear plan, including weight estimates and your protective measures. Keep their written approval safe.
How to Install a 500-Litre Water Butt in a Terraced-House Garden?
For a terraced house with a garden, a 500-litre water butt is a fantastic sustainability goal. For the urban balcony gardener, however, it’s a dangerous impossibility. A full 500L butt would weigh over 500kg—far exceeding the structural budget of almost any residential balcony. But this doesn’t mean the principle of rainwater harvesting is out of reach. The real engineering challenge is: how can we adapt this concept for the micro-scale of a balcony?
The answer is in micro-harvesting. Even a small catchment area can collect a significant amount of water over time, reducing your reliance on tap water and providing your plants with chlorine-free rainwater they love. This is about clever adaptation, not brute force storage. There are two main approaches to balcony micro-harvesting.
The first is to use a slimline water butt of 25-50 litres. If your balcony has a downpipe from the roof above, you can fit a small rainwater diverter kit (available from DIY stores like B&Q or Screwfix) to channel rainfall into your compact reservoir. The second, more creative approach is for balconies without downpipes. This involves harvesting your garden’s own overflow by placing a collection container beneath the bottom tier of your vertical garden. More advanced DIYers can even construct a small, angled polycarbonate ‘roof’ above the planter to create a dedicated mini-catchment area, channelling every drop of rain into a container. A 60cm x 40cm sheet, for example, can yield a surprising amount of water over a typical London month.
Key Takeaways
- Safety First: Never exceed your balcony’s structural budget. A full garden is heavy, and a wet garden is heavier. Do the maths.
- Automate Everything: Consistent watering is the key to success. A solar-powered drip system is an investment, not a luxury.
- Invest in Durability: In the UK’s climate, UV-stabilised modular panels offer the best long-term value and prevent material failure.
How to Cut Garden Water Use by 50% Without Sacrificing Colour in Summer?
In an urban environment, water is a precious resource. Cutting your garden’s water consumption is not only ecologically responsible but also makes your system more resilient and less labour-intensive. While drought-tolerant plants are a good start, the biggest savings come from efficient delivery systems. The goal is to get every drop of water to the plant’s roots with minimal loss to runoff or evaporation. This is where modern garden engineering truly shines.
The single most effective method is to use a self-watering or sub-irrigation system. This can be a feature of your chosen vertical planter or an automated drip system as discussed earlier. Instead of watering from the top, where much of the water evaporates before it can be absorbed, these systems deliver water directly to the root zone or allow the plant to draw up moisture from a built-in reservoir as needed. This simple change in hydrology has a massive impact; in fact, research on self-watering containers demonstrates a potential reduction in water waste from runoff and evaporation by over 50%.
Other key strategies include applying a layer of mulch (such as fine bark chips or gravel) to the top of the soil in each pot to reduce surface evaporation. Grouping plants with similar water needs together also allows you to fine-tune your watering schedule more effectively. Finally, watering early in the morning or late in the evening minimizes evaporation loss during the hottest part of the day. By combining these techniques—efficient delivery, surface protection, and smart timing—you can create a dramatically more water-wise garden without sacrificing the lush, vibrant results you want.
Now that you have the complete engineering blueprint, it’s time to move from theory to practice. Begin by auditing your own balcony space—its sun, wind, and structural capacity—and start designing the high-performance urban garden that works for you.