
In summary:
- Your sensor isn’t faulty; it’s being triggered by sudden changes in infrared energy from your pet.
- The solution isn’t just lowering sensitivity, but creating « intelligent blind spots » using physical masking and precise placement.
- Understanding the physics of how Passive Infrared (PIR) and dual-technology sensors work is key to a quiet night.
- For UK homes, choosing the right system (DIY vs. professional) has significant implications for insurance and police response.
The sudden, piercing shriek of a house alarm in the dead of night is a uniquely jarring experience. Your heart hammers against your ribs as you scramble for the control panel, only to find the culprit is not an intruder, but your cat, nonchalantly grooming itself in the hallway. This frustrating cycle of false alarms leaves many UK pet owners at a crossroads: disable the system and compromise security, or endure the sleepless nights. Many guides offer simple advice like « buy a pet-immune sensor » or « lower the sensitivity, » but these are often incomplete solutions that fail to address the root cause of the problem.
The truth is that achieving harmony between your furry companion and your security system isn’t about finding a magic-bullet product. It’s about understanding the physics of detection that your sensors rely on. These devices see the world in patterns of heat and motion, and by learning to manipulate that environment, you can teach your system to distinguish between a potential threat and a prowling pet. It’s less about turning the system down and more about making it smarter.
This guide will move beyond the generic advice. We will explore the technical reasons your sensor might fail, provide professional-grade adjustment techniques for a typical UK terraced house, and compare the real-world value of different alarm setups. We’ll even delve into the crucial, often-overlooked, legal requirements for video doorbells to ensure your entire home security ecosystem is not only effective but also compliant with UK privacy laws. By the end, you’ll have the knowledge to configure your system with the precision of a specialist, ensuring both peace of mind and a peaceful night’s sleep.
In this comprehensive guide, we’ll break down everything you need to know. The following sections will walk you through the technical details, practical adjustments, and strategic choices for a pet-friendly and robust home security system.
Contents: Mastering Your Pet-Aware Security System
- Why Does Your PIR Sensor Miss Intruders Moving Slowly Across the Room?
- How to Adjust Motion Sensor Range for a Small UK Terraced House?
- Standalone Sensor or Full Alarm Package: Which Offers Better Value for a UK Flat?
- The Radiator-Proximity Mistake That Causes 50% of UK PIR False Alarms
- When Should You test Motion Sensors to Ensure They Work Before Holiday Absences?
- How to Choose a Water Feature That Masks Traffic Noise in a City Garden?
- How to Mask the Pavement From Your Doorbell Camera’s Field of View?
- How to Install a Video Doorbell That Complies With UK GDPR and Neighbour Privacy?
Why Does Your PIR Sensor Miss Intruders Moving Slowly Across the Room?
It’s a paradox of home security: the same Passive Infrared (PIR) sensor that triggers every time your cat twitches can sometimes fail to detect a genuine, slow-moving intruder. This isn’t a fault in the sensor, but a fundamental aspect of its design. A PIR sensor doesn’t see movement; it detects rapid changes in infrared energy (i.e., body heat) moving across its segmented detection zones. Your cat, making a quick dash across the room, creates a sharp, sudden thermal spike that the sensor immediately flags as an event.
Conversely, a person moving extremely slowly creates a gradual temperature change across the sensor’s field of view. To prevent false alarms from ambient temperature shifts (like the sun warming a patch of floor), the sensor’s electronics are designed to ignore these slow-drifting signals. This is a known vulnerability, as security vulnerability research confirms that PIR sensors can be defeated by very slow, deliberate motion. The intruder’s heat signature blends into the background ‘noise’ of the room’s slowly changing thermal landscape.
This is where professional-grade dual-technology sensors become essential. These devices combine a standard PIR sensor with a microwave detector. The microwave component emits waves and detects motion by analysing the Doppler shift in the returning signal—an effect that is not fooled by slow movement. For the alarm to trigger, both the PIR sensor (detecting a heat signature) and the microwave sensor (detecting physical movement) must activate simultaneously. This layered approach dramatically reduces false alarms from pets and environmental factors while effectively eliminating the vulnerability to slow-moving intruders.
How to Adjust Motion Sensor Range for a Small UK Terraced House?
In the constrained spaces of a typical UK terraced house or flat, simply reducing a sensor’s sensitivity is a blunt instrument. It might stop the cat from triggering the alarm, but it could also create a blind spot big enough for an intruder to exploit. The professional approach is not to reduce sensitivity, but to physically reshape the detection area, creating an intelligent pet-aware blind spot at floor level while maintaining full coverage at human height.
The key is to understand the sensor’s plastic cover is not just a cover; it’s a Fresnel lens, a series of concentric rings that focus infrared energy from different zones onto the sensor element. By physically blocking specific parts of this lens, you can precisely ‘switch off’ the zones covering the floor. This is a far more reliable method than software-based sensitivity adjustments. A common technique involves using a small, neat strip of electrical tape to mask the lower facets of the lens, effectively making the sensor blind to anything below waist height.
This paragraph introduces the physical method of customising your sensor’s detection zones. The illustration below shows how a precise application of tape can create a pet-friendly blind spot at floor level.
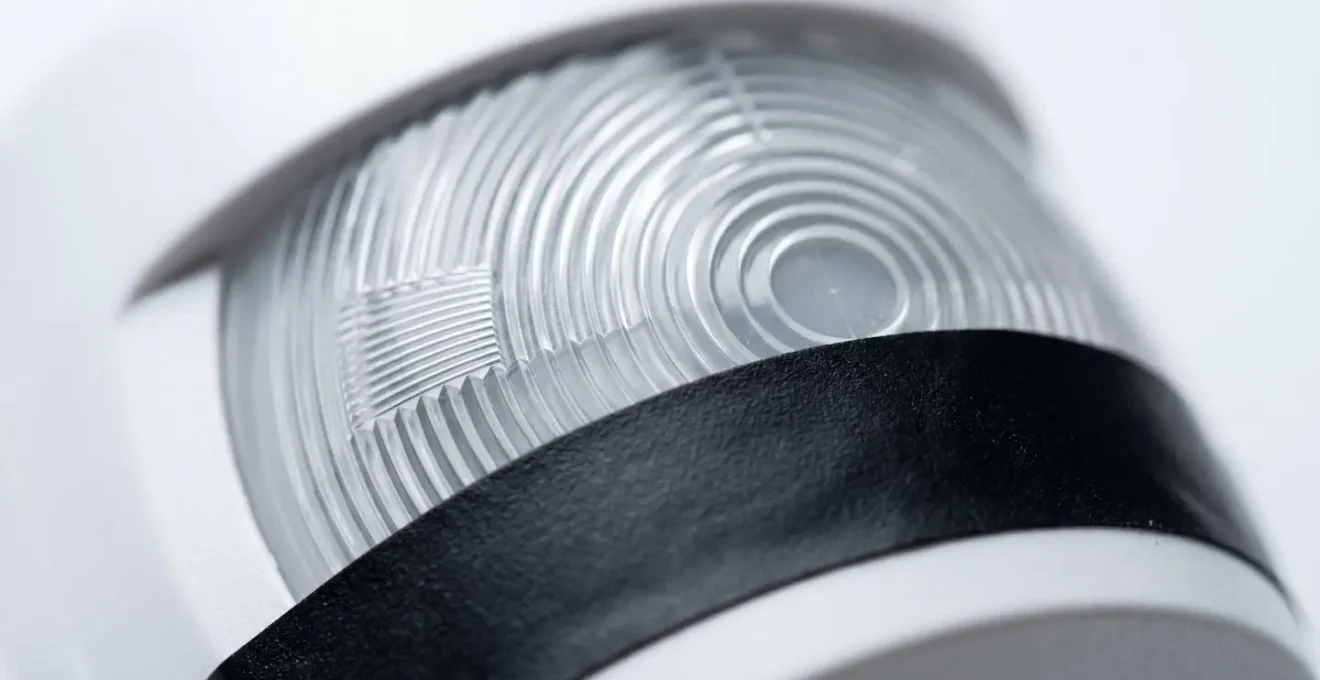
As you can see, this technique allows the upper zones to remain fully active, detecting a walking or standing person, while the lower zones that would pick up a cat or small dog are completely disabled. For this to work perfectly, the sensor should be mounted at a height of 7-8 feet and angled slightly downwards. This maximises coverage for human intruders while ensuring the ‘pet alley’ you’ve created on the floor is effective, even if your cat decides to jump on the sofa. This precise physical customisation is the secret to a truly pet-immune system.
Standalone Sensor or Full Alarm Package: Which Offers Better Value for a UK Flat?
For those living in a UK flat or rented property, the appeal of a standalone, DIY sensor system (like those from Ring or Eufy) is undeniable. They are affordable, portable, and require no drilling. However, when assessing long-term value, the calculation is more complex than just the upfront cost. A professionally installed and certified alarm package, while more expensive initially, offers critical benefits that DIY systems cannot, particularly concerning insurance and police response.
The single most significant financial differentiator is insurance. In the UK, major home insurance providers often offer significant premium reductions for properties with professionally monitored alarm systems. Crucially, to be eligible, the system must be installed and maintained by a company certified by the NSI (National Security Inspectorate) or SSAIB (Security Systems and Alarms Inspection Board). Standalone DIY sensors do not qualify for these discounts. Over several years, the insurance savings from a certified system can substantially offset its higher initial cost.
Furthermore, only monitored systems with a Unique Reference Number (URN) from a certified Alarm Receiving Centre (ARC) are eligible for police response in the event of a confirmed alarm. A standalone sensor will simply send a push notification to your phone, leaving you to deal with the situation. The following table breaks down the key differences for a UK property owner.
| Feature | Standalone Sensors (Ring, Eufy) | Professional Package (SSAIB/NSI Certified) |
|---|---|---|
| Installation Type | DIY, no-drill, portable | Professional wired/wireless installation |
| UK Insurance Discount | Not eligible | Eligible for significant premium reductions |
| Police Response | None (push notification only) | Available with URN (Unique Reference Number) |
| Renter-Friendly | Yes – take with you when you move | No – permanent installation |
| Monitoring | Self-monitored via smartphone | 24/7 professional Alarm Receiving Centre |
| Certification | None | SSAIB or NSI Gold/Silver required |
| Upfront Cost | £50-200 per sensor | £500-1500+ for complete system |
| Long-term Value | Moderate (no insurance offset) | High (insurance savings offset cost over time) |
Ultimately, the choice depends on your circumstances. For a short-term renter prioritising portability, a standalone system offers good basic deterrence. However, for a homeowner or long-term tenant in a flat, a professional package offers superior security, genuine police response, and long-term financial value, as installing a certified security system can result in significant home insurance discounts.
The Radiator-Proximity Mistake That Causes 50% of UK PIR False Alarms
You’ve pet-proofed your sensors and adjusted the sensitivity, yet you’re still getting mysterious false alarms, especially during colder months. The likely culprit is an invisible threat your PIR sensor can’t ignore: a radiator. Placing a motion sensor directly above or facing a radiator is one of the most common installation errors, responsible for a huge number of false triggers in UK homes when the central heating kicks in.
To understand why, we must go back to the physics of detection. PIR sensors are designed to work in a stable ambient temperature, typically around 15-20°C. They are looking for a rapid change in infrared energy. When your central heating turns on, the convector radiator doesn’t just warm the room; it creates a powerful, rising plume of hot air. This invisible thermal current moves quickly into the sensor’s detection zones, creating a sudden temperature differential that the sensor interprets as a person-sized heat source moving into the room. According to technical analysis of how PIR sensors operate, these strong infrared sources can overload the sensor and cause high-output responses identical to a genuine alarm event.
The solution is about environmental manipulation. The first and best option is strategic placement: never install a sensor where it has a direct line of sight to a radiator. Always position it perpendicular to heat sources. If relocation isn’t an option, especially in a rented property, physical barriers are highly effective. Installing a simple radiator shelf or an air deflector can redirect the rising heat plume away from the sensor’s field of view. A crucial diagnostic step is to conduct a ‘heating on’ test in autumn: arm your system, turn the heating on full, and see which, if any, sensors are triggered by the thermal currents.
When Should You test Motion Sensors to Ensure They Work Before Holiday Absences?
The worst time to discover a flaw in your security system is when you’re hundreds of miles away on holiday. A pre-departure system check is not just a good idea; it’s an essential protocol for ensuring your home is truly protected. However, the timing and thoroughness of this test are critical. Rushing a quick « walk test » on the morning you leave is a recipe for failure, as it leaves no time to fix any issues you might uncover.
The professional standard is to conduct a full system audit at least seven days before your departure. This buffer gives you ample time to troubleshoot problems, order replacement parts, or schedule a technician if needed. This audit should be far more comprehensive than simply arming the system and walking past a sensor. It needs to be a systematic process that tests every component of your security chain, from detection to notification.
Your pre-holiday audit should include several key steps. First is the ‘Walk Test,’ where you methodically move through every detection zone to confirm coverage is as expected. If you have pets, follow this with a ‘Pet Test’: arm the system in test mode and allow your pet to move around naturally to confirm your pet-immunity settings are effective. Next, a ‘Communications Test’ is vital to verify that alarm signals are being successfully received, whether as a push notification to your phone or by your professional monitoring centre. Finally, test the resilience of your system by simulating power and network failures to ensure your battery and cellular backups are functioning correctly. Informing a trusted neighbour of your test schedule can also prevent unnecessary panic if an alarm does sound.
How to Choose a Water Feature That Masks Traffic Noise in a City Garden?
True home security extends beyond just detecting threats; it’s also about creating an environment that feels safe and serene. In an urban setting, particularly in a small city garden or courtyard typical of UK properties, the constant low-frequency rumble of traffic can create a pervasive sense of unease. While not a security threat in itself, this background noise can be effectively managed using psychoacoustic principles, and a carefully chosen water feature is a surprisingly effective tool.
The goal is noise masking, but not all water sounds are created equal. The trick is to match the frequency of the masking sound to the frequency of the noise you want to hide. As noted in psychoacoustics research on noise masking, high-frequency splashing or tinkling sounds are excellent at masking inconsistent, sharp noises like distant voices or birdsong. However, they do little to counter the deep rumble of traffic.
To mask low-frequency traffic noise, you need a water feature that produces a broader spectrum of sound. Look for designs that create a cascading or gurgling effect rather than a simple splash or trickle. Wall-mounted slate or stone features where water flows over a large, textured surface are ideal. The movement of water over the uneven surface generates a mix of frequencies, creating a pleasant « white noise » that effectively covers the monotonous drone of traffic, transforming your small urban space into a more peaceful sanctuary.
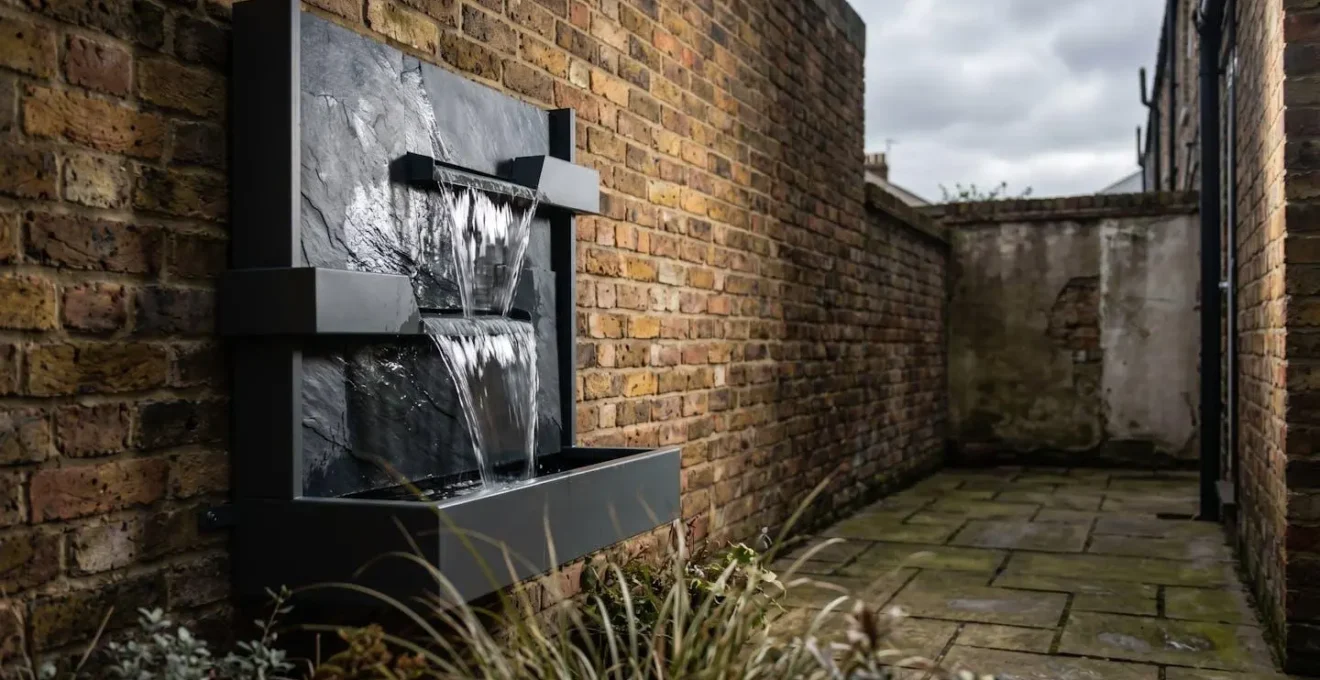
The visual element is also important. A compact, vertical water feature, as shown, can add a sense of tranquillity without consuming valuable floor space in a small courtyard. By choosing a feature that generates the right kind of sound, you are actively managing your sensory environment, contributing to a greater sense of security and well-being at home.
Key Takeaways
- Physics Over Features: True pet immunity comes from understanding and manipulating detection physics (heat, motion), not just buying a « pet-friendly » product.
- Strategic Blind Spots: Use physical masking (tape on the Fresnel lens) and careful placement to create intelligent blind spots at pet-level, a more reliable method than software sensitivity.
- UK Compliance is Crucial: For video doorbells, UK GDPR compliance (masking public areas, signage) is a legal requirement, not an option. For alarm systems, NSI/SSAIB certification is key for insurance discounts and police response.
How to Mask the Pavement From Your Doorbell Camera’s Field of View?
Installing a video doorbell enhances security, but in the UK, it also brings legal responsibilities regarding your neighbours’ privacy. You cannot simply point the camera at your street; you have a legal duty to avoid recording public spaces or your neighbours’ property unnecessarily. The Information Commissioner’s Office (ICO) has clear guidelines on this, and failure to comply can lead to serious disputes and even legal action. Therefore, masking the pavement from your camera’s view is not a polite suggestion—it is a mandatory step in a compliant installation.
The legal precedent is clear. In the notable Fairhurst v. Woodard court case, a homeowner was found to be in breach of data protection laws for excessive surveillance that captured a neighbour’s property. This case highlights that while you have a legitimate interest in securing your own property, it does not give you the right to continuous surveillance of public areas. This is why UK data protection law requires that public footpaths and neighbouring properties are excluded from your camera’s view wherever possible.
There are two primary methods for achieving this. The most robust is a physical solution: using an angled wedge mount. These accessories, often supplied with the doorbell, tilt the camera downwards, forcing its field of view to focus exclusively on your doorstep and pathway, physically cutting the pavement and road out of the shot. This is superior to software solutions because it cannot be accidentally reset or changed. The second method is using the software’s privacy zones. In your doorbell’s app, you can draw ‘black boxes’ over areas you do not want to record. You must draw these zones tightly to exclude all public pavement and any part of your neighbours’ homes or gardens. After setting this up, you must test it by standing on the public pavement to verify you are not being recorded.
How to Install a Video Doorbell That Complies With UK GDPR and Neighbour Privacy?
A video doorbell is a powerful security tool, but its installation marks the point where you become a « data controller » under UK GDPR. This means you are legally responsible for how you capture, process, and store images of people outside your home. A compliant installation is about more than just technology; it’s about being a responsible and transparent system operator. It requires a proactive approach that balances your security needs with the privacy rights of your neighbours and the general public.
Beyond simply masking the camera’s view, the ICO sets out several clear requirements for domestic CCTV users. You must be transparent about the recording. This is most easily achieved by displaying a clear, simple, and visible sticker indicating that video recording is in operation. Furthermore, you should disable audio recording by default. While video can be justified on security grounds (‘legitimate interest’), recording conversations of people on a public pavement is almost impossible to justify and is a significant privacy intrusion. You must also have a policy for data retention, ensuring you don’t store footage for longer than is necessary for its security purpose—typically, a 30-day rolling deletion is considered reasonable.
However, technical compliance is only half the battle. Security professionals consistently advise that the most effective way to prevent disputes is through proactive communication. Before you even install the device, have a friendly conversation with your immediate neighbours. Explain why you’re installing it and, crucially, show them the privacy zones you’ve configured in the app to demonstrate that you are not monitoring their property. This ‘Neighbour Relations Protocol’ builds trust and is far more effective at preventing complaints than any technical measure alone.
Your 5-Point ICO Compliance Plan
- Display Clear Signage: Place a clear, visible sticker on or near your door to warn visitors and passers-by that video recording is in operation.
- Disable Audio Recording: Turn off audio recording by default. Justify video on security grounds, but avoid capturing public conversations which is a significant privacy breach.
- Configure Precise Privacy Zones: Use the app’s software to meticulously draw exclusion zones over all public areas (pavements, roads) and any part of your neighbours’ property.
- Understand Access Requests: Be aware that a member of the public can issue a Subject Access Request for footage of themselves. Know how to access and provide this data from your system.
- Limit Data Retention: Set your device to automatically delete footage after a reasonable period, typically no longer than 30 days, to avoid holding personal data indefinitely.
By taking a thoughtful, responsible, and technically informed approach, you can build a home security system that provides genuine peace of mind—protecting your property effectively without disrupting your life or infringing on the privacy of those around you. The next logical step is to conduct a full audit of your current or planned system using these principles.