Successfully integrating in-ceiling speakers into a UK loft conversion depends on treating them as a structural component from day one, not a decorative afterthought.
- Poor audio performance and noise transfer are almost always caused by improper installation within the ceiling void and interaction with structural elements like steel beams.
- Choosing passive speakers and planning all wiring during the first-fix electrical phase is critical for simplifying installation and ensuring compliance with UK Building Regulations.
Recommendation: Coordinate speaker locations, cable runs, and back-box requirements with your builder, electrician, and structural engineer before any construction begins.
The vision for a newly converted loft is often one of clean lines, uncluttered surfaces, and seamless functionality. In-ceiling speakers are the perfect embodiment of this minimalist aesthetic, promising high-quality audio without the visual distraction of wires or bulky boxes. Many homeowners, however, assume that installing them is a simple finishing touch—a matter of cutting a hole in the plasterboard and pushing a speaker through. This common misconception is the root of countless audio disappointments and, in some cases, costly structural headaches.
The typical advice often revolves around basic placement, but rarely addresses the physical realities of a UK construction site. When speakers sound thin and lifeless, or when sound bleeds into the room above, the problem isn’t usually the speaker itself. It’s the environment it was placed in. The truth is that an in-ceiling speaker’s performance is intrinsically linked to the building’s fabric. But what if the secret to great invisible audio wasn’t about the speaker you choose, but about how it’s integrated into the building’s structure from the very first day of your project?
This guide shifts the perspective from decoration to construction. As architectural audio installers, we will walk you through the critical decisions and processes that must happen at the structural and first-fix stages. We will cover the science of why speakers fail acoustically, the regulatory pitfalls of wiring, and how to work with, not against, structural elements like steel RSJs. This is your blueprint for getting invisible audio right, ensuring your investment sounds as good as it looks.
This article provides a comprehensive roadmap for homeowners and builders, detailing the essential steps for a successful and compliant installation. Explore the key considerations below to ensure your project achieves flawless audio without compromising structural integrity.
Summary: A construction-aware guide to invisible audio in loft conversions
- Why do your in-wall speakers sound thin compared to freestanding units?
- How to position ceiling speakers in an l-shaped UK living room for even coverage?
- Passive or active in-ceiling speakers: which simplifies wiring in a UK retrofit?
- The IP rating mistake that destroys bathroom ceiling speakers within 2 years
- When should in-ceiling speakers be installed during a UK first-fix electrical phase?
- How to install a steel RSJ for an open-plan conversion under UK building regs?
- Loft conversion or garage conversion: which adds more per-square-metre value in the South East?
- Which DIY renovations add the most value to a UK terraced house?
Why do your in-wall speakers sound thin compared to freestanding units?
The most common complaint about in-ceiling or in-wall speakers is a noticeable lack of bass and a « thin, » unsatisfying sound compared to their freestanding counterparts. This isn’t a fault of the speaker itself, but of physics. A traditional speaker uses a carefully designed, solid cabinet to control the air pressure created by the driver, allowing it to produce rich, controlled bass. An in-ceiling speaker, by contrast, is often installed in an ‘infinite baffle’—a large, open ceiling void. Without a defined enclosure, the sound waves from the back of the speaker cone interfere with the waves from the front, cancelling out the low frequencies and resulting in a compromised bass response.
To counteract this, the speaker needs a form of back-box. While dedicated, purpose-built back-boxes offer the best performance, they add cost and complexity. A highly effective and common practice on construction sites is to create a « pseudo-enclosure » using acoustic insulation. By carefully packing Rockwool or a similar dense fibreglass insulation around and behind the speaker in the joist bay, you effectively create a sealed-off chamber. This prevents sound from escaping into the void, stops sound from travelling to the room above, and provides the necessary air resistance for the speaker driver to produce the full, warm bass it was designed for. Failing to manage this acoustic integrity is the single biggest reason for poor audio performance.
How to position ceiling speakers in an l-shaped UK living room for even coverage?
L-shaped rooms, common in loft conversions and extensions, present a unique challenge for audio coverage. A single pair of stereo speakers placed in the main part of the room will inevitably leave the other leg of the ‘L’ with weak, unbalanced sound. The instinct to simply add more speakers can lead to phasing issues and an acoustic mess. The correct approach, as highlighted by audio professionals, is to treat the L-shaped space as two distinct rectangular zones. As the experts at Smart Home Sounds advise:
For rooms that are L-Shaped, it’s better to have a pair of stereo speakers in each section of the room, rather than installing pairs either side of a corner.
– Smart Home Sounds, A Complete Guide to Ceiling Speakers
This « zoning » strategy ensures that each area has its own dedicated left and right channel, providing a full stereo image whether you are in the main living area or the narrower section. The key is to position each pair symmetrically within its own zone, maintaining equal distance from the side walls and aiming for a listening « sweet spot » in the centre of that specific area. For a typical loft conversion, this means planning for four speakers in total, wired as two separate stereo pairs.
As you can see in the layout above, this approach creates two immersive listening environments within a single, complex space. This avoids the common problem of one speaker in the corner trying to serve two different areas, which never works effectively. By wiring back to a multi-zone amplifier, you can even have the option to play audio in one or both zones simultaneously, offering maximum flexibility for how you use the space.
Passive or active in-ceiling speakers: which simplifies wiring in a UK retrofit?
When planning your installation, one of the first technical decisions is whether to use passive or active speakers. Active speakers have a built-in amplifier, meaning they only need a power source and an audio signal. Passive speakers have no internal power and require external amplification via traditional speaker cables. While active speakers seem simpler on paper, for a UK loft conversion, passive speakers almost always simplify wiring and regulatory compliance. The reason lies in UK Building Regulations, specifically Part P, which governs electrical safety in dwellings.
An active speaker requires a 230V mains power connection at each speaker location. This work must be carried out and certified by a qualified electrician. In contrast, passive speakers use low-voltage speaker cable, which does not fall under Part P regulations. This allows for much greater flexibility in who can run the cables and where they can be placed. Furthermore, the amplifier for a passive system can be located accessibly in a cupboard or media unit, making future upgrades or servicing simple. Upgrading an active speaker system requires replacing the entire unit in the ceiling. This table breaks down the key differences from a construction perspective.
This comparative analysis clearly shows the advantages of a passive system within the context of a UK renovation, as highlighted in a recent installation comparison.
| Factor | Passive Speakers | Active Speakers |
|---|---|---|
| Wiring Requirements | Low-voltage speaker cable only (2-core or 4-core) | Mains power (230V) + audio signal cable |
| UK Building Regs (Part P) | Not applicable (low voltage) | Requires certified electrical work for each speaker location |
| Installation Complexity | Simple: run speaker cables from single amplifier location | Complex: each speaker needs nearby power socket or connection to lighting circuit |
| Future-Proofing | Amplifier can be upgraded independently without ceiling access | Fixed amplifier specification; upgrade requires speaker replacement |
| Heat Dissipation in Insulated Loft | No heat generation (passive component) | Generates heat; potential overheating risk in highly insulated ceiling voids (Celotex/Kingspan) |
| Scalability | Easily add more speakers to existing amplifier (within power limits) | Each speaker is a separate powered unit; more costly to expand |
Case Study: London Loft Conversion with Passive Speaker System
A London homeowner retrofitting a loft conversion opted for a passive system with Monitor Audio CT265 speakers powered by a Sonos wireless amplifier. This allowed the builder to run simple speaker cables during the first-fix stage to a bedroom, en-suite, and office. The amplifier remained accessible in a central cupboard, completely avoiding the cost and complexity of getting multiple mains power connections certified in the ceiling voids and ensuring effortless compliance with UK electrical safety standards.
The IP rating mistake that destroys bathroom ceiling speakers within 2 years
Installing a speaker in a bathroom or en-suite is a popular feature in loft conversions, but it’s an environment that is uniquely hostile to electronics. Steam and condensation can quickly lead to corrosion and failure if the wrong product is chosen. The key to longevity is understanding and correctly applying IP (Ingress Protection) ratings, which define how resistant a product is to solids and liquids. A common and costly mistake is to assume any « bathroom speaker » will suffice, without considering its placement relative to the bath or shower.
UK electrical regulations define specific zones in a bathroom to ensure safety. These zones also provide a robust framework for selecting the right speaker. For instance, according to UK IET Wiring Regulations for bathroom installations, any speaker placed in Zone 1 (directly above a bath or shower up to a height of 2.25m) must have a minimum rating of IPX4, though IP65 is strongly recommended for direct shower overheads. Zone 2 (the 0.6m area outside the bath or shower) also requires a minimum of IPX4. Choosing a non-rated or under-rated speaker for these wet zones is a guarantee of premature failure, often within 18-24 months.
Beyond the IP rating of the speaker itself, the overall construction of the loft is a factor. A « warm-roof » design, which is highly insulated, can increase the risk of interstitial condensation. Therefore, ensuring the Vapour Control Layer (VCL) is correctly installed and sealed is just as important as the speaker’s IP rating to prevent moisture from becoming trapped in the ceiling void behind the speaker. Selecting speakers with marine-grade coatings also provides an extra layer of protection against corrosion from minerals in the water vapour.
When should in-ceiling speakers be installed during a UK first-fix electrical phase?
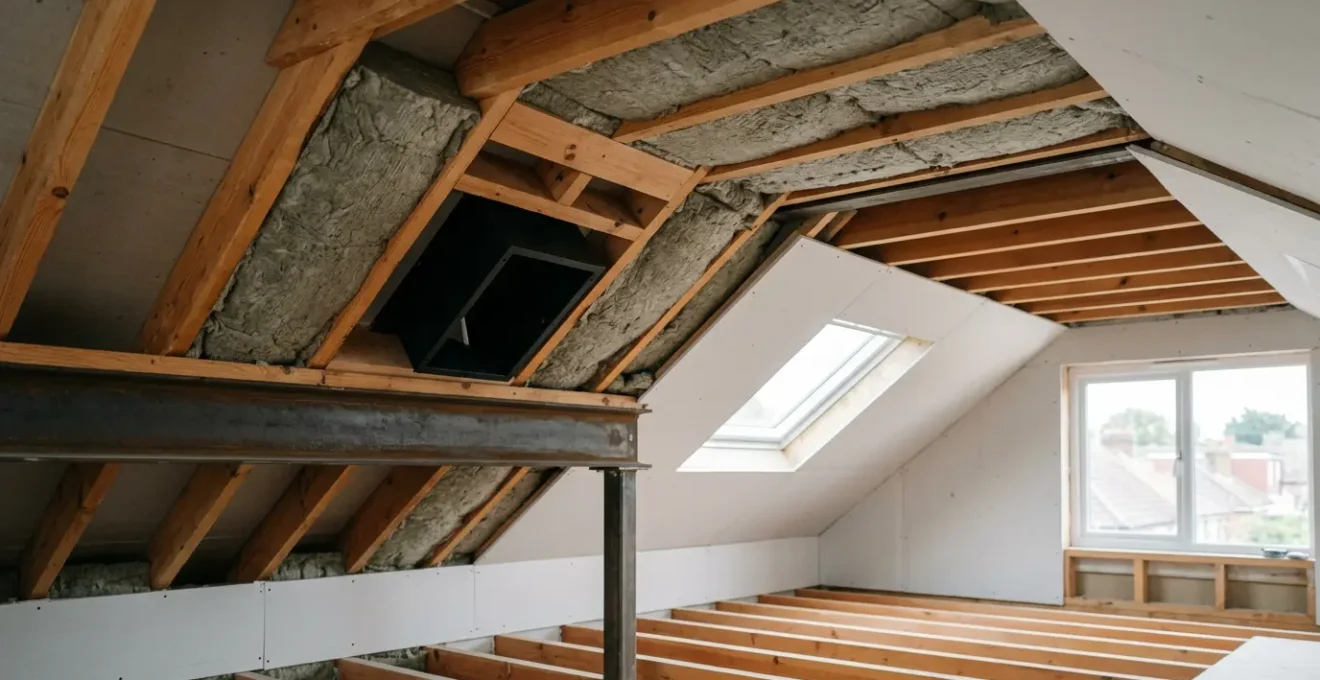
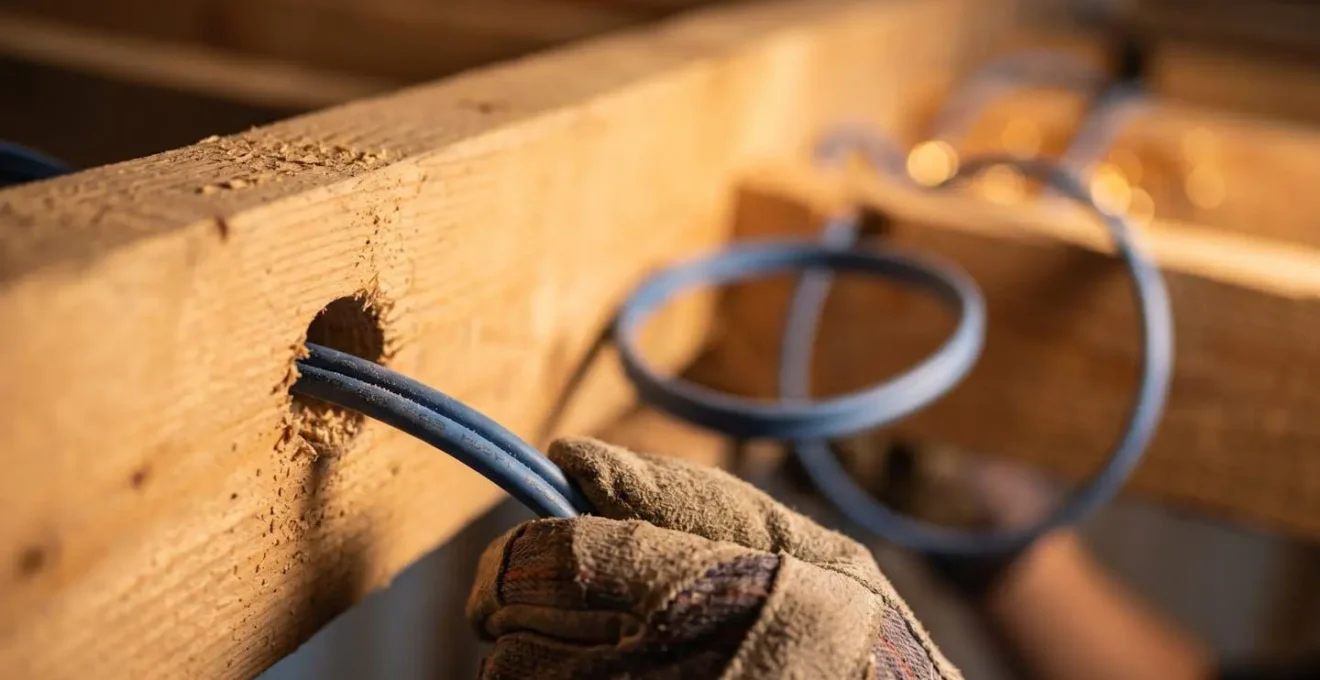
The single most important factor for a successful in-ceiling speaker installation is timing. It is not a finishing trade; it is a first-fix electrical and construction task. The ideal moment to run speaker cables is at the same time the electrician is installing the wiring for lighting and power sockets, before any plasterboard goes up. At this stage, the ceiling joists are exposed, allowing for the neat and safe routing of cables away from potential sources of interference or damage.
Waiting until the room is plastered creates a nightmare scenario. It involves chasing walls, lifting floorboards in the room above, and a great deal of mess and expense that is entirely avoidable. Integrating the speaker installation into the main build schedule ensures a clean, efficient, and professional result. This requires early coordination between the homeowner, builder, and electrician to decide on speaker locations before the first-fix begins. These locations should be physically marked on the joists to avoid clashes with other services like downlights, plumbing, or ventilation ducts.
The process is a multi-stage sequence that must be respected by all trades on site. From the initial coordination meeting to the final connection after decorating, each step is designed to protect the cables and ensure a perfect final fit. Attempting to rush or skip steps, such as not leaving a service loop of cable or cutting holes incorrectly, will compromise the entire installation.
Action plan: a sequential guide to loft conversion speaker installation
- Pre-First-Fix: Hold a coordination meeting on-site with the client, builder, and electrician to physically mark speaker locations on joists with spray paint, avoiding clashes with plumbing, MVHR ducts, and downlights.
- First-Fix: The electrician runs speaker cables to the marked locations, leaving a 1-meter service loop at each point for flexibility during final connection.
- Post-First-Fix: The builder or installer fits any required back-boxes or protective acoustic hoods before the plasterboard is installed.
- Plasterboard Stage: The plasterboarders use the speaker manufacturer’s template to cut precise holes, ensuring a snug fit for the speaker.
- Plastering & Decoration: Plasterers and decorators work around the pre-cut apertures, with the speaker cables safely coiled and protected inside the void.
How to install a steel RSJ for an open-plan conversion under UK building regs?
Creating the desirable open-plan living space in a loft often requires removing internal walls and supporting the structure with a Rolled Steel Joist (RSJ). While essential for structural integrity, this large piece of steel introduces a significant risk to your audio system: vibration and sound transmission. An RSJ is an incredibly efficient conductor of vibration. If a speaker is installed in a ceiling joist that is rigidly connected to the RSJ, the beam itself can become a giant resonator. As noted by installation experts:
rigidly mounting a speaker back-box to a joist that rests on an RSJ can turn the entire steel beam into a giant resonator, transmitting noise to other rooms
– Ceiling Speaker World, Getting the Best from Your In-Ceiling Speakers
This structural-acoustic conflict can result in bass frequencies being clearly audible in adjacent rooms or even on different floors. The solution involves two key principles: isolation and safe cable routing. Firstly, you must never drill through any part of an RSJ, as this compromises its structural integrity and would be flagged by any building inspector. Speaker cables must be routed over or under the beam, using flexible conduit for mechanical protection.
Secondly, acoustic decoupling is vital. This means creating a break in the path of vibration. This can be achieved by using specialist acoustic decoupling clips or pads between the speaker’s back-box and the timber joist it’s fixed to. This simple step prevents the speaker’s vibrational energy from transferring into the joist and, subsequently, into the steel RSJ. It’s a small detail that makes a monumental difference to sound isolation and ensures your music stays in the room it’s intended for. These considerations should be discussed with your structural engineer early in the design process.
Loft conversion or garage conversion: which adds more per-square-metre value in the South East?
When considering home renovations in the competitive South East property market, homeowners often weigh the value-add of a loft conversion against a garage conversion. While both add valuable square footage, a loft conversion typically creates more desirable living space—a master suite, a home office, or a media room—rather than the often more functional space of a converted garage. Research shows that loft conversions generally enhance property value significantly, and a well-designed one can offer a better return on investment, especially when it includes features that elevate the quality of life.
This is where high-quality, integrated technology plays a crucial role. A basic loft conversion adds a room; a high-specification loft conversion with thoughtfully integrated features like a discreet, high-performance audio system creates a ‘destination space’. This was demonstrated in one project where a homeowner converted their loft into an L-shaped master bedroom with a projector and a custom-placed ceiling speaker system. The seamless integration of this technology transformed the room from just a bedroom into a luxurious private retreat, significantly enhancing its appeal and, by extension, the property’s overall market value.
In a market saturated with standard renovations, it’s these quality-of-life features that differentiate a property and command a premium. A potential buyer doesn’t just see an extra bedroom; they see a lifestyle upgrade. Compared to a garage conversion, which can sometimes feel disconnected from the main house, a well-integrated loft conversion with premium features becomes a true asset that resonates emotionally with buyers, justifying a higher valuation.
Key takeaways
- Speaker installation is a first-fix decision, not a final decorative touch. Plan it with your builder and electrician from day one.
- For optimal sound quality, every in-ceiling speaker requires a back-box or a pseudo-enclosure made from dense acoustic insulation to deliver proper bass.
- In the UK, passive speakers simplify installation and regulatory compliance (Part P) compared to active speakers, which require certified mains wiring at each location.
Which DIY renovations add the most value to a UK terraced house?
In the context of renovating a UK terraced house, the conversation often turns to DIY projects that add value. However, when it comes to integrated technology like ceiling speakers, the line between a value-adding feature and a liability is defined by the quality of the installation. A poorly executed « DIY » job with wires tacked along skirting boards and bookshelf speakers dumped in corners can detract from a property’s appeal. Conversely, a professionally planned and integrated system signals a commitment to quality that buyers notice and appreciate.
This sentiment was echoed by a homeowner who undertook a significant renovation project. Their experience highlights the importance of getting it right from the start.
A London customer praised the excellent pre- and after-sales service when fitting out their renovated bedroom, office, and en-suite with Monitor Audio ceiling speakers and a Sonos amplifier, noting that asking the right questions and offering good advice ensured the speakers were ‘right for the job.’ The customer acknowledged this wasn’t a cheap exercise but emphasized it demonstrated a commitment to quality that would have been compromised by simply dumping bookshelf speakers in corners.
– Customer feedback via Ceiling-Speakers.co.uk
Adding value through integrated audio isn’t an all-or-nothing proposition. It can be scaled to suit the project and budget. The key is that even a small, well-executed installation adds more perceived value than a clumsy one. A « Good, Better, Best » strategy allows homeowners to choose an investment level that enhances their home and appeals to future buyers, moving beyond a simple DIY mindset to one of strategic investment.
The following table provides a clear overview of how different levels of investment in integrated audio can translate into tangible value, as detailed in a comprehensive guide to ceiling speakers.
| Investment Level | System Description | Typical Cost Range | Value-Add Potential |
|---|---|---|---|
| Good | Single Bluetooth ceiling speaker in bathroom (e.g., Lithe Audio IP44) | £100-£200 | Modest lifestyle enhancement; appeals to tech-aware buyers |
| Better | Pair of passive speakers in kitchen/diner powered by Sonos Amp or similar | £400-£800 | Demonstrates space-saving design commitment; enhances daily living experience |
| Best | Full multi-room system integrated into loft conversion or extension (multiple zones, centralized amplification) | £1,500-£3,500+ | Commands ‘developer’s premium’; creates emotional connection during viewings; differentiates property in competitive terraced house market |
To ensure your loft conversion delivers the seamless, high-quality audio experience you envision, the next step is to incorporate these considerations into your formal project plans. Begin the conversation with your architect, builder, and electrician today to integrate audio as a core component of the construction, not an afterthought.